Purging the PGI-9 cartridges

jtoolman

Printer Master
Platinum Printer Member
Joined
May 7, 2011
Messages
1,949
Reaction score
940
Points
277
Location
United States
Printer Model
All of them! LOL
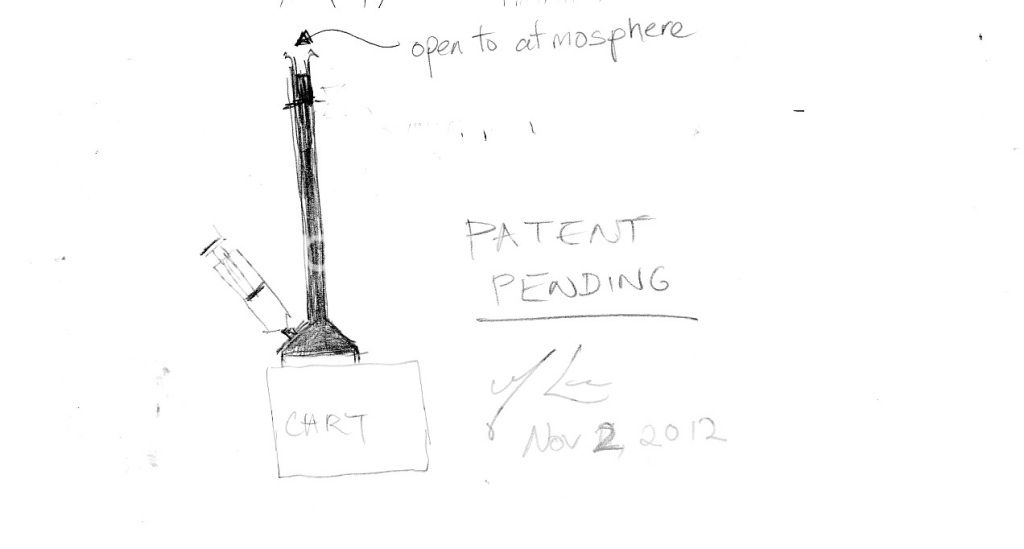
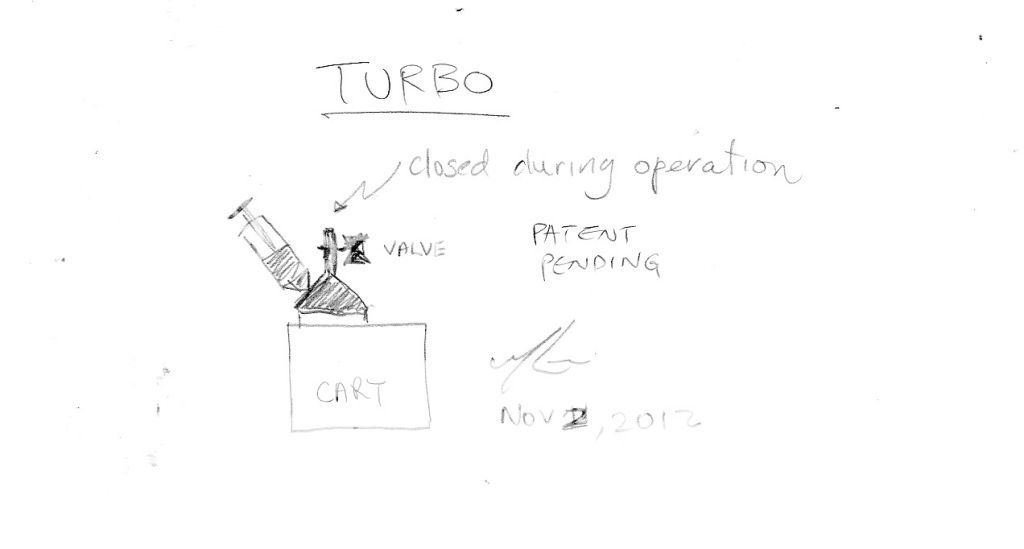
All I can say is that in one of my two videos, ( I forget which one ) I fill up a dead empty cart ( Got a set from PC mikling ) using the driblem method from a dead empty cart. I was able to get all 10 carts to maximum weight of 32-33 grams without any problems and often I was streaming ink in at a heck of lot faster rate then a dribble. More like a stream. It only took me about 2-3 minutes to complete acart including reseting.
Now I just top off when any read 50% and let the ARCs take care of the resetting back to full. I follow this method religiously so unless I suffer a complete brain fart ( which is highly likely ), accidentally turn off the printer or loose power, I always top off all carts when one is down. Well actually I just swop the whole set with my second spare set and do the topping off immediately afterwards.
Works for me.
 

mikling

Printer VIP
Platinum Printer Member
Joined
Jul 2, 2006
Messages
3,239
Reaction score
1,471
Points
313
Location
Toronto, Canada
A little more calculations in order. I roughly measured the spring forces involved in the cartridge. They range roughly between 100 grams to 150 grams when measured with a zeroed inverted scale. That is between empty and full. I roughly measured the surface area of the diaphragm. It was approximately 2.8 square inches. A quick calculation indicates that the vacuum inside the cartridge will vary between 0.08 to 0.11 psi. Since this is the pressure that the vacuum is exerting, it is now interesting to see just how much of a water column this represents.... 1 foot of water is equivalent to 0.43 psi. Let us now see what this translates to in the cartridge. 0.11 psi is then equivalent to 3 inches of water and .08psi is equivalent to 2.2 inches of water. Since the specific gravity of the pigment ink is lighter than water, to create these pressures require ink column heights greater than 3 inches. This tells us that to double the force in creating something Thrilla suggested would require a brim or ring between at least 3 inches in height...give or take. Not practical I would suggest.

Now would that halve the fill time?.... not likely. Why? because as the flow speed increases, the resistance increases and more so than just proportional. So just putting a little more height like the Hat has done will not have that much of an effect. I suppose the time taken to attach it and then detach it carefully would have nullified any gains.

You still can speed up the process a bit but do not expect by orders of magnitude by a little rim. You are bound by physics and engineering....mother nature rules.

there is a way to construct such a device actually. It would be impractical to the user because of the time it would take to clean between the colors. It fulfills all the requirements actually. it would require a MC to fabricate.
 

mikling

Printer VIP
Platinum Printer Member
Joined
Jul 2, 2006
Messages
3,239
Reaction score
1,471
Points
313
Location
Toronto, Canada
PGI-9_PGI-72refiller.jpg


The above is released for hobbyists to create and enjoy. No commercial applications are allowed.
 

mikling

Printer VIP
Platinum Printer Member
Joined
Jul 2, 2006
Messages
3,239
Reaction score
1,471
Points
313
Location
Toronto, Canada
You fabricate a reverse conical flattened funnel with a long column reaching up perhaps 6" high. The total volume of this column and funnel will exceed the total volume of the cartridges. A syringe attachment or loading port is attached to the side of the funnel. The flattened opening of the funnel will open to match the outlet pad of the cartridge. It must do that to be functionally correct. The column must open to the atmosphere at the top. The funnel must be as small as practical and still allow trapped air to exit to the top of the column. The vertical columns should not be too small as surface tension effects will restrict downward pressure.

Method of use. Attach to the cartridge. Regardless of fill level of the cartridge, empty 20 ml or more of ink into the jig. Any air that enters the chamber will float up and exit to the top When ink level ceases to decrease, invert the assembly and empty contents into ink container. Squeeze side of cartridge to release excess ink. Detach fill funnel from cartridge. cartridge is full and pigments are redispersed. .

Enjoy!
 

mikling

Printer VIP
Platinum Printer Member
Joined
Jul 2, 2006
Messages
3,239
Reaction score
1,471
Points
313
Location
Toronto, Canada
As you can see it can be done properly but the key question is how much better would it be over what jtoolmans' video shows. How much faster? Not that much when you consider the washing.

Want it turboe'd. Simple. Seal the top using a valve and then pressure fill the sucker. Here's how.

For this variation, there is no need to use a tall column. Just an air trap at the top. However.

Another variation covered.

PGI-9_PGI-72refillerTurbo.jpg


No commercial applications allowed.
 

mikling

Printer VIP
Platinum Printer Member
Joined
Jul 2, 2006
Messages
3,239
Reaction score
1,471
Points
313
Location
Toronto, Canada
The above will allow a much faster and safe fill. You can still empty the excess ink back into a container and any air that enters rises and is not forced into the cartridge.
You no longer need a tall column to generate the pressure and by having the valve, you can dump any excess ink out at the end. Partially fill the funnel with ink before closing the valve.
You will need to make the funnel non opaque for proper use.

Again no commercial applications but hobbyists are allowed to construct and experiment for their pleasure and enjoyment.

Cheers
 

stratman

Printer VIP
Platinum Printer Member
Joined
Apr 19, 2007
Messages
8,712
Reaction score
7,172
Points
393
Location
USA
Printer Model
Canon MB5120, Pencil
What the heck is that! Are you making bongs, Mikling?
 

ThrillaMozilla

Printer Master
Joined
Jan 18, 2011
Messages
1,189
Reaction score
341
Points
253
mikling said:
This tells us that to double the force in creating something Thrilla suggested would require a brim or ring between at least 3 inches in height...give or take. Not practical I would suggest.
Oops, there's been a misunderstanding. The point is to increase the area, not the head. If you drip a little ink into one little spot, you will get a lot less flow than if you flood the whole area. The idea is to flood the whole area so you get more flow. In other words, the cartridge should be able to absorb ink faster if you simply increase the flow from the syringe.

The point of a tube extending up a couple of inches was just one method to contain any overflow and prevent spills. It's not an essential feature, and I didn't intend it as a means to significantly increase the head.

Now JToolman comes along and says you can fill in 2-3 minutes even by dribbling, and that might be good enough. If you look again at the video, it looks like he has actually done what I suggest and flooded the whole area. I don't know how I missed this. Problem solved, I think. My suggestion, which may be superfluous, was just a way to do it a little more safely by containing any spill.

I don't know why The Hat didn't find faster filling by flooding the area. Maybe it's because he used water (although he later tried also with ink), or maybe it's because of the air he had in the screen, or maybe it's because the cap is right against the surface and obstructs the flow. I suspect the last one. If it does obstruct the flow, then all the flow goes through a spot in the center, and we're right back to the problem of not flushing the whole screen.

I don't want to take sides on this, though. Both methods have advantages. If you do get much air into the cartridge, The Hat's method could be used to remove it (although I'm not certain that air wouldn't just flow back in again).
 

The Hat

Printer VIP
Platinum Printer Member
Joined
Jan 18, 2010
Messages
15,623
Reaction score
8,695
Points
453
Location
Residing in Wicklow Ireland
Printer Model
Canon/3D, CR-10, CR-10S, KP-3
OK you guys I reckon its time for me to give up on this one, 3 years ago when I started out refilling I drilled a hole in these cartridge which work our reasonably well at that time but it was very dodgy, since then Ive switch to using my refill method and top off with the dribble when necessary.

Now some guys like this method which now includes the newer SquEasy bottle way also
but there are others that clearly dont, so its purely down to their own personal choice.

But I have to honestly say despite miklings reservations which I certainly do respect,
it is by far the safest, easiest, quickest and less problematic way that Ive so far used
and now with the availability of a resetter refilling couldnt get any better.

So happy refilling guys. :)
 

mikling

Printer VIP
Platinum Printer Member
Joined
Jul 2, 2006
Messages
3,239
Reaction score
1,471
Points
313
Location
Toronto, Canada
ThrillaMozilla said:
The point is to increase the area, not the head. If you drip a little ink into one little spot, you will get a lot less flow than if you flood the whole area. The idea is to flood the whole area so you get more flow. In other words, the cartridge should be able to absorb ink faster if you simply increase the flow from the syringe.
That will work up to a point. Since I provided the instructions to jtoolman I had experimented with the process before issuing instructions and flooding is done provided the user can control it properly. You can easily swamp the pad area with the syringe. This means that the surface area is not the bottleneck in the process but something else. When I perform the engineering calculations it becomes clear that the spring vacuum and the negative head is the dominant force and the major constraint to increasing speed. Thus the only way to make a significant dent to the fill time is to increase the head significantly by external means.
 
Top