- Thread starter
- #21
You are using an out of date browser. It may not display this or other websites correctly.
You should upgrade or use an alternative browser.
You should upgrade or use an alternative browser.
print head sticks and makes noise
- Thread starter Mardulia
- Start date
- Joined
- May 7, 2011
- Messages
- 1,949
- Reaction score
- 940
- Points
- 277
- Location
- United States
- Printer Model
- All of them! LOL
Have you tried this?:
With the printer off, press the on button and as soon as the head begins moving to the left, plug the rear power plug off.
Now you can move the head by hand from the right to the far leaf, which should tell whether there is a mechanical obstruction of any sort. If all is fine, meaning you can move the head from the far right to the far left without any problems, then it would have to be something to do with the detectors as discussed earlier by Websnail ( Martin )
But to elaborate on your earlier question, the SS end needs to be in the correct original orientation.
Joe
- Thread starter
- #23
With the printer powered off- it doesn't need to be unplugged to do this- I can move the printhead fine all the way either direction. And I just checked to be sure the strip is oriented correctly and it is. I did notice that the spring is a little wonky and tightened it up a bit. It started to behave a little differently and for a moment I thought it was fixed, but not. I wonder if that strip isn't tight enough. Could that be it? Could it be that finicky?
- Joined
- May 7, 2011
- Messages
- 1,949
- Reaction score
- 940
- Points
- 277
- Location
- United States
- Printer Model
- All of them! LOL
Mine is quite tight.
Why are you able to move the carriage? Did it ever park and lock itself in the right hand position over the capping station? You should never be able to manually move the carriage unless it's been unlocked as I stated earlier. Powering on and then pulling the plug
Exactly what is the printer doing when it is powered on? Are you able to video the event with a phone or camera and post it on youtube?
Really, that's the only way to really see what's taking place here.
Otherwise we will be discussing this back and forth for ever.
I can then compare it to one of mine 2200s
Joe
- Thread starter
- #25
Actually, that's an interesting question. I was able to, and in the back of my mind was this process you describe of pulling the plug because I've done it before. I don't seem to need to now. I can see where the printhead lock is and I can depress it and release the printhead that way. Video here: http://youtu.be/9KpvzTuxPws. Sorry about the quality. Does this tell you anything? I gotta tell you I'm pretty much ready to call it quits and bring it in to be serviced. The nearest place is about an hour and a half away, so I'm not thrilled with that, but I also want my printer back! Let me know what you think. It's nearly 11pm here and I've been under the weather so I'm heading off to bed. I'll check in in the morning.
Thanks for all your attention, JToolman, I really appreciate it.")
Thanks for all your attention, JToolman, I really appreciate it.
- Joined
- Nov 27, 2010
- Messages
- 5,250
- Reaction score
- 5,155
- Points
- 373
- Location
- Copenhagen Denmark
- Printer Model
- Canon MP990
If you look carefully using a magnifier at the encoder strip, which I think is made from polyester, you will see some fine vertical stripes and possibly also some other markings at the ends. I think the markings are laser engraved. The strip is passing through a double optical sensor located in the print head carriage. The sensors count the markings and due to the double sensors spaced at a critical distance, both position of print head and direction of print head travel can be determined.Mardulia wrote:
@PeterBJ I can't make out that picture to save my life! The strip (we are talking of the cellophane strip still, right?) is in no way attached to the printhead, nor does it run through it in any way. Is it supposed to? I wondered about that. I did clean it btw, no diff.
So it is seen that proper function of the encoder strip and optical sensors are vital for the printer.
Here is a picture shoving a part of a strip from a Canon Pixma 4000. The "L" marking is actually the letter "L" meaning left and must be placed to the left side of the printer and read as a proper "L" when vieved from the front of the printer to ensure correct position:

Here is a picture showing how the strip is threaded through the double optical sensor in a Canon Pixma 4000 printhead carriage:
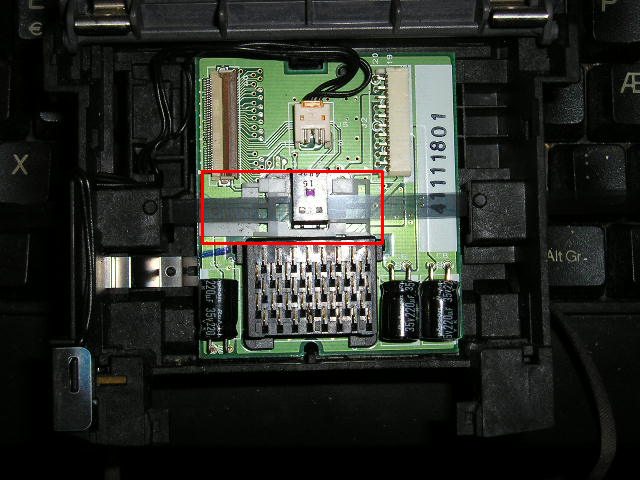
You can see the double optical sensor. It is the white plastic part in the red rectangle marked "91".
Here is a thread about refitting a timing strip as it is called by Canon in a Canon printer. All or nearly all inkjet printers use the strip and sensor system to determine printhead position, so maybe you will find some useful info in it?: http://www.nifty-stuff.com/forum/viewtopic.php?id=7438 . Especially note the links to other pictures and explanations.
Being an A3+ printer the Epson is big and heavy, I think. Did your husband accidentally bump or drop the printer when taking it upstairs? Normal moving the printer should not cause the strip to come loose.
- Thread starter
- #27
Ok- but it looks like I'll have to remove the printhead to get it re-threaded. I fumbled around back there with my fingers looking for something obvious, but that's not going to work. It is a heavy printer. I had my husband put it on the floor next to my bed, but I don't recall it getting bumped.
- Joined
- Nov 27, 2010
- Messages
- 5,250
- Reaction score
- 5,155
- Points
- 373
- Location
- Copenhagen Denmark
- Printer Model
- Canon MP990
Be careful, don't disassemble too much.
AFAIK unlike Canon print heads Epson print heads are not user replaceable and correctly reinstalling them takes feeler gauges and other special tools maybe even adjustment software, for proper adjustment, so I suggest to try to locate the slit the strip should thread through in the print head carriage and try to thread the strip through the slit and optical sensor.
Here is a link to a strip threaded through a printhead carriage. The picture is from an HP printer and not from an Epson, but it is the best picture of a printhead carriage and strip I've seen: http://h30434.www3.hp.com/t5/image/...CDD060F262/image-size/original?v=mpbl-1&px=-1
I think it would be a good idea to wait for jtoolman's comments before taking anything apart. He is an Epson expert, I am not.
- Thread starter
- #29
- Joined
- Nov 27, 2010
- Messages
- 5,250
- Reaction score
- 5,155
- Points
- 373
- Location
- Copenhagen Denmark
- Printer Model
- Canon MP990
See pages 121 to126 in the service manual for removal of the housing. I think that is relatively risk free, but I don't know.
Some years ago I was given an Epson R200 by a colleague of mine. The printer showed the dreaded error message "some parts have reached the end of their service life" or similar. I resat the waste ink absorber counter using the SSC reset tool, and the printer was back in service. But resetting the counter without actually changing the absorbers is not a good idea, so I started to disassemble the printer to gain access to the absorbers to clean them. I did not have the service manual, but thought it could not be difficult. I was wrong. I ended up with a lot of parts and gave up and dumped the printer. Ironically I later found the service manual on the web.
Some years ago I was given an Epson R200 by a colleague of mine. The printer showed the dreaded error message "some parts have reached the end of their service life" or similar. I resat the waste ink absorber counter using the SSC reset tool, and the printer was back in service. But resetting the counter without actually changing the absorbers is not a good idea, so I started to disassemble the printer to gain access to the absorbers to clean them. I did not have the service manual, but thought it could not be difficult. I was wrong. I ended up with a lot of parts and gave up and dumped the printer. Ironically I later found the service manual on the web.