- Joined
- Jan 18, 2010
- Messages
- 15,915
- Reaction score
- 8,923
- Points
- 453
- Location
- Residing in Wicklow Ireland
- Printer Model
- Canon/3D, CR-10, CR-10S, KP-3
Seeing Ghwellsjr successful attempt with his new refilling method start me wondering if I could use the same method on all my cartridges.
I am however quite happy with top filling my BCI-6, CLI-8 and CLI-521 cartridges and
the method of refilling the PGI-9s was on the same line but with the hole in the bottom instead,
it is a very successful way but a little crude and not for everybody.
I decided in the end to stick with my Neanderthal top fill method, however drilling a hole in the bottom of the PGI-9 cartridge
was still bothering me even dough it seemed to be the only way to fill these cartridges easily and quickly.
Dribbling ink onto the outlet hole in the bottom also works but very time consuming because it doesnt have anything to vent the air.
George got me thinking if his method works with a ridged walled cartridge
then it should work with the more flexible one (PGI-9).
So heres what I came up with.
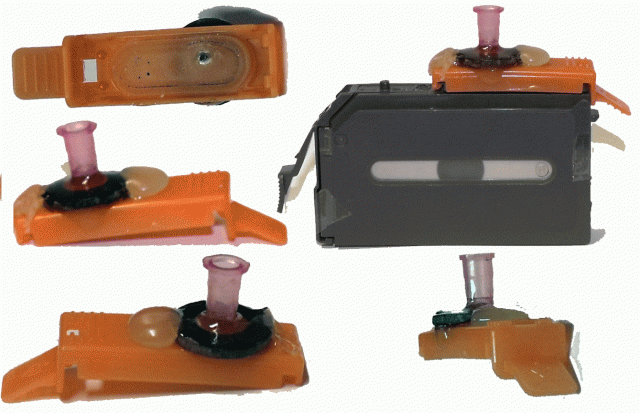
The orange shoe clip on the bottom of the PGI-9 cartridge is held onto the outlet hole
with little hooks either ends so securing it on to the cartridge is not a problem.
I drilled a 3mm hole in the orange clip right through the O in the word Canon on the bottom.
There is a very flexible silicone washer on the inside of the clip that doesnt puncture very well, which in this case is very good.
Next I got a 20 gauge 30cm long needle and poked it into the new hole
I just had made and with the rest of the needle protruding through the silicone washer.
I sniped off the excess needle with a sharp wire snips and left about 1mm of it still showing through the silicone washer (less is better).
The barrel of the needle was flattened by the cutting so I rotate it around and pinched it just enough to reopen the hole again.
Next I put an old metal washer around the top of the plastic of the needle which is now sticking out of the bottom of the orange clip
and secured there with a small bit of hot wax just to hold the washer in place till I could glue it.
Then I mixed up some Araldite and dropped it into the sounding space between the metal washer and the top of the needle and left it set over night.
The moment of truth had arrived, would this work or not I didnt bother with any gloves and hadnt got a helmet so it was going to be colourful if it failed.
I was using a 10 ml. syringe because I had lots of them and couldnt get one any larger so I emptied one of my cartridges and resealed the hole again.
I put the orange clip on the bottom of this cartridge and put 5ml of ink into the syringe and then
attached it to the needle on the bottom of my orange clip that was now clipped to my cartridge and pulled back ever so gently and waited a few seconds.
I had now got quite a lot of bubbles in the top of my syringe so I then let go of the syringe plunger and only 3 ml of ink went into the cartridge,
I repeated this operation a few minutes later twice more and only got another 1 ml in which gave me a total of 4ml.
I removed the syringe a bit early and ejected a small amount of ink all over my keyboard
except for that my hands would have stayed clean and so would my now coloured keyboard.
It worked on my first attempt but not enough to declare it a big success so
I will work on it some more and try apply some other tactics as I need another 8 ml to go in to fill the cartridge completely
I tried to use only pieces that the average refiller would have in their arsenal except for the Araldite glue,
so anyone who wanted to attempt to duplicate it please do because is costs little or nothing to construct
but try and make it better than mine.
This information is out of date now and has been up-date here:- http://www.nifty-stuff.com/forum/viewtopic.php?pid=47655#p47655
A complete up to date Video of the new filling method can be found here:- http://www.nifty-stuff.com/forum/viewtopic.php?id=6999
Here is a link to the Original Freedom Method
http://www.nifty-stuff.com/forum/viewtopic.php?pid=45963#p45963
I am however quite happy with top filling my BCI-6, CLI-8 and CLI-521 cartridges and
the method of refilling the PGI-9s was on the same line but with the hole in the bottom instead,
it is a very successful way but a little crude and not for everybody.
I decided in the end to stick with my Neanderthal top fill method, however drilling a hole in the bottom of the PGI-9 cartridge
was still bothering me even dough it seemed to be the only way to fill these cartridges easily and quickly.
Dribbling ink onto the outlet hole in the bottom also works but very time consuming because it doesnt have anything to vent the air.
George got me thinking if his method works with a ridged walled cartridge
then it should work with the more flexible one (PGI-9).
So heres what I came up with.
The orange shoe clip on the bottom of the PGI-9 cartridge is held onto the outlet hole
with little hooks either ends so securing it on to the cartridge is not a problem.
I drilled a 3mm hole in the orange clip right through the O in the word Canon on the bottom.
There is a very flexible silicone washer on the inside of the clip that doesnt puncture very well, which in this case is very good.
Next I got a 20 gauge 30cm long needle and poked it into the new hole
I just had made and with the rest of the needle protruding through the silicone washer.
I sniped off the excess needle with a sharp wire snips and left about 1mm of it still showing through the silicone washer (less is better).
The barrel of the needle was flattened by the cutting so I rotate it around and pinched it just enough to reopen the hole again.
Next I put an old metal washer around the top of the plastic of the needle which is now sticking out of the bottom of the orange clip
and secured there with a small bit of hot wax just to hold the washer in place till I could glue it.
Then I mixed up some Araldite and dropped it into the sounding space between the metal washer and the top of the needle and left it set over night.
The moment of truth had arrived, would this work or not I didnt bother with any gloves and hadnt got a helmet so it was going to be colourful if it failed.
I was using a 10 ml. syringe because I had lots of them and couldnt get one any larger so I emptied one of my cartridges and resealed the hole again.
I put the orange clip on the bottom of this cartridge and put 5ml of ink into the syringe and then
attached it to the needle on the bottom of my orange clip that was now clipped to my cartridge and pulled back ever so gently and waited a few seconds.
I had now got quite a lot of bubbles in the top of my syringe so I then let go of the syringe plunger and only 3 ml of ink went into the cartridge,
I repeated this operation a few minutes later twice more and only got another 1 ml in which gave me a total of 4ml.
I removed the syringe a bit early and ejected a small amount of ink all over my keyboard
except for that my hands would have stayed clean and so would my now coloured keyboard.
It worked on my first attempt but not enough to declare it a big success so
I will work on it some more and try apply some other tactics as I need another 8 ml to go in to fill the cartridge completely
I tried to use only pieces that the average refiller would have in their arsenal except for the Araldite glue,
so anyone who wanted to attempt to duplicate it please do because is costs little or nothing to construct
but try and make it better than mine.
This information is out of date now and has been up-date here:- http://www.nifty-stuff.com/forum/viewtopic.php?pid=47655#p47655
A complete up to date Video of the new filling method can be found here:- http://www.nifty-stuff.com/forum/viewtopic.php?id=6999
Here is a link to the Original Freedom Method
http://www.nifty-stuff.com/forum/viewtopic.php?pid=45963#p45963

")


