Pro-1 Ink absorber spilling on to rollers

The Ragster

Printing Apprentice
Joined
Nov 4, 2018
Messages
6
Reaction score
5
Points
13
Location
Glenrothes, Scotland
Printer Model
Canon Pixma Pro-1
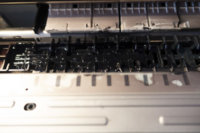
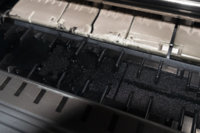
I have started to notice marks appearing on my prints; mainly on the rear but now significantly visible on the front of the printed image. A look inside reveals that the ink absorber is overflowing and spilling out onto the feed rollers. I have had this printer almost since it was released 7 or so years ago and am reluctant to think that it is a 'consumable' device (having read some of the horror stories here). As a former service engineer I am not put off by getting my screwdrivers and spudger out, but does anyone have a video of this machine being disassembled, to help me on my way?
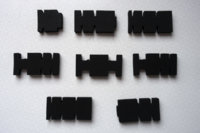
I will need to take the carriage out to get in to clean the rollers. I also think I might have a go at fitting 'The Potty', as I'm sure the absorber will not take long to fill up again. Canon are not very helpful when it comes to supplying spare parts, but does anyone have a supplier in the UK (or EU) for the absorber? Can it be flushed of the ink in it?
I only use Canon PGI-29 cartridges and would say I use it moderately - I tend to build up a lot of prints-in-waiting and do them in a batch. I'm not sure what the optimum method should be.
 

Attachments

  • InkLeakage.jpg
    InkLeakage.jpg
    168.7 KB · Views: 13,458

The Hat

Printer VIP
Platinum Printer Member
Joined
Jan 18, 2010
Messages
15,618
Reaction score
8,691
Points
453
Location
Residing in Wicklow Ireland
Printer Model
Canon/3D, CR-10, CR-10S, KP-3
There are several things you can do, one is as you say to fit a Printer Potty and the other is to remove the platen sponge and clean the whole area, question:- how full is your waste ink cartridge, after 7 years it must be bursting..

What’s your nozzle check print like, can you post one up here, and are you still using the original print head..
 

The Ragster

Printing Apprentice
Joined
Nov 4, 2018
Messages
6
Reaction score
5
Points
13
Location
Glenrothes, Scotland
Printer Model
Canon Pixma Pro-1
Thanks Hat
I didn't know these had a waste ink cartridge. How accessible is it?
The absorber, in front of the rollers is so full it is spilling on to the rollers behind. I'm happy to have a go at pulling this out and flushing it.
Nozzle check is perfect, as are the prints - apart from the smudge along the length (Mainly on A3 and A3+ pages)! And yes, I still have the original print head.
Scan of nozzle check attached. Vertical banding is due to my cheap scanner.
 

Attachments

  • NozzleCheck05112018.jpg
    NozzleCheck05112018.jpg
    45.7 KB · Views: 628

The Hat

Printer VIP
Platinum Printer Member
Joined
Jan 18, 2010
Messages
15,618
Reaction score
8,691
Points
453
Location
Residing in Wicklow Ireland
Printer Model
Canon/3D, CR-10, CR-10S, KP-3
As far as the waste ink cartridge is concerned, that’s a no go, the amount of work and special brackets needed to remove it is out of the question for all but a Service Agent, but with the use of a Printer Potty this can be avoided.

Maybe this might help you get to grips with your excess ink problem..
Pleas keep us up to date with your progress..
O' and have fun.. ;)
 

Attachments

  • Printer Potty for Pro 1.pdf
    1.9 MB · Views: 729

stratman

Printer VIP
Platinum Printer Member
Joined
Apr 19, 2007
Messages
8,712
Reaction score
7,163
Points
393
Location
USA
Printer Model
Canon MB5120, Pencil
From the Printer Potty PDF:

upload_2018-11-5_11-10-2.png


@The Hat - remind us the consequence of lack of both internal battery power and external mains power with a Pro 1?
 

The Ragster

Printing Apprentice
Joined
Nov 4, 2018
Messages
6
Reaction score
5
Points
13
Location
Glenrothes, Scotland
Printer Model
Canon Pixma Pro-1
So. That is my Ink Potty fitted, but I do not think that was (and possibly still is) my problem.
The absorbent pads in front of the rollers had become completely sodden on the left side; so much so that they were spilling over on to the feed rollers behind (second image). This was causing long streaks on all my prints; front and back.
Once I had the printer disassembled to fit the Ink Potty, these pads were more accessible. Thankfully they just lifted out (third image) and I could rinse them under the tap (sorry - fawcet). The ones on the left took a good bit of rinsing, but eventually they ran clean. Some serious drying with kitchen paper got them looking like new.
About 100 cotton buds later (sorry Mr. Attenborough), I managed to clean the tray holding the sponges before reinstalling them. The rollers needed a lot of cleaning too. Luckily, the paper pressure guides above the rollers were able to be moved back a fraction, allowing me to get a slightly damp cloth in to take the ink off. The rollers are easily rotated using the large white gear on the left.
The first few prints have gone through as clean as a whistle and I have fallen back in love with my Pro-1.
Some things now worry me though: Firstly, there is no waste ink flowing into the potty jar. It doesn't sound like the printer has done a full ink purge yet, so I'll give that some time. However, can you clear something on the potty instructions? You said to pull the tube all the way out of the printer, as per page 7 image 3. Is this the tube on the left side? The notes say it is a long tube, but mine was only 15cm or so long. The tube on the right would not budge. I have the disconnected tube on the right feeding into my potty jar. Is this correct? If I have this the wrong way round I'll have to work out how to re-insert the left tube.
You said to join the tubes again using the original connector. Does that stay in situ or should it come out? The way I have it, the tube would not reach the drilled hole.

I checked the absorbent pads immediately after the first print and they are already showing ink just beyond the border of my print (I never print edge-to-edge). How does that get there?
The holes under the ink pads were a bit gunked up, but still viable. I assume when the ink pads fill up they should simply drain into the absorber below. Peering below the pads, the lower absorber seems inky on the right, but not on the left. This ink does not appear to be flowing through on the left side. My printer is dead level.

Thank you for your help. Your instructions were excellent and hopefully I will get a bit more life out of what now appears to be a discontinued printer (certainly in the UK anyway).
 

Attachments

  • Disassembled.jpg
    Disassembled.jpg
    235.2 KB · Views: 685
  • BottomPlateCarnage.jpg
    BottomPlateCarnage.jpg
    121.6 KB · Views: 666
  • _DSC5367-2-1.jpg
    _DSC5367-2-1.jpg
    103.7 KB · Views: 588

The Hat

Printer VIP
Platinum Printer Member
Joined
Jan 18, 2010
Messages
15,618
Reaction score
8,691
Points
453
Location
Residing in Wicklow Ireland
Printer Model
Canon/3D, CR-10, CR-10S, KP-3
So, you’re still having some waste ink problems...
You said to pull the tube all the way out of the printer, as per page 7 image 3. Is this the tube on the left side?
OK the tube in photo (1) circled should only be pulled back to the position where the finger is showing in photo (4) and no further, (Short tubing)
Capture21.PNG Capture22.PNG click to enlarge..
You said to join the tubes again using the original connector.
The tube on the left in photo (3) needs to be removed from the plastic nipple and then carefully and slowly pulled backwards till it comes out of the printer, (Much Longer tubing) its covered in ink so a cloth will be needed close to hand.
Capture23.PNG
Does that stay in situ or should it come out? The way I have it, the tube would not reach the drilled hole.
The white plastic nipple holder can also be removed, and you can reuse the same straight nipple to join the two pieces of black tubing together again, giving you more than enough to pass out through the bottom of the printer.

This tube should be cut to length and then joined to the clear tube that connects to the printer Potty, which should be on the same table level as the printer is sitting on and not above.

If you haven’t purchased the original official Printer Potty from OctoInkjet then things can get very messy, if this tube should ever disconnect from its moorings, The Printer Potty does not leak even when knocked from the table, it's 100% safe...

P.S. Do not be tempted to tilt the printer backwards, to gain safe access, move the right side of the printer off the edge of the table and access the printer bottom from underneath..
A lot done but more to do...
 

The Ragster

Printing Apprentice
Joined
Nov 4, 2018
Messages
6
Reaction score
5
Points
13
Location
Glenrothes, Scotland
Printer Model
Canon Pixma Pro-1
Thank you again Hat. I think I have got my connections correct. At the moment I just have the tube going into a jar. Amazon UK shows Ink Pottys for specific brands of printer - none of which are Canon. Does it make a difference and will an Epson one do for my Pro-1?
 

Mturan69

Newbie to Printing
Joined
Jul 17, 2021
Messages
5
Reaction score
0
Points
6
Printer Model
Canon Pixma Pro 100S
As far as the waste ink cartridge is concerned, that’s a no go, the amount of work and special brackets needed to remove it is out of the question for all but a Service Agent, but with the use of a Printer Potty this can be avoided.

Maybe this might help you get to grips with your excess ink problem..
Pleas keep us up to date with your progress..
O' and have fun.. ;)
Do you have same doc about Pro 100S?
 

Latest posts

Top