Possible print head clog with IP4500

ghwellsjr

Printer Master
Platinum Printer Member
Joined
Jun 16, 2006
Messages
3,645
Reaction score
85
Points
233
Location
La Verne, California
Printer Model
Epson WP-4530
tsu3000 said:
Will the method in the video be suitable for carts used in the German Method ie with small drill hole near the bottom? I can see the carts in the vid have the exit hole in the top of the cart rather than the bottom as in the German Method carts.
If you were going to use this method on cartridges that only had a German refill hole, it probably will work but take longer because most of the water is going to go right from the outlet port to the refill hole which are very close together. It might help to tape over the refill hole and let the water exit through the air vent hole. But I would suggest that you also inject water into the reservoir to get out residual ink in there.

But it really is very easy to clean Canon OEM dye ink carts without using a contraption, just flow water into the outlet port, or submerge them to get the sponge wet, then blow the liquid out (be careful of that German refil hole) and repeat.

Pigment black cartridges are another story, they take a long time to clean and probably will require a solvent.
 

l_d_allan

Fan of Printing
Joined
Feb 2, 2011
Messages
420
Reaction score
1
Points
64
Location
Colorado Springs, CO
tsu3000 said:
Will the method in the video be suitable for carts used in the German Method ie with small drill hole near the bottom?
Most of the videos I've seen on purging/flushing assume the plastic ball in the inlet port has been removed, which is typical for "traditional top filling". I haven't used German refilling, but I believe you would want to leave that plastic ball alone, and also not disturb the label tape on the top ... so sealing isn't diminished and vent hole "breathing" works as designed.

I've found flushing of dye carts to be quite easy and quick with the plastic ball out, and my speculation would be flushing would take longer with the plastic ball intact.

I think part of the decision to use German refilling makes an assumption to leave the plastic ball intact, and do somewhat abbreviated flushing, or no flushing at all. I think the emerging consensus is that flushing isn't all that necessary for dye carts that came with the printer, carts you purchase retail and used up yourself, and virgin empties oem carts purchased online, such as eBay.

Flushing would be more advisable for used compatible carts, or oem carts in bad condition with dried ink. However, I wouldn't use those at all, and would be inclined to throw them away.

There may be justification to flushing carts that have been refilled multiple times ... like 5x to 10x? ... to ensure that ink flow through the sponge/foam is sufficient when doing a lot of printing. It is possible to get "ink starvation". I haven't refilled any single cart that often, so I don't have an informed opinion on that ... consider the source.
 

l_d_allan

Fan of Printing
Joined
Feb 2, 2011
Messages
420
Reaction score
1
Points
64
Location
Colorado Springs, CO
tsu3000 said:
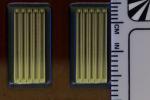
See pic. The contrast has been increased to make it clearer.
Good idea to provide the pic with increased contrast ... but the "best practice" to get the most help from the forum experts might be providing both ... normal contrast and increased contrast.

Also for completeness, consider having a "gray card" included (or in another picture taken before or after with the same lighting) to get the white-balance correct.
 

tsu3000

Getting Fingers Dirty
Joined
Oct 8, 2008
Messages
49
Reaction score
8
Points
26
*UPDATE*

So far I have done the following to try and unclog the black PIGMENT nozzles.

1) I used folded kitchen paper (kitchen roll) saturated in Lidl W5 glass cleaner and placed the print head on top. I gently "pumped" the head and could see ink coming through the ink inlets. The residue ink "swells" up when I gently press down on the kitchen paper for all 5 inlets.
2) I then put a few drops of undiluted W5 onto the pigment inlet (but not the colour inlets) and continued to pump the head. After a while the W5 will slowly drain down. I repeated this a few times.
3) I thoroughly dried the head and removed any excess W5 by shaking over a sink. Then left the head to dry by an open window.
4) I then put the head and carts back into the printer and did a nozzle check. The first print was still disappointing. There were a few black marks in the first row of print. The photo colours printed clear and without problems.
5) I then did a normal clean on the pigment black only.
6) I did another nozzle check and this time the print was a little better. The first printed row resembled a grid pattern. But the grid pattern still had large areas missing.
7) Then I did a deep clean on the pigment black and did another nozzle check.
8) The print that came out was the best so far and the grid pattern was there but still had "gaps".
9) I did one more normal clean and another nozzle check. This did NOT improve matters.
10) I decided to soak the head overnight and put the head in undiluted W5 glass cleaner. I only put enough solution to cover the nozzles (about 5mm depth of solution). I did not cover the inlets with solution. I also put a few drops of W5 on the pigment ink inlet over a period of a few hours. I then left the head to soak until the morning.
11) I thoroughly dried the head and removed any excess W5 by shaking over a sink. Then left the head to dry by an open window.
12) I then did a nozzle check. The results was surprising and disappointing. The pigment black grid pattern did NOT print. Only the colours came out. Why?

So some questions:

a) Why didn't the overnight soak work? I was at least expecting some improvement. But it went reverse and got worse.
b) Could the head be damaged now due to the overnight soak in undiluted solution?
c) Maybe there is a problem with the pigment cart?

I have ordered a new pigment cart to eliminate point c).

Hope the post is not too lengthy and thanks for your time and patience . I wanted to document my steps so potential errors or improvements can be spotted.

Thanks.
 

The Hat

Printer VIP
Platinum Printer Member
Joined
Jan 18, 2010
Messages
15,628
Reaction score
8,698
Points
453
Location
Residing in Wicklow Ireland
Printer Model
Canon/3D, CR-10, CR-10S, KP-3
tsu3000 Thanks for the update.

As your scanned nozzle check thread #24 was showing almost 100% I taught you were all most there.
You had a near perfect nozzle check at that point and I just wanted you to purge the pigment cartridge,
fill with dye ink and then try a few more head cleans on the black only to clear the rest of the nozzles.

I have read down through your progress repost and noted a few little un-necessaries

On (4) when you put the head back in first you did a nozzle check but should have done a head clean before the nozzle check.
On (10) by soaking the print head again overnight you undone all your own hard work in getting the print head to work.
On (12) again you did the nozzle check before a head clean.

When you put in the print head after drying it is completely, its better to put a few drops of Windex
on the inlet ink holes leave it a few minutes and repeat just to moisten the inlets again.

Its usually one of the reasons why the first nozzle checks are bad and then it looks like your not making much progress.

(Questions)

(a) When you leave the print head to dry out thats what is does dry out
(b) Your print head is most un-lightly to have being damaged by your overnight soak.
(c) The pigment cartridge was working fine but needed a purge to change it to dye ink and that would have completely renewed the cartridge again.

Now just follow your own steps again carefully and you will get the print head up working properly again,
at this point I would say try not to get disheartened, it is a slow process as you have found out already..
 

tsu3000

Getting Fingers Dirty
Joined
Oct 8, 2008
Messages
49
Reaction score
8
Points
26
The Hat said:
As your scanned nozzle check thread #24 was showing almost 100% I taught you were all most there.
You had a near perfect nozzle check at that point and I just wanted you to purge the pigment cartridge,
fill with dye ink and then try a few more head cleans on the black only to clear the rest of the nozzles.
I have since purged the PIGMENT cart, and refilled using dye black ink.

I have read down through your progress repost and noted a few little un-necessaries
On (4) when you put the head back in first you did a nozzle check but should have done a head clean before the nozzle check.
On (10) by soaking the print head again overnight you undone all your own hard work in getting the print head to work.
On (12) again you did the nozzle check before a head clean.
I will make sure I do a head clean BEFORE any nozzle checks in future. Man, I'm going through ink like anything :(

(a) When you leave the print head to dry out thats what is does dry out
Perhaps this step was a step too far and completely dried out the remaining clogged pigment particles in the print head. I should have put extra W5 on the inlets and let them soak for while before doing a clean/nozzle check.

Some quick questions:

1) Would it be necessary to soak the head again?
2) Or shall I just go through the whole procedure again?
3) Also would it be wise to put some drops of isopropyl alcohol into the W5 to make a stronger solution?

Here is a Service Test Print that might be useful for someone. TBH it doesn't mean anything to me at this stage apart from seeing that the dye inks are printing nicely. There are some curious black specks highlighted.


Thanks.
 

The Hat

Printer VIP
Platinum Printer Member
Joined
Jan 18, 2010
Messages
15,628
Reaction score
8,698
Points
453
Location
Residing in Wicklow Ireland
Printer Model
Canon/3D, CR-10, CR-10S, KP-3
tsu3000
I am pleased to hear you got the black cartridge sort.


Some quick questions:

1) Would it be necessary to soak the head again? I wouldnt youll just waste more ink that way
2) Or shall I just go through the whole procedure again? Yes that would be the best way all-right.

3) Also would it be wise to put some drops of isopropyl alcohol into the W5 to make a stronger solution? It wont dilute the W5 but it will make a better solution than W5 by its self.
Your service print with the curious black specks is in fact the pigment black trying to print.
One of the things I strongly recommend was that you dont print anything till you got all of the
heads working properly and that includes doing Service prints.

When you get your printer working again it might help just to do a test print
once a week to keep your black nozzles clear ok..
 

tsu3000

Getting Fingers Dirty
Joined
Oct 8, 2008
Messages
49
Reaction score
8
Points
26
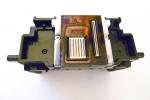
Just to add to the mix, here is a pic of the printhead.

I have noticed that the print head has quite a bit of black ink around the nozzles. Is this normal?


Thanks.
 

nche11

Printing Ninja
Joined
Mar 3, 2008
Messages
230
Reaction score
0
Points
79
It is normal as long as the ink does not cover over the nozzles. The purge unit has a soft plastic wiper that wipes the print head from time to time. So the print head may have some ink on the edge.
 
Top