Horizontal lines epson wf7710 after pigment ink replacement

Eyefinest

Printing Apprentice
Joined
Oct 20, 2019
Messages
10
Reaction score
2
Points
11
Printer Model
Epson wf7710
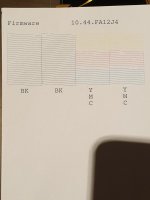
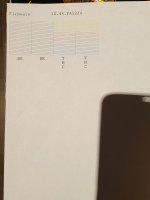
Hello I'm roberto and I'm new at this forum. Welcome to you all here. I need some help with my epson wf7710 printer. I bought the printer new and after installation of the original cartridges everything worked fine. So I bought pigment ink and refill cartridges to go over with pigment ink. Filled and installed the new cartridge with the pigment ink and did nozzle check and tried to flush the old ink out and after several printhead cleanings I came to the point that there is no more changes and I still get cut lines on a few places on the black and magenta.yellow and cyan are fine. Also I did a printhead clean already with printhead cleaner fluid before installing the new cartridge. Now I'm stuck at several printhead and nozzle checks and there is no more changes in the nozzle prints. So I did a print with the 3g jet opaque paper and the result was bad at the bottom of the print.there are 2 files of the nozzle checks,this result are the same at the last 5 prints.
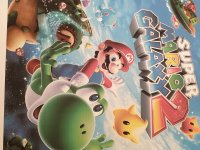
See on the Mario picture, the green beast nose, there are horizontal lines to see. Is there somebody that can help with some info what to do. I don't know anymore. I bought the printer new and I'm stuck. I will use the printer to print designs for tshirts and heatpress it.
Hope to get a reply from someone what some solution.

Thanks gr roberto
 

Ink stained Fingers

Printer VIP
Platinum Printer Member
Joined
Dec 27, 2014
Messages
5,838
Reaction score
6,965
Points
363
Location
Germany
Printer Model
L805, WF2010, ET8550
Please post a nozzle check, you have the option to upload image files here. Can you please upload a well an image of your refill cartridges showing the top of them - with the plugs.
 

Eyefinest

Printing Apprentice
Joined
Oct 20, 2019
Messages
10
Reaction score
2
Points
11
Printer Model
Epson wf7710
20191020_213349.jpg
20191020_213335.jpg
20191020_213335.jpg
20191020_213159.jpg
20191020_213349.jpg 20191020_213335.jpg 20191020_213159.jpg 20191020_213150.jpg
Ink stained fingers I've uploaded the nozzle check. See the black and magenta. Also check the image with green beast,there are the lines.
 

Eyefinest

Printing Apprentice
Joined
Oct 20, 2019
Messages
10
Reaction score
2
Points
11
Printer Model
Epson wf7710
Jil
20191021_074016.jpg
 

Eyefinest

Printing Apprentice
Joined
Oct 20, 2019
Messages
10
Reaction score
2
Points
11
Printer Model
Epson wf7710
Please post a nozzle check, you have the option to upload image files here. Can you please upload a well an image of your refill cartridges showing the top of them - with the plugs.
Ink stained fingers,I've uploaded the files and replied with some info in the post
 

Ink stained Fingers

Printer VIP
Platinum Printer Member
Joined
Dec 27, 2014
Messages
5,838
Reaction score
6,965
Points
363
Location
Germany
Printer Model
L805, WF2010, ET8550
Please do one cleaning cycle and another nozzle check - let's check if the missing nozzles stay in place or move around - it could be that the ink flow is impeded with these refill cartridges or there is a solid clog.
Did you do any initialization/priming with these refill cartidges ?
 

Eyefinest

Printing Apprentice
Joined
Oct 20, 2019
Messages
10
Reaction score
2
Points
11
Printer Model
Epson wf7710
Please do one cleaning cycle and another nozzle check - let's check if the missing nozzles stay in place or move around - it could be that the ink flow is impeded with these refill cartridges or there is a solid clog.
Did you do any initialization/priming with these refill cartidges ?
Ink stained,ok the last 6 or 7 nozzle check and head cleanings stayed the same. But what found in research something from someone through YouTube and he did pull off the full rubber of the color that where broken on the nozzle print, so I tried that this morning, and it did change only one line in the black.im attaching the image with the change.
15716489362962416698802045237146.jpg
 

Eyefinest

Printing Apprentice
Joined
Oct 20, 2019
Messages
10
Reaction score
2
Points
11
Printer Model
Epson wf7710
Please do one cleaning cycle and another nozzle check - let's check if the missing nozzles stay in place or move around - it could be that the ink flow is impeded with these refill cartridges or there is a solid clog.
Did you do any initialization/priming with these refill cartidges ?
After so many researches I think that it has something to do with the air flow. Because when I tested with the broken black and magenta color,on a plain a4 paper there was in my opinion no banding but when I printed with the 3g jet opaque heat transfer paper, the banding takes place on the green part of the image...let's say the last quarter of the paper.see the images,this one is with plain a4 paper
15716492231013563590233392757406.jpg

And this one on 3g jet opaque paper
15716492766135662021871805469095.jpg

Also the color tints is a bit vibrant on the A4 paper and a bit lighter on the 3g paper. Do you think it could be something with paper settings when printing. I used plain paper for both,and quality high, and the a4 printed through Adobe illustrator with Adobe rgb color profile, and the other with silhouette studio software also with adobe rgb profile.
 

Ink stained Fingers

Printer VIP
Platinum Printer Member
Joined
Dec 27, 2014
Messages
5,838
Reaction score
6,965
Points
363
Location
Germany
Printer Model
L805, WF2010, ET8550
missing nozzles are separate from other issues - profiles - colors - driver/paper/quality settings etc. If you select a higher quality additional print passes may overprint some of the missing lines so printouts look better with this setting than with another. I rather would focus first to get a clean nozzle check.
 

berserk

Printer Guru
Joined
Mar 8, 2016
Messages
206
Reaction score
98
Points
118
Location
Sweden
Printer Model
3880
@Ink stained Fingers
- asked if You primed the carts. That is You suck the outlet hole with a syringe until no bubbles are seen and there is no obvious resistance. The sucked ink can be put back in the filling hole.
Just after refilling, knock the cart gently against something so unwanted air pockets may disappear. Let the cart rest for 10 minutes or until you see no foam before priming. Inspect the cart for oddities. Do not let the ink levels go low. Also check the outlet hole so there is no cellophane or protective plastic left. However take care - on some cheap carts this plastic also is there to hold the O-ring (rubber ring) so no air comes in from outside the O-ring.
Is there a capping station clean it. Is there a wiper blade - clean it.
The capping station can often be reached by pulling the wall plug when you start the printer and the print carriage is in the middle of the printing area.
That's the primary.

To many cleaning cycles may also empty some of the ink holes in the print head. Let the printer rest between cleaning cycles. YMCK-bar charts are on the net - download one of those for printing instead of doing cleaning cycles one after another.
If there is a clog - You notice that if you replace to the original OEM-carts and after a head cleaning you still have the same ink bars are missing. Always have a set of reliable carts (OEM) to help diagnose errors.

If this do not help - You most certainly got a clog from some impurities caused by yourself or non-clean cheap carts/inks. If the printer is heavily used before - there might be other things going on.
 
Last edited:
Top