Freedom Refill Method for Canon BCI 3, 5, 6 & CLI 8 & PGI 5 and others

ThrillaMozilla

Printer Master
Joined
Jan 18, 2011
Messages
1,189
Reaction score
341
Points
253
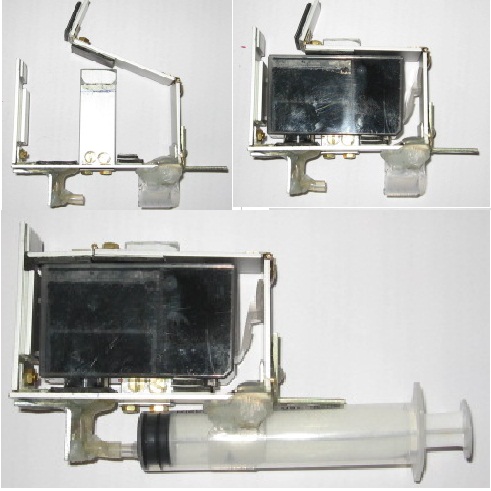
Barfl2, what size syringe is that? In my fooling around, and from what others have mentioned, it seems like a fairly large syringe is needed. I think at least twice the capacity of the sponge side.
 

gigigogu

Getting Fingers Dirty
Joined
May 7, 2011
Messages
150
Reaction score
2
Points
49
Good job, Barfl2.

Last week I built myself something similar but I had not posted it, feeling, as pharmacist said, that is a rip-off of Eweko box.

However, here it is.

8054_refill_clip_2.jpg


The articulated upper arm allows to seal/unseal the air vent (without adhesive tape) while keeping the outlet port sealed, to be able to clean the maze and upper sponge.
 

barfl2

Print Addict
Joined
Feb 22, 2010
Messages
481
Reaction score
65
Points
168
Location
Hampshire U.K.
Thrillamozilla Re your interest syringe is 60ml. Pharmicist Your right about 3.50 but I had quite a lot of the material, and a Lathe. Gigigogu's version looks very elegant and is mounted the other way up. Not noticed air maze problems yet but may well occur if you overfill. His syringes look smaller as well, the articulated design looks great. I have not had much luck in locating luer fittings, no Medical Supply shop around here, only want to sell Scooters, Beds etc. Even the major Chemists do not keep large syringes. There are industrial suppliers but they only quote in 25 or above.

Anyway I am quite pleased with my effort which seems to work. I had no problem with ink Foaming. Each fill took between 4-5 plunger pulls. The advantage possibly of a large syringe.

barfl2:)
 

gigigogu

Getting Fingers Dirty
Joined
May 7, 2011
Messages
150
Reaction score
2
Points
49
barfl2 said:
... I had quite a lot of the material, and a Lathe.... Gigigogu's version... is mounted the other way up... ... His syringes look smaller as well, ...
My version is expensive too, not so much in materials but in tools and work hours.
The position in picture is only for release stage, at drawing I keep it with outlet port up.
The syringe pictured is 20 cc with eccentric tip, but a 50 cc syringe with central tip can be used, too. I found that a 20 cc syringe with eccentric tip is enough to fill dye cartridges in one go and the pigment black in 2-3 steps of 10 cc of ink.
 

LeeE

Getting Fingers Dirty
Joined
Aug 1, 2011
Messages
20
Reaction score
5
Points
25
I read with interest this thread, and registered just to post this:
About 5 years ago I started using a Canon printer with CLI 8 cartridges and went thru many inerations in filling the cartridges.
Removing the ball or drilling a hole in the tank etc. always searching for a better method.

I was convinced that bottom filling (thru the exit port) would be the best way, so I made a simple fixture using the orange plastic break off clip from the canon cartridge.
I removed the threaded shell from a 10 cc lure lock syringe to expose the nozzel.
Drilled a hole (smaller than the nozzel) thru the plastic (and rubber gasket) cf the orange clip.
Then using a small tappered reamer enlarged the plastic to make a tight fit for the nozzel.
This held nozzel tightly in the plastic and thru the rubber gasket sealing the system, however of course I found I could only fill the sponge.
The lure lock syringe is easily removed from the orange clip.


Sadly after 5 years my canon printer failed (the power supply went bad) so I bought an HP Office jet 6000 (920 cartridge) to replace it, as it has an external PS. and obtained the InkTec fillers.

After seeing the Freedom method I pulled out my old fixture, converted a 60 cc lure lock syringe to fit, using my old CLI 8 carts and iit worked great!! Gee, I had never thought of this!!
I don't know why others had a problem using this simple fixture method, perhaps its my tight fitting reamed hole that made the difference.


Some hints from my experiences:
1. For expermenting I use distilled water with a slight amount of ink (about 2 cc for 80 cc of water) & perhaps some glycerine or antifreeze.
The tint makes it easy to see how the well sponge works & doesn't create the mess of ink !

2, For sealing the air vent I use "Poster putty" made by "Duck" it is pliable and can be used over & over, seals tightly.
I started using it to seal the tank holes I drilled and never had a problem with a leaky cartridge again (as I did with tape or wax), just make a small ball, wet your finger tip
(so it don't stick to your finger) and press down. On the CLI 8 cartridge air vent it pulls off clean. :)
 

stratman

Printer VIP
Platinum Printer Member
Joined
Apr 19, 2007
Messages
8,712
Reaction score
7,172
Points
393
Location
USA
Printer Model
Canon MB5120, Pencil
LeeE said:
2, For sealing the air vent I use "Poster putty" made by "Duck" it is pliable and can be used over & over, seals tightly.
I started using it to seal the tank holes I drilled and never had a problem with a leaky cartridge again (as I did with tape or wax), just make a small ball, wet your finger tip
(so it don't stick to your finger) and press down. On the CLI 8 cartridge air vent it pulls off clean. :)
For the Duck "Poster Putty" suggestion you may be my favorite first time post poster. That's some ingenuity at work.

Did the putty ever "wear out" and need to be replaced? If so, why and after how long?
 

Redbrickman

Printer Master
Joined
Dec 27, 2010
Messages
1,105
Reaction score
1,189
Points
293
Location
UK
Printer Model
MB5150
AKA Blue Tack in UK ;)

Not tried it (yet) :D
 

LeeE

Getting Fingers Dirty
Joined
Aug 1, 2011
Messages
20
Reaction score
5
Points
25
stratman said:
LeeE said:
2, For sealing the air vent I use "Poster putty" made by "Duck" it is pliable and can be used over & over, seals tightly.
I started using it to seal the tank holes I drilled and never had a problem with a leaky cartridge again (as I did with tape or wax), just make a small ball, wet your finger tip
(so it don't stick to your finger) and press down. On the CLI 8 cartridge air vent it pulls off clean. :)
For the Duck "Poster Putty" suggestion you may be my favorite first time post poster. That's some ingenuity at work.

Did the putty ever "wear out" and need to be replaced? If so, why and after how long?
My poster putty came in a 2 oz pack of 4 sticks (cyan blue in color), I used it to seal the tank hole I drilled in CLI 8 cartridge for about 4 years and only used about half of one stick.

I don't think any ever wore out, however using it for the tank hole it would get a little ink on it so I replaced it when it got bad enough to coat my finger with ink.
I don't think using it for the air vent would ever wear it out. :p
 

marceltho

Getting Fingers Dirty
Joined
May 12, 2010
Messages
95
Reaction score
0
Points
34
Location
Dutch/Living in Qubec
LeeE wrote:
My poster putty came in a 2 oz pack of 4 sticks (cyan blue in color), I used it to seal the tank hole I drilled in CLI 8 cartridge for about 4 years and only used about half of one stick.
LeeE, perhaps a strange thought, but would it be possible, to insert a syringe through the putty sealed tank hole, fill the ink chamber and retract the syringe without getting air in the ink chamber ?
It would be a top-fill, but through the putty.
 

rodbam

Printer Master
Joined
Mar 9, 2011
Messages
773
Reaction score
173
Points
213
Location
Australia
Printer Model
Canon Pro 9000 mk2 & Pro 9500
If it's blue Tack we can get that down here so I will try it on the German Method hole. Does it just get applied to the surface or do you push it into the hole a bit?
 
Top