Epson Ecotank ET-7750

Francesco Longobardi

Getting Fingers Dirty
Joined
Jun 23, 2018
Messages
17
Reaction score
20
Points
35
Printer Model
Epson ET 7750
Hi! I finally got the printer and started using it. The first couple of prints i made were full page borderless and I thought they came out good. Then I tried to print an image with some margins from the Lightroom print module but the margins were not what I expected. On the left the margin was smaller and on the right there was no margin at all. So I looked back at the borderless pictures and they had been cropped as well. I can't figure out how to set the printer so that what I see on screen is what I get. Is there a setting in the driver which causes this problem?
 

Ink stained Fingers

Printer VIP
Platinum Printer Member
Joined
Dec 27, 2014
Messages
5,837
Reaction score
6,964
Points
363
Location
Germany
Printer Model
L805, WF2010, ET8550
The ET-7750 offers you the option for borderless printing for some types of papers and some formats , but e.g. not for custom formats, not for plain paper. The driver allows you to select the borderless option, and you can select the amount of overspray. This may help to prevent white egdes if the paper is a millimeter longer than the selected format or can help with paper skewing when being pulled in.
All the rest - how your image is placed onto the paper - is a matter of your software you are using to print. Just image a panoramic photo - you can print it so it just fits onto the paper - by width - with white borders top and bottom - or you expand it such that there is no white border left , but part of the image is truncated left and right. Or some programs - graphics - layout - let you compress the width to make it fit onto the paper, that may look stupid but just slight changes may not be visible at the end.
If you want to know how much you loose at the edges you may use a test image for this purpose
https://www.druckerchannel.de/testdateien/dc_ueberdruck_10x15cm.jpg
You can use it for formats 10x15cm or larger formats with this same width/height ratio of 1.5 - or you use it just in one direction to test the effect of various formatting options in your print program.
 
Last edited:

Francesco Longobardi

Getting Fingers Dirty
Joined
Jun 23, 2018
Messages
17
Reaction score
20
Points
35
Printer Model
Epson ET 7750
I understand that how you place the image depends on the software, but the problem is that the result is not what I see in my software (and in the print preview).
For example, I've printed a panoramic photo and set the margins to 4mm left and 4mm right, centered vertically. The result is 1-2mm on the left (which is the side that comes out first) and no margin on the right, as if the image went beyond the paper.
I've tried it with different settings, from max expansion to none. If I export the print to a jpeg file, it's 210x297mm borders included, but then when I print it looks like it's larger.
Am I making something wrong?
 

Francesco Longobardi

Getting Fingers Dirty
Joined
Jun 23, 2018
Messages
17
Reaction score
20
Points
35
Printer Model
Epson ET 7750
Oh and I will use that test image you provided as soon as I get home! Do you think I can print on standard paper (maybe just thicker) using photo paper settings? So that I can print borderless but don't waste paper for these tests.
 

Ink stained Fingers

Printer VIP
Platinum Printer Member
Joined
Dec 27, 2014
Messages
5,837
Reaction score
6,964
Points
363
Location
Germany
Printer Model
L805, WF2010, ET8550
Do you think I can print on standard paper (maybe just thicker) using photo paper settings? So that I can print borderless but don't waste paper for these tests.
Yes, or just use the matte/inkjet paper setting with normal paper. You cannot print borderless with the normal paper setting anway. I'm printing with Qimage and would not be able to comment much on Photoshop/Lightroom etc print software settings - I hope somebody else can jump in for that. Just check with a ruler that the paper sizes - normal and photo paper - exactly match - there can be variances by a millimeter or more.
 

Francesco Longobardi

Getting Fingers Dirty
Joined
Jun 23, 2018
Messages
17
Reaction score
20
Points
35
Printer Model
Epson ET 7750
Ok so I will create a thread specifically about this problem with more detailed info, so hopefully someone will be able to help me and someone else facing the same problem!
 

The Hat

Printer VIP
Platinum Printer Member
Joined
Jan 18, 2010
Messages
15,617
Reaction score
8,691
Points
453
Location
Residing in Wicklow Ireland
Printer Model
Canon/3D, CR-10, CR-10S, KP-3
Here is the way to use Photoshop to print your photos, but I imagine its much the same as in Light Room, if its not then this tutorial is of no use to you.
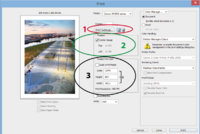
When you select your photo to print, this is the print preview Tab that will appear.

Fig 1.jpg click to enlarge.

There you will see three distinctive box Positions: (1) RED (2) Green (3) BLACK.

BOX (1) RED. The Best place to start is with your paper size so you must First Select (Print Settings) please disregard paper Orientation, you can set that anytime later.
Capture12.PNG
Once you click on Print Settings, you are directed to your printer MAIN setting Tab.
Fig 2.jpg
I am sure you know how to choose your Media type, Paper Source and Print Quality, so I’ll skip that, and you can next click on PAPER SETUP.

Fig 3.jpg

Here is where you can set your Paper Size and Orientation that you choose to Print with, and once you have select your correct paper size from the drop-down box, just click on the OK Button and you'll be back at your Print Preview again.

BOX (2) GREEN. There you can Centre the photo Automatically or untick the Centre Image box and using TOP and LEFT you can put in your own set of figures to adjust the image Left/Down, if you wish.
Capture10.PNG


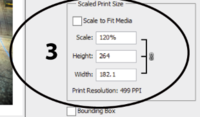
BOX (3) BLACK. Scaled Print Size: There you can make your photo Smaller/Bigger (Scale to Fit Media) or scale using Percentage %, Don’t use the change the photo dimensions (Not recommended) and on the bottom it shows you the Print Resolution (PPI)
Capture 11.PNG
When your happy with your own setting (Check Twice) then you can click Print and you’ll know that your photo will be perfectly centred on your printed sheet, If your still not quite sure yet, you can click on the DONE Button and it will save your print setting for you.

Disregard any of the setting that appear in these Illustrations.
 
Top