Clogged Canon print head

Grandad35

Printer Master
Platinum Printer Member
Joined
Feb 24, 2005
Messages
1,669
Reaction score
182
Points
223
Location
North of Boston, USA
Printer Model
Canon i9900 (plus 5 spares)
ghwellsjr said:
Did you sand right through the nozzles and all the electronics?
No - the electronics had been removed.

ghwellsjr said:
Are you suggesting that we could use very hot water or other liquid for cleaning without risk of damage? But even if this were true for the parts that you show, it may not be true for the electronics region, would it?
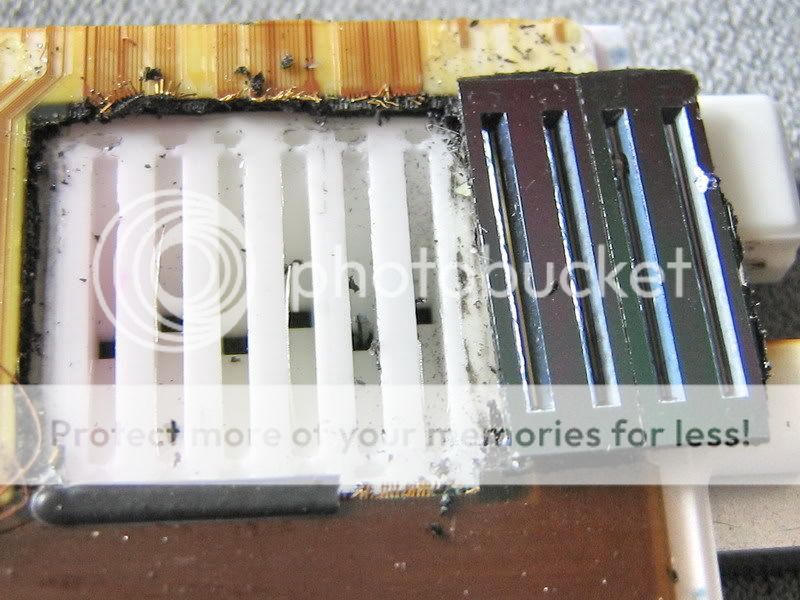
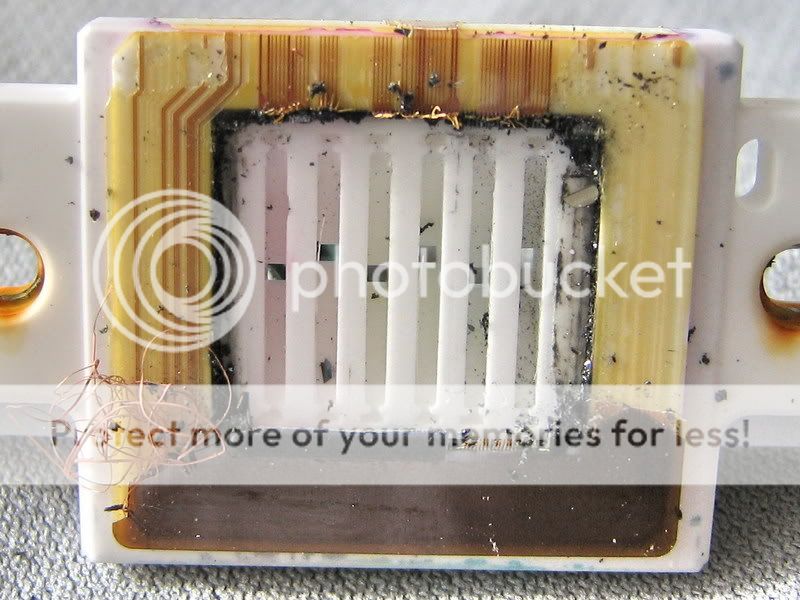
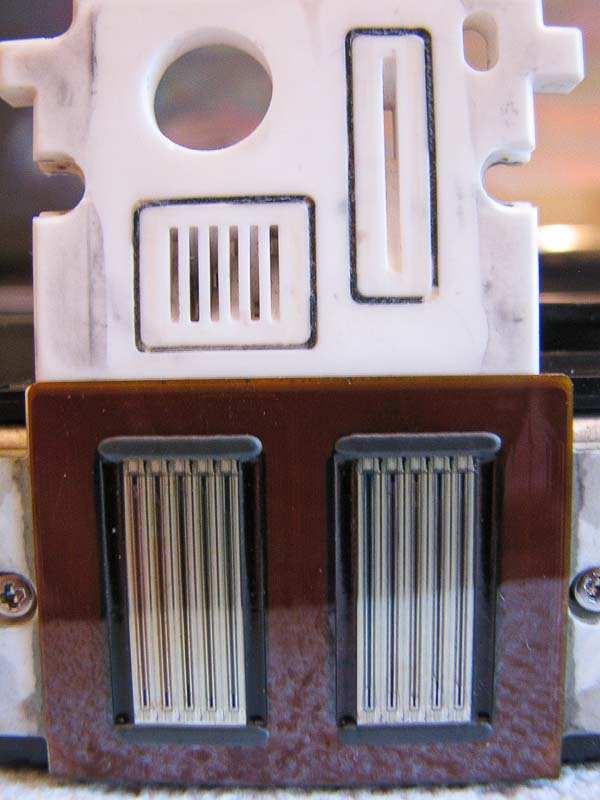
If all Canon print heads are made the same way as this one, it appears that we can get quite aggressive with our cleaning techniques once the electronics have been removed. In any case, you won't be doing this unless the head can't be brought back to life with normal cleaning techniques, so what do you have to lose? I'm not suggesting that this is the first thing to try when you have a head clog.

I am also playing around with the electronics separately to see if there is anything to be learned about the construction of the print head itself. It appears that it is held together with adhesive, so that is why you have to be careful about how you treat that part of the print head. For example, several years ago I found that a hot water soak (at 160 deg F) would de-bond the heat sink from the nozzle plate.
 

Emulator

Printer Master
Platinum Printer Member
Joined
Jan 4, 2012
Messages
1,675
Reaction score
1,308
Points
277
Location
UK
Printer Model
Canon Pro9000 II
Thanks Grandad 35 for your ingenuity, these are the images I have been keen to see. They make understanding the malfunctions of the head ink flow more open to reasoning and possible solutions.

Excellent work.

I am still rather surprised that in all the imagery on this site, I have not seen any actually showing an ink clog!

Regards
Ian
 

ghwellsjr

Printer Master
Platinum Printer Member
Joined
Jun 16, 2006
Messages
3,645
Reaction score
85
Points
233
Location
La Verne, California
Printer Model
Epson WP-4530
Grandad35 said:
For example, several years ago I found that a hot water soak (at 160 deg F) would de-bond the heat sink from the nozzle plate.
That was the information I was looking for.

I can also vouch for a print head being damaged (and subsequently damaging a printer) by applying to much positive and negative pressure from a syringe full of liquid attached to the inlet ports. This caused electrical damage. I don't know about air pressure. I'm still looking for a fool-proof way to remove stubborn clogs from a print head without risking damage to the print head.
 

The Hat

Printer VIP
Platinum Printer Member
Joined
Jan 18, 2010
Messages
15,625
Reaction score
8,696
Points
453
Location
Residing in Wicklow Ireland
Printer Model
Canon/3D, CR-10, CR-10S, KP-3
ghwellsjr said:
I'm still looking for a fool-proof way to remove stubborn clogs from a print head without risking damage to the print head.
Which ink is causing you the problems with clogs, is it the current one youre using now or is it an old clog that just wont shift for you..
 

Grandad35

Printer Master
Platinum Printer Member
Joined
Feb 24, 2005
Messages
1,669
Reaction score
182
Points
223
Location
North of Boston, USA
Printer Model
Canon i9900 (plus 5 spares)
ghwellsjr said:
I can also vouch for a print head being damaged (and subsequently damaging a printer) by applying to much positive and negative pressure from a syringe full of liquid attached to the inlet ports. This caused electrical damage. I don't know about air pressure. I'm still looking for a fool-proof way to remove stubborn clogs from a print head without risking damage to the print head.
As has been stated previously, this approach is to be used only when all else fails and a clog cant be removed by normal means. However, once I got the proper screwdriver bit it is a fairly simple procedure once you get over the FUD that goes with the first time you do something new just like Panos stated. Removing the electronics and print head plate takes less than 10 minutes and putting back together takes even less time. Once the mounting nibs on the PC board are ground off, its less than a 2 minute procedure to go either way.

A few more tests were run this morning. The print head body used in the preceding posts was immersed in boiling water for 30 minutes (being careful to keep the plastic from touching the bottom of the pan by supporting it on metal spacers). After it cooled, there was no sign of distortion and the cover plate (which was not put into the water) fit perfectly back into place. This was not surprising, since many phenolics are rated for continuous operation at 250 deg F. I also checked the pieces of the raised boss that were broken off when it was disassembled, and they were all tight indicating that the glue used for assembly withstood this temperature. If a clog cant be broken free by pressure/suction alone, then I would also try boiling water.

I have also had an experience where the ceramic print head was damaged by high pressures, so the ceramic print head was soaked in alcohol for 24 hours. Using a razor blade driven into the joint between the thin and thick ceramic pieces, it was possible to break free a few pieces of the thin ceramic cover at the corners, but it wasnt possible to delaminate anything near the nozzles. Blowing 100 psi into ink entry point made no difference. The ceramic sandwich was then placed in boiling water for 30 minutes; it was still impossible to delaminate the thin ceramic plate. Finally, the ceramic sandwich was put into the oven at 400 deg F for 30 minutes. There were a few minor smells when it first heated, and there was some discoloration around the nozzle plates, but the thin ceramic plate still would not delaminate. I was trying to replicate two photos shown in this milking post, but I had to resort to chipping the thin ceramic plate off in small pieces with a hammer and chisel. A slight amount of adhesive residue could be felt on the thick ceramic plate after the thin ceramic plate was chipped off.
HeadChannelsnotsealed.jpg

Inkchannels.jpg

This is what my ceramic piece looked like after it was cleaned up and stacked on top of a spare i9900 print head for comparison.
Print_Head_082712_1.jpg
 

MP640

Print Addict
Joined
Oct 20, 2010
Messages
196
Reaction score
71
Points
168
Location
The Netherlands
Printer Model
Canon MG6150
fotofreek said:
... If we subscribed to the conspiracy theory, we would conlude that Canon manufactures an adhesive/OEM ink relationship that keeps the adhesive intact unless one uses a non-OEM ink in which case the adhesive breaks away and kills the head. A "sleeper" killer in our midst...
Given the profit margins in the ink business, I wouldn't be surprised if they actually did...

Would it be allowed from a legal point of view?
 

ghwellsjr

Printer Master
Platinum Printer Member
Joined
Jun 16, 2006
Messages
3,645
Reaction score
85
Points
233
Location
La Verne, California
Printer Model
Epson WP-4530
The Hat said:
ghwellsjr said:
I'm still looking for a fool-proof way to remove stubborn clogs from a print head without risking damage to the print head.
Which ink is causing you the problems with clogs, is it the current one youre using now or is it an old clog that just wont shift for you..
I have lots of print heads for the iP4000 and most of the other printers I still have that use the same head. Some of these I got with used printers with unknown histories. Some of these had ink that I supplied but I have no idea which ink was in them. Most of the bad clogs are in the pigment nozzles and some of them "move around". That is, each time I do a nozzle check, a different set of nozzles don't print.
 

ghwellsjr

Printer Master
Platinum Printer Member
Joined
Jun 16, 2006
Messages
3,645
Reaction score
85
Points
233
Location
La Verne, California
Printer Model
Epson WP-4530
Grandad35 said:
If a clog cant be broken free by pressure/suction alone, then I would also try boiling water.
In my case where I used pressure/suction, I don't really know whether I got rid of the clog because the print head and printer were damaged when I tried to use it. However, I could force water or Windex through the inlet ports and it would eventually create a nice, even spray out of the nozzles so I believed I unclogged the nozzles. Since I didn't submerge the print head, I believed I didn't have to wait for the electronics to dry. I just don't know if the pressure opened up a path for the liquid to get onto the electronics or if I just splashed some liquid where I shouldn't have.

Are you saying that it is easy to remove the electronics, brutally clean the rest of the print head and then reassemble it?
 

The Hat

Printer VIP
Platinum Printer Member
Joined
Jan 18, 2010
Messages
15,625
Reaction score
8,696
Points
453
Location
Residing in Wicklow Ireland
Printer Model
Canon/3D, CR-10, CR-10S, KP-3
ghwellsjr
Most of the bad clogs are in the pigment nozzles and some of them "move around".
The reason I asked was if the clogs are still a problem then why you dont try to soak the head from the far side. (Underside)

Turn the print head upside down and apply Putty, Blue Tac, Hot Glue or a sealing compound
around the nozzles creating a reservoir and then pour your solution onto the top of the nozzles.

On occasion just top up the solution every now and then over time and just see if any muck comes out of the far side.
Try a mixture of washing up liquid, Windex and water 33/33/33, no alcohol otherwise the solution will dry up long before it can do some good..
 

ghwellsjr

Printer Master
Platinum Printer Member
Joined
Jun 16, 2006
Messages
3,645
Reaction score
85
Points
233
Location
La Verne, California
Printer Model
Epson WP-4530
I have never done it that way but I have put a print head upside down under a stream of warm tap water. Then I wait two days for it to dry before putting it back in the printer. I have also placed the print head right-side-up in a shallow pool of Windex and dribbled Windex into the inlet ports.
 
Top