Canon IP3000 broad smears at page end

Trigger 37

Printer Guru
Joined
Dec 23, 2006
Messages
607
Reaction score
4
Points
136
yuyakay,... YOu have some very good questions. First, the color test pattern you printed is an "IMAGE". The printer thinks all images are "Pictures" and all pictures MUST be printed with color inks since that is the only way printers can make different colors. Images are always broken down into PIXELS and each pixel is a different color of the full color spectrum of RGB which is always converted to CYN before printing. RGB(Red, Green Blue) is "Additive color Spectrum" and CYN is "Subtractive color Spectrum". Pigmented Black ink is use for "TEXT" printing only, like from a work document. It also does not matter that there is TEXT in the middle of a "IMAGE",... it is all image. Text documents don't carry any color description. Each text carriage is identified by font, and a hexidecmal number, but no information about color. Why is this,... because all TEXT is going to be Black and is printed in Pigmented black since that helps the printer achieve the highest qualtity in text print. You could spend years learning about all of this but just accept that text is pigment black and images are printed in Cyan, Magenta, and Yellow. Some companies have gone to adding "Dye" black ink and what this does is "Expand the color Gamut" or total spectrum of all possilbe colors that can be created by a printer.

There are 100's of web site discussions about all of this and as I said you could spend years just getting educated on all the topics of "Color"

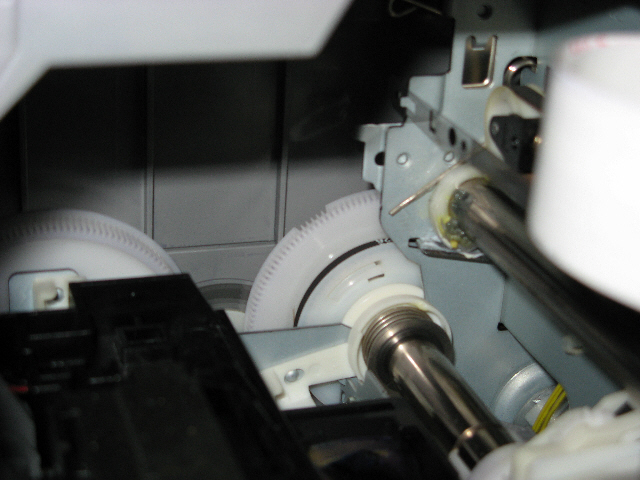
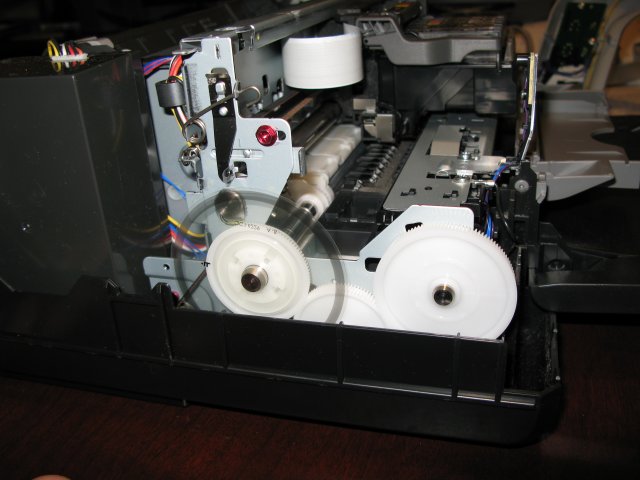
As far as the wheel I've never watched the internal movement but I believe that the wheel turn one full revolution for one page length. This is the only way the print you have posted makes sense. Otherwise you would have multiple "Brown bands" in each print.

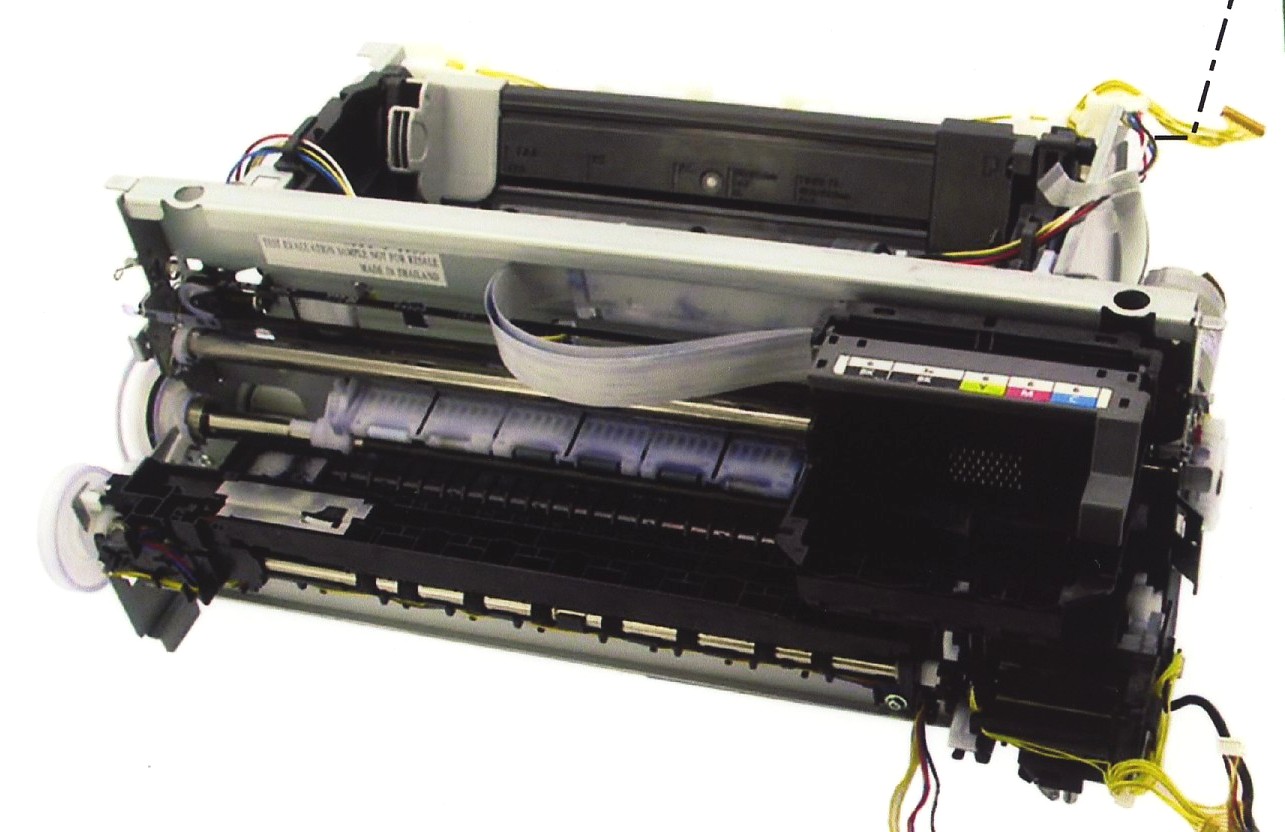
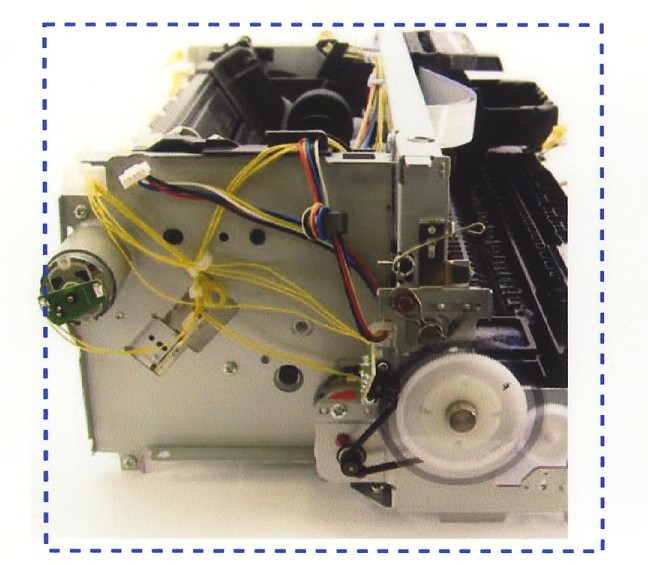
You need to consider taking your printer apart and check the wheel and clean it.
 

yuyakay

Getting Fingers Dirty
Joined
Apr 4, 2008
Messages
20
Reaction score
0
Points
22
I tried to look at the timing wheel as best I could when the unit is powered on. One time it came to rest at a point where, this is a little hard to describe, although the outer (leftmost) side of the timing wheel for most of the 360 degrees is slightly higher than the further left of the two rows of teeth, there is a spot where 5 teeth (consecutively) do not have that higher part behind (to the left of) them. Here's a picture.


Is that the normal appearance of the timing wheel ? It looks so cleanly cut, I suspect that it's as it should be, but I am not certain.

Also, if the problem was due to a malfunction of the timing wheel, why do I consistently get one further inch of good printing when I use the "Plain Paper" setting?
 

Trigger 37

Printer Guru
Joined
Dec 23, 2006
Messages
607
Reaction score
4
Points
136
yuyakay,... Unfortunately I do not have close up pictures of the iP3000, but I do have pictures of the timimg wheel for the iP4200 and it does not look like your picture. Here it is below;


You can enlarge this image and see there are no teeth missing. Also, the gears attached to the main shaft also contain the large Timing Disk. The image you show has a much smaller timing wheel inbetween the two gears. This I don't understand at all since I have a detailed iP3000 Service Manual with rather good digital pictures and the manual is in PDF format which allows me to enlarge it up to 500%. It show clearly that the timimg disk is attached to the main gear and the main shaft. I'm beginning to think you don't have a iP3000 printer. I don't understand why your internal picture does not look like the Service Manual.

Getting to your question about printing on photo paper and plain paper,... I think this is simple. The photo paper is printed in much higher resolution than plain paper. You don't have to tell the printer what resolution to print at, it sees what paper you have selected and it decides what resolution it will print in. For example, the iP4000, which I believe is the same, has only 4 choices for print quality for plain paper, 2&3 will print CYM at 1200x1200 dpi, and 4&5 are 600x600 dpi. The default for plain paper is 5. If you select Photo Paper Pro, you have the option of Quality settings 1, 2, &3. At (1) it will print at 2400x1200 dpi, where 2&3 will print at 1200x1200 dpi. This difference in resolution is again controlled by the timing wheel. Go into the print manager and force the printer to print a picture at quality 2 with plain paper and see what the difference is.
 

Ron350

Print Addict
Joined
Mar 7, 2007
Messages
428
Reaction score
77
Points
176
Location
Alabama
Printer Model
-
Yuyakay that picture looks exactly like my iP3000 with the small clear timing wheel in the center.

there is a spot where 5 teeth (consecutively) do not have that higher part behind (to the left of) them.
The gear is the same on my iP3000.
 

Trigger 37

Printer Guru
Joined
Dec 23, 2006
Messages
607
Reaction score
4
Points
136
Ron350, Thanks very much for comfirming that it matches your ip3000. I don't know what the problem is with these pictures and the Service Manual I have. It turns out I do have a very good picture of the iP3000 from the newer Simplified Canon iP3000 Service Manual. The only thing I can think of is that somewhere along the line Canon changed the inside guts but that does not make sense either. They would have come out with a new model number.

Just to help muddy up the water I will print out the image from the iP3000 Service Manual, Scan it and upload to this thread. I'm very sure if we tried to ask Canon Support about this, we would not get any answer except, take it to a Authroized Canon Repair location. Here is the picture of the chassis;


And here is a picture of the end view of the chassis.


These pictures clearly show the timing disk connected to the main shaft and in Yuyakay's picture there is no timing wheel on the large main shaft. At least it is not visible. Where did it go. Also, you will notice there are no missing teeth on any of these wheels. Is this possible a iP3000 printer shipped to a different country???? Is it a US model or is it Far East, Europe, Asia, Japan, etc.
 

on30trainman

Printer Guru
Joined
Jan 22, 2006
Messages
310
Reaction score
0
Points
109
Location
Philadelphia, PA area
I have been following this thread on an irregular basis, but when I saw the note about the Post-It tag I decided to jump in with a comment. I used to have a similar problem with my ip6000D when printing 8 " X 10.5" prints on 8.5"X11" paper. I would get banding (sometimes very noticeable especially with photos with lots of blue sky or a solid color) on the last inch or so of the trailing edge of the print. The Post-It trick didn't work. But I changed my paper size to Legal (8.5" X 14") in the print driver, but still use 11" paper. I use QImage to do all my printing. In QImage I set my leading margin to 1/4" and my trailing margin to 3.25". This puts the print within the actual 8.5X11 sheet. All my trailing edge banding problems went away. That is the way I do all my printing now. Need to take care to set up the printer and paper settings correctly and you can't do borderless printing (but I never did anyways).
My reasoning why it works - when the printer driver is set to 11" paper, something happens in the operation near the trailing edge of the paper that causes the banding in some situations. But with the paper set to 14" the printer driver is merrily going along and doesn't realize it is near the edge of the paper. The data to the printer ends and the paper just feeds out. It works for me - may be worth a try.

Steve W.
 

Trigger 37

Printer Guru
Joined
Dec 23, 2006
Messages
607
Reaction score
4
Points
136
ontrainman,.. Great information. I've also use Qimage for all kinds of prints and find it one of the best photo software. My question to you is,.. were you ever able to get rid of the print banding if you correctly set you paper sizes in both the software and the print driver to the correct values? I can see how you got around it, but why do you think your printer started doing it. Was it a bad print driver???

I just looked again at the photo that yuyakay put up and I can not see any Timing disk on his drive wheel. I see a portion of the timing wheel and who knows it could be laying on the side of the machine, having come off some how???.

Yuyakay,... if you send me your email addres, I will send you some photos that will teach you how to take the top covers off of your printer and look much closer at the gears and the timing disk. However, all of this may be a waste of time if you will first check what ontrainman has suggested. Make sure your paper size is correct in the software you are using and in the paper type you select in the Canon Print driver. If they are different, no telling what will happen to the printout.
 

on30trainman

Printer Guru
Joined
Jan 22, 2006
Messages
310
Reaction score
0
Points
109
Location
Philadelphia, PA area
Trigger 37 said:
ontrainman,.. Great information. I've also use Qimage for all kinds of prints and find it one of the best photo software. My question to you is,.. were you ever able to get rid of the print banding if you correctly set you paper sizes in both the software and the print driver to the correct values? I can see how you got around it, but why do you think your printer started doing it. Was it a bad print driver???
Actually after I found that setting the printer paper size to 14" fixed my problem, I never went back to the 11" size. Could be a bad printer driver but I doubt it. As I stated in my earlier post - I think it has to do with how the printer acts as it is approaching the end of the paper. I do remember that when it was set to 11" paper the printer made a different sound and seemed to slow down as it came near the end of the paper. With the driver set to 14" paper I don't hear any change in sound or see a speed change - and no banding at all.

Steve W.
 

Trigger 37

Printer Guru
Joined
Dec 23, 2006
Messages
607
Reaction score
4
Points
136
ontrainman,... Thanks for your reponse. We are all trying to figure these printers out, and wouldn't it be great if Canon actually helped us. The reason I get so upset with Canon is that I worked for IBM for 33 years developing everything from logic circuit cards to sophisticated integrated circuit chips, to Inventing an 8 bit microprocessor before Intel ever created there first 4 bit process chip. For the first 25 years IBM was dedicated to total support of each and every customer. I worked for the original owner, T.J.Watson, and I have awards that hang on my wall right now that are signed by him. I finally ended up managing the Corporate Staff ar Group Headquarters in New York for the three major divisions of IBM, the Systems Processor Division, the Storage Technology Division, and the Technology Division. This amounted to 65% of the total revenue for IBM. It was a great place to work for with outstanding recognition of individual achievement. After Watson retired, and then Cary, and finally Ackers, things went down from a people management style. It was never the same again. While they have continue to excell, and I appreciate their success todate, It was never the same for the last 10 years.

Canon has the same capable engineers and employes, but they won't share any of their information with anyone. I remember at IBM we used to publish "White Papers", with the goal of providing our customer with all the critical information that we had access to. The goal was to help our customers. Canon has all the information we all need, on each and every printer they have manufactured. I now the Engineers at Canon would love to support the people, but the marketing type have told the executives that any information provided to the public will only create a demand for more and that this will deminish the sales of new printers.

I'm glad to have been an Electrical Engineer. I was always proud of the work I did.
 

Ron350

Print Addict
Joined
Mar 7, 2007
Messages
428
Reaction score
77
Points
176
Location
Alabama
Printer Model
-
Trigger37 the timing wheel is in Yuyakays picture its just hard to see.

The timing wheel is small and mounted on the idler gear between the two large gears.

Here is the serial # on my iP3000 if that will help.
Sn: FCHA24170

Print head #
374F14A005 00520981
QY6-0042

EEPROM print out:
http://s28.photobucket.com/albums/c249/ron350/?action=view&current=SWScan00039.jpg


SWScan00039.jpg
 
Top