You are using an out of date browser. It may not display this or other websites correctly.
You should upgrade or use an alternative browser.
You should upgrade or use an alternative browser.
Canon IP3000 broad smears at page end
- Thread starter yuyakay
- Start date
- Thread starter
- #32
Thanks for the offer Ron. I'll spend some time trying to clean this head in various ways and even if the nozzle check is still flawed, I'll probably keep using it for a while. Next time I want to make some big prints I'll probably get a new printhead. Lately I mostly have been using Costco to print my photos. Using their online software, you can select to have their automatic image enhancement turned OFF and that really gives quite nice results.
The fact that that post about the I560 also having the rust coloration at the end of the page sure is curious. Now that I know other people have experienced that, I'd sure like to know what's causing it. I think it's unrelated to whatever is causing the lower half of the dark Cyan band to be lighter, because it doesn't start until the end of the page.
The fact that that post about the I560 also having the rust coloration at the end of the page sure is curious. Now that I know other people have experienced that, I'd sure like to know what's causing it. I think it's unrelated to whatever is causing the lower half of the dark Cyan band to be lighter, because it doesn't start until the end of the page.
Trigger 37
Printer Guru
- Joined
- Dec 23, 2006
- Messages
- 607
- Reaction score
- 4
- Points
- 136
yuyakay,... It has been very interesting watching all the speculation about this problem. Now that we know you have a head problem since the nozzle check clearly shows that sections of the nozzles are not printing as they should be. To my knowledge no one has every resolved the "picket fense" or "Half bar" printing problem. I had the problem once and unfortunately I fixed several things at the same time and the problem disappeared and I've not seen it again. Just think, I had the perfect opportunity to identify what the problem was, but I was in too big a hurry to fix it, and so I did.
Getting back to the other problem that started all this discussion. I had made several suggestions on how to test the printer to help isolate the cause, but this didn't get done. I will try again. Please print several different images that are full page length. One could be just the 3 color bars test image of Cyan, Magenta, and Yellow. Others could be other simple color test charts of "Know" colors. Many of these test images are free on the Internet. Neil Slade has them on his web site at neilslade.com. Forgetting about your nozzle check and head problem, the smear or color change should show up rather clear in these test prints. They don't have to be on photo paper, just plain paper. The goal is to see if you can prove that the color change (shift,etc.) happens at the same point or a different point on the different prints. These print are forcing a know amount of one single color at all locations,... so when any color shifts or smears it will be obvious.
I like to guess a lot, so I will guess that it happens at a different place on each test print,... and if it does I will guess that one or more ink cart is suffering from ink starvation. The "Rust Tint" you see on the one image is probably a fade out of Cyan or yellow, which puts a "Magenta" cast on the rest of the image. It also does not have to be consistant since the printhead is gradually loosing the supply of one or more inks and can't print the dots. When the printhead rest for just seconds, the ink begins to flow again to the head and fills the nozzle "Tub". That always contains sufficient ink to print a good nozzle check. A photograph is a very poor way to diagnose a color problem because each pixel is made up of so many dots overlayed with variouse about of C, M, Y to form the correct color. If one color can make a full dot, or just half a dot, think of the magnitude of change that will occur in the final image. Repeat the problem over a page and you may or may not see it. Many times I've printed a photo and noticed it would have the wrong color of sky. If it was missing just a little magenta, the sky would look more Cyan that blue. Some of my photos used to take on a slight red tint and this was because there was insuffieient Cyan.
Anyway, I'll be waiting to see the test prints
- Thread starter
- #34
OK Trigger, here goes:
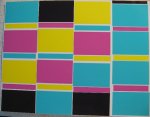
All images show the trailing edge of the paper as the right side of the image. All images have to printer settings on Custom/diffusion/QualityHighestAvailable. The borderless setting is chosen, and the overspray setting is set to minimal except for the last of these 4 images, where it is set one notch right of minimal.
This first image is on plain paper. On the very left edge the black & cyan are light (actually the black being brown). This is probably due to overspray being set to minimal. The yellow and Magenta nevertheless go right to the edge in full color. On the right edge, there is a sizable band of light cyan. Again yellow and magenta are good to the edge of the paper. I didn't notice at first until I saw the 2nd image which I will show, but seeing that, I went back to this first image and saw that the black in the upper right corner (trailing edge of the paper was brown at exactly the same place where the cyan turned light.

The second image is the same thing on glossy photo paper. Looking at this now, I'm wondering if perhaps I didn't set the overspray one notch right of minimal on this image too. (The other being the 4th image). Here's where it gets interesting. Other than a little bit of color getting onto what should be virgin paper ... nothing serious, the print came out very nicely ... UNTIL ... the upper right corner black ! There is my nemesis, Rusty. It's not the cyan or the red which is causing the problem. It's the Black! The black every else however is just fine. Furthermore, as Rusty appears exactly where he did in my print of the hummingbird, about an inch and a half from the right edge, that is too far from the edge for the overspray issue to have anything to do with it, I would think.
Here is a closeup of that right corner. This closeup is not image#3 or any of my four mentioned images. ... It is a bonus!

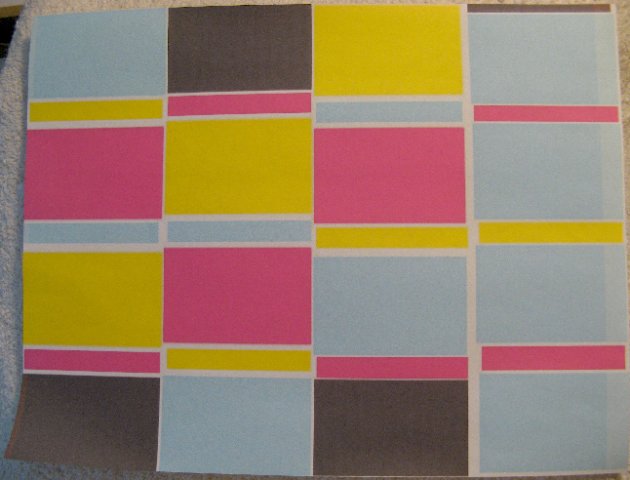
Image #3 I made this morning. BTW the color blotches are from Neil's test page. This image is on plain paper. Overspray set to minimal. Except for the thin band of brown instead of black on the left, and the wider band of brown rather than black on the right (due to minimal overspray ??) the print looks pretty good.
Notice there is no appearance of Rusty on the plain paper image. Just as there was no appearance of Rusty on Image #1 (plain paper also). Rusty is definitely not the same thing as the brown band. The brown band is solid and consistent. Rusty is strippy, has varying intensities and is more red. Just as when I print photos. Rusty doesn't appear on plain paper, but always appears where black is part of the last inch and a half of a print on photo paper. Incase you're wondering, these prints on plain paper use the plain paper setting, and the prints on glossy photo paper use the glossy photo plus setting.l
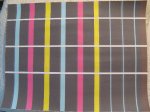
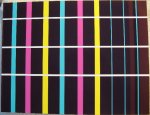
Image #4 is the same as #3 except it is on photo paper. ... and it is completely different from the way #3 came out
The entire rightmost inch and a half of the page, but only where there is black, is Rusty's kingdom.
Now that I look at the left edge under a magnifying glass ... That looks like Rusty also. In fact, although I doubt if this can be seen in the upload, even good looking patches of black are micro-dotted with a Rusty color!
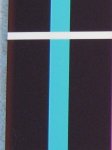
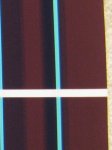
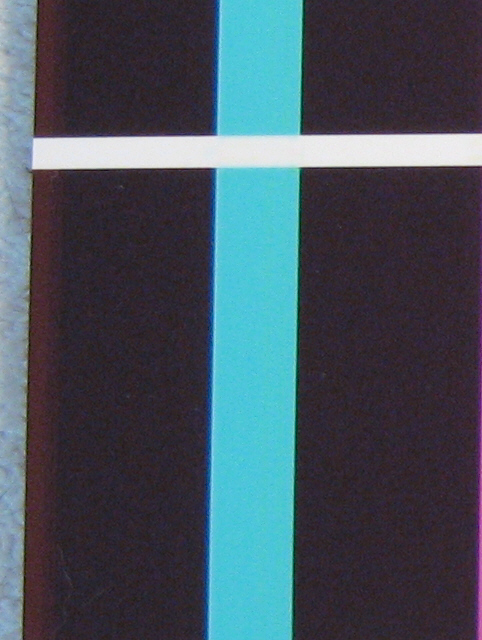
Here's two close-ups of the left and right middle of the page:
Hope this sparks some conversation, ... and maybe some light as well.
yuyakay
All images show the trailing edge of the paper as the right side of the image. All images have to printer settings on Custom/diffusion/QualityHighestAvailable. The borderless setting is chosen, and the overspray setting is set to minimal except for the last of these 4 images, where it is set one notch right of minimal.
This first image is on plain paper. On the very left edge the black & cyan are light (actually the black being brown). This is probably due to overspray being set to minimal. The yellow and Magenta nevertheless go right to the edge in full color. On the right edge, there is a sizable band of light cyan. Again yellow and magenta are good to the edge of the paper. I didn't notice at first until I saw the 2nd image which I will show, but seeing that, I went back to this first image and saw that the black in the upper right corner (trailing edge of the paper was brown at exactly the same place where the cyan turned light.
The second image is the same thing on glossy photo paper. Looking at this now, I'm wondering if perhaps I didn't set the overspray one notch right of minimal on this image too. (The other being the 4th image). Here's where it gets interesting. Other than a little bit of color getting onto what should be virgin paper ... nothing serious, the print came out very nicely ... UNTIL
... the upper right corner black ! There is my nemesis, Rusty. It's not the cyan or the red which is causing the problem. It's the Black! The black every else however is just fine. Furthermore, as Rusty appears exactly where he did in my print of the hummingbird, about an inch and a half from the right edge, that is too far from the edge for the overspray issue to have anything to do with it, I would think.
Here is a closeup of that right corner. This closeup is not image#3 or any of my four mentioned images. ... It is a bonus!

Image #3 I made this morning. BTW the color blotches are from Neil's test page. This image is on plain paper. Overspray set to minimal. Except for the thin band of brown instead of black on the left, and the wider band of brown rather than black on the right (due to minimal overspray ??) the print looks pretty good.
Notice there is no appearance of Rusty on the plain paper image. Just as there was no appearance of Rusty on Image #1 (plain paper also). Rusty is definitely not the same thing as the brown band. The brown band is solid and consistent. Rusty is strippy, has varying intensities and is more red. Just as when I print photos. Rusty doesn't appear on plain paper, but always appears where black is part of the last inch and a half of a print on photo paper. Incase you're wondering, these prints on plain paper use the plain paper setting, and the prints on glossy photo paper use the glossy photo plus setting.l

Image #4 is the same as #3 except it is on photo paper. ... and it is completely different from the way #3 came out
The entire rightmost inch and a half of the page, but only where there is black, is Rusty's kingdom.
Now that I look at the left edge under a magnifying glass ... That looks like Rusty also. In fact, although I doubt if this can be seen in the upload, even good looking patches of black are micro-dotted with a Rusty color!

Here's two close-ups of the left and right middle of the page:

Hope this sparks some conversation, ... and maybe some light as well.
yuyakay
HEY just a note about the ink company Inkcessories..0rrrrrr now it's called OfficeStoreDepot...or OSD for short.....I've seen a few complains on here about this companies service....well, at the beginning or March, I ordered a printhead and 20 cartridges of ink. I recieved the ink but no printhead......a lot of good that is......I have tried to contact them by the 1-800 but it doesn't work here in Canada....I also, tried the 626 phone number in California but no one ever answers the phone.....I sent them 3 e-mails and asked for replies as to the where abouts of my printhead but they never reply..........I will NEVER do anymore business with them and this does look bad for business from other countries doing business with the states.....SHAME.....
- Thread starter
- #36
- Thread starter
- #37
Well I did some more experimenting today. The problem is the uneven rusty smear that occurs only from black and only in the last inch and a half of full page print. This problem occurs regardless of the borderless overspray setting, and regardless of quality level setting. There is however one thing that will reduce the problem. If I choose the "Plain Paper" setting, then the black is good throughout the page except for the last 1/2". Notice this setting gives me one inch more of good printing before the problem occurs. As black otherwise has no problems, it seemed to me like a software problem. I tried installing Canon's newest driver, which is incidentally very new dated 4-1-08. The new driver changed nothing about the problem.
I sure would be interested to get some feedback from somebody about what might be happening. The black ink is not corrupted, the printhead is not physically smearing the paper. For some reason Magenta seems to be aberrantly firing during the last inch and a half ... but only the last 1/2" if set on plain paper. Totally Weird.
I sure would be interested to get some feedback from somebody about what might be happening. The black ink is not corrupted, the printhead is not physically smearing the paper. For some reason Magenta seems to be aberrantly firing during the last inch and a half ... but only the last 1/2" if set on plain paper. Totally Weird.
Trigger 37
Printer Guru
- Joined
- Dec 23, 2006
- Messages
- 607
- Reaction score
- 4
- Points
- 136
yuyakay,... Well I'm not very fond of your color test samples, but they do tell the story. I can tell you what it is doing but I don't yet know why. On the last 1" of the page you are getting what you call a "Smear". It is not a smear at all. It is totally consistant starts at the same point all the time and runs the full width of the page. It is also not what I guessed it was. In my guess I felt it would be random and start at various points and fade in and out. It doen't do this and it is absolutley not ink starvation.
The black segments you see are not black at all but are equal parts of Cyan, Magenta, and yellow. So at the last inch of the page, all of a suddenly you get "Brown" for the full width of the page. Then it goes to black again, and then back to brown. If you look at the "Subtractive color chart" below,

You will see that just out side of the black center, equal parts of magenta and yellow produce red. To convert Red to Black you continue to add more Cyan and Yellow. If you don't add sufficient Cyan, you will probably get a dark brown color. If you don't add sufficient Yellow you will get something with a green tint. So my guress is that there is somekind of electrical signal that is shutting down the Cyan ink at the "one ink mark", and this signal comes and goes. It happens only on vertical movement of the paper. This gives me a clue that the problem could be with the paper feed timing wheel. Let me explain how. To make Black, it has to print many many dots of Cyan, Magenta, and Yellow, and they have to be overlayed in the exact spacing or you will get another color. Imagine the color chart above as ink spirted from 3 nozzles, Cyan, magenta, andYellow. If they are all located at the exact correct spot, the very center will be black. If you change the size of any nozzle, or the shape of any nozzle, or the location of any nozzle, you'll get all kinds of colors.
So my guess is that there is some grease or ink or some other kind of problem with the paper feed timing wheel and it is give the printer a bad location on the return print. This bad location is moving the dots such that the color appears brown instead of black. Remember, this timing wheel is what produces the lower number in the resolution of the printer. The iP3000 has 4800dpi x 1200 dpi. To achieve the 1200 dpi the printer has to move the paper at 1/1200" per step and that is what the wheel does. Most people can not even see individual dots at 300 dpi, so you can imagine how close 1200dpi is. Now imagine if you have a photocell mask that has black and clear spaces of 2400 dpi. That is what it takes to produce 1200 dpi signal. Smear a couple of these lines and you can't print in the right location for the entire width of the page.
I look forward to all the comments on this discussion. We learn a lot when others contrubute. By the way I found a similar problem with the horizontal timing strip and the ink printing problems it has produced. I posted the solution tonight.
- Joined
- Feb 24, 2005
- Messages
- 1,669
- Reaction score
- 183
- Points
- 223
- Location
- North of Boston, USA
- Printer Model
- Canon i9900 (plus 5 spares)
yuyakay,
Could you please run a test? Attach a "Post-it" to the back of the paper on the right edge so that it extends out about 2 inches. This will fool the printer into thinking that the paper is longer than it really is and may move/eliminate your problem.
It is possible that the printer lays down the ink at a heavier rate in some areas. As Trigger37 stated, black requires heavy layers of all 3 C/M/Y inks. If these inks are applied too quickly and the paper can't absorb them instantly, they can "pool" on the surface of the paper and generate a muddy brown color.
- Thread starter
- #40
First Grandad. Way earlier in this thread I mentioned that I had tried the post-it trick even before I started this thread. It made no difference, but thanks.
Trigger. Thanks for your reply. Yes I know (now) that we are not dealing with an actual physical smear. The mostly black test image was designed with virgin white spaces in an attempt to eliminate that possibility. The colors themselves were all taken from Neil's test image.
An obvious question from one who knows nothing, so I'll ask it without reservation. Why isn't the black ink used in the process of printing black ?
At this point, after eliminating a range of other possible causes, the timing wheel does seem to be a likely culprit ... but, why does the timing wheel operate correctly until exactly the same spot on the page every time? If a grease or ink was causing some kind of slippage, wouldn't that be random throughout the page? ... or is the timing wheel such that it only rotates once for the entire length of an 8.5 X 11 page, and that there is some kind of contamination on just a small portion of the timing wheel ? And why does changing the paper setting to "Plain Paper" consistently give me one more inch of good printing before the final 1/2" turns brown ?
Thanks.