ArgyllCMS printer profile GUI is on it's way

crenedecotret

Print Addict
Joined
Oct 5, 2006
Messages
220
Reaction score
89
Points
163
Hi everyone

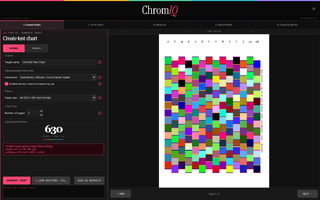
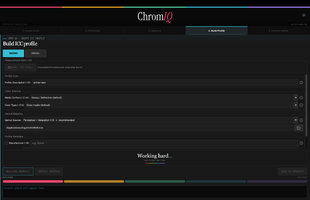
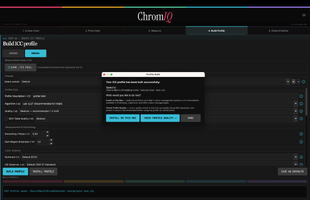
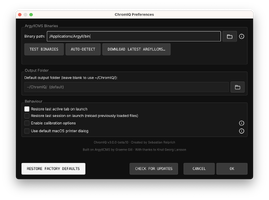
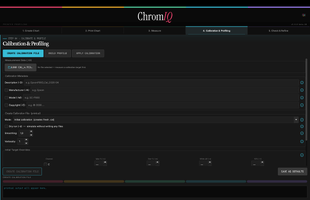
Just thought I would drop this here... it's not entirely done but when it is I will provide instructions. This is on LINUX but python is very portable
The "generate" and "profile" portions are not done.. those are the easiest to do. Having the software read the row layout correctly and having it talk to chartread was difficult.

1777434822249.png


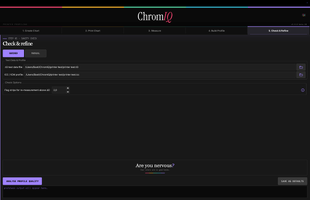
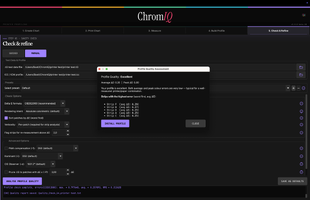
I also did a fun compare screen sort of like i1profiler and spyderprint but it only works once all the patches have been read. It may help spotting bad reads
1777435023936.png
 

pharmacist

Printer VIP
Platinum Printer Member
Joined
May 29, 2007
Messages
3,042
Reaction score
1,779
Points
333
Location
Ghent, Belgium
Printer Model
SC-900 ET-8550 WF-7840 TS705
A free version similar to i1Profiler interface for ArgyllCMS would be nice.
 

crenedecotret

Print Addict
Joined
Oct 5, 2006
Messages
220
Reaction score
89
Points
163
A free version similar to i1Profiler interface for ArgyllCMS would be nice.
I doubt it will ever be the same. Argyllcms was never really intended to be used outside of the command line. I1Profiler was built for a GUI

An example is the "split" color patches to check for errors. Chartread has no way of showing us the values for the strips. It keeps everything in memory so that's why I can only display it at end.

An another almost comical example.. My program is built to be able to click a row and read it again. The way I have to do it is have Python send F and B repeatedly to chartread to reach the column the user clicks.

I'm surprised at this point the wrapper works as well as it does :)

I'll probably reuse some code from pkpatches for the patch generator when I'm done with the chart reader.

I'll probably never add printing routines since I want to keep this portable between Linux and Windows.

Since a GUI would probably interest beginners, I also have some ideas for a two step process (like i1studio). I'm thinking step 1, print a 98 patch colormunki format profile Step 2. Use the first profile to precondition 98 more patches. Step 3. Combine both ti3 files and profile. I due time I suppose.. I've never even tested such a process it's super hypothetical in my head right now.
 

pharmacist

Printer VIP
Platinum Printer Member
Joined
May 29, 2007
Messages
3,042
Reaction score
1,779
Points
333
Location
Ghent, Belgium
Printer Model
SC-900 ET-8550 WF-7840 TS705
The idea of a 2 step-method with 98 patch start target + 98 patch secondary target like the 50 + 50 Colormunki/i1Studio method would be nice and probably produce better profiles than 50 + 50 patches as more sample points are used to sample the RGB color space.
 

crenedecotret

Print Addict
Joined
Oct 5, 2006
Messages
220
Reaction score
89
Points
163
I believe I was able to figure out the two step process or at very least do someting useful.

Here is a comparaison between my profiling tool (with new fancy 2 step process) and a multi-page profile I did with argyllcms
1778119676659.png


Now the first thing you are going to say is that it looks bad, but there is a caveat. The original profile was done with 1144 patches using proper procedures on an i1pro. The "combined measurements" profile was done with 30 patches on step 1 followed by 30 patches on step 2. All on 4x6 paper. This 2-step profile was done rapidly without even allowing the ink to dry for than 2 minutes. This was with a colormunki and it only took a minute to scan each set. With such a small set, I suspect that the colormunki might be better but even then, i'm not so sure. The reported gamut is smaller but it's dosent mean it's not accurate. It's probably OK for cheap snapshots on 4x6 paper. I havent printed with it yet. There is a difference in the soft proof as one would expect (remember 60 vs 1144 patches)

I'm hoping that with a 1 page + 1 page approach on letter or A4 paper where we have a realistic number of patches, we might get a better result than a normal two-page profile

Here is the method... the first page uses targen and then generates a preliminary profile. It can be small and super easy to measure with something like a colormunki (I'm allowing single and double density modes)

For the second page, I'm using code that generates a custom ti1. The code builds a candidate pool of about 10000 rgb values using a few strategies: uniform 3d grid, mathematical space filling, neutral axis and hardcoded perceptual anchors (skin tones, foliage, sky, etc).

Each of the candidates is then converted to lab space through xicclu and then graded based on
- novelty: DE distance from the nearest existing patch in pass 1, but i soft cap at DE 30 to avoid having candidate patches that the printer will never be able to improve
- region undecoverage: the algorhytm will add weight to areas we havent sampled as well
- neutrality bonus: since the 2nd set is an optimisation set, we give some additional weight to near neutral colors
- luminance balance: patches in under-represented luminance areas (shadows/mids/highlights) are given some extra attention

Once we have our graded candidates, we add one white, one black and 3 gray patches. The remaining patches are then selected based on their ranking BUT they need to be at least 2.5 DE away from the patches in the original step 1 measurements.

The result is a second patch set that measures where the preliminary profile was weak and was missing information. At least that's the theory

At the end, I combine the ti3 measurements from step #1 and step #2 and hope that colprof now has enough information to build a decent profile.

I'm probably run a bigger next over the weekend with full colormunki double density pages
 

crenedecotret

Print Addict
Joined
Oct 5, 2006
Messages
220
Reaction score
89
Points
163
I couldnt resist and I did a test print.

For 60 patches TOTAL, it's not terrible. For color images, I'm seeing a very small color cast towards yellow but it's only noticeable side by side with the 1144 patch profile. Black and white is pretty much unuseable with this profile.

This was matte paper loaded with OBA which is already a tiny bit more difficult to get good results due to the limited bandwidth. The small patch count might get better results with a better ink/paper combo but I ended up marking the 4x6 selection as experimental in the software.

The ink/printer i'm using is already pretty hard to profile.
 

itsab1989

Newbie to Printing
Joined
Feb 11, 2026
Messages
7
Reaction score
3
Points
8
Printer Model
Epson ET 8550, Canon Pro 300
I am working on a similar project but have not gotten much feedback here yet. My app ChromIQ is a GUI for the printing part of Argyll. In the beginning it was MacOS only but in the latest beta releases it works with Windows as well (but might still have some issues). I don‘t have this nice comparison view that you offer but I managed to create some profiles with it.

https://github.com/itsab1989/ChromIQ

This video is from an earlier version of the app. I made it for the person (Thanks again Knut!) who inspired me to do this and it shows the measurement and refinement process (more experienced users will probably not need this):


Attachments

  • Bildschirmfoto 2026-05-09 um 19.27.18.png
    Bildschirmfoto 2026-05-09 um 19.27.18.png
    165.5 KB · Views: 14
  • Bildschirmfoto 2026-05-09 um 19.27.25.png
    Bildschirmfoto 2026-05-09 um 19.27.25.png
    181.1 KB · Views: 13
  • Bildschirmfoto 2026-05-09 um 19.28.06.png
    Bildschirmfoto 2026-05-09 um 19.28.06.png
    199.5 KB · Views: 15
  • Bildschirmfoto 2026-05-09 um 19.28.14.png
    Bildschirmfoto 2026-05-09 um 19.28.14.png
    149.5 KB · Views: 14
  • Bildschirmfoto 2026-05-09 um 19.29.18.png
    Bildschirmfoto 2026-05-09 um 19.29.18.png
    260.6 KB · Views: 13
  • Bildschirmfoto 2026-05-09 um 19.29.58.png
    Bildschirmfoto 2026-05-09 um 19.29.58.png
    111.5 KB · Views: 13
  • Bildschirmfoto 2026-05-09 um 19.30.38.png
    Bildschirmfoto 2026-05-09 um 19.30.38.png
    183.9 KB · Views: 13
  • Bildschirmfoto 2026-05-09 um 19.30.49.png
    Bildschirmfoto 2026-05-09 um 19.30.49.png
    87.7 KB · Views: 12
  • Bildschirmfoto 2026-05-09 um 19.30.58.png
    Bildschirmfoto 2026-05-09 um 19.30.58.png
    207.6 KB · Views: 14
  • Bildschirmfoto 2026-05-09 um 19.31.19.png
    Bildschirmfoto 2026-05-09 um 19.31.19.png
    239.2 KB · Views: 11
  • Bildschirmfoto 2026-05-09 um 19.31.35.png
    Bildschirmfoto 2026-05-09 um 19.31.35.png
    126.7 KB · Views: 8
Last edited:

pharmacist

Printer VIP
Platinum Printer Member
Joined
May 29, 2007
Messages
3,042
Reaction score
1,779
Points
333
Location
Ghent, Belgium
Printer Model
SC-900 ET-8550 WF-7840 TS705
It looks nice: I will have a look at it.
 
Last edited:

itsab1989

Newbie to Printing
Joined
Feb 11, 2026
Messages
7
Reaction score
3
Points
8
Printer Model
Epson ET 8550, Canon Pro 300
For the printing part I am not sure yet. My goal was to make it so the user does not have to care about choosing the right settings to disable colormanagement. He should only select his printer, media size, type and quality and click print. I really hope it works this way with my implementation for macOS. In the end this was one of the main concerns why I did not make it available for Windows as well. But someone on GitHub requested that he wanted to use the default macOS printer dialog. And when I added this option I figured that I could make it this way for Windows as well. But maybe there there is still a better solution. I mean Adobe Color Print Utility can do it. But some chats with the AI suggested that Adobe might be maintaining a database of printerdrivers and how to manipulate them to get the desired outcome. This is something I certainly cannot do.
Tomorrow my usage limits for my two Claude accounts will reset and I will then try to fix some more things and add some more features that were requested. At the moment the app does not show gamut volume and coverage - a tester asked for this. Maybe it could even show a 3D visualisation of the icc profile. I will try.
 

itsab1989

Newbie to Printing
Joined
Feb 11, 2026
Messages
7
Reaction score
3
Points
8
Printer Model
Epson ET 8550, Canon Pro 300
I also like the idea of the two step process with a pre-conditioning profile. I just have to admit that I have no idea how this process works with Argyll. My knowledge about the whole topic is sadly pretty limited.
When Knut (aka soul-traveller, knowing or know) released his Argyll Printer Profiler script it was the first time I managed to create profiles with my i1Studio and I learned from there. With that starting point I read more of the Argyll documentation and had a few chats with the AI about it. However it is a lot to learn.
I was a aware that this pre-conditioning process exists but not what is required for it. I thought you would simply throw in an icc that you created before and it would then magically work. Therefore I implemented a logic that when the user selects an icc profile for this it gets copied to the working folder and „pre_“ ist added at the beginning of the filename if it is not already there. Just so this icc profile dies not get deleted in the process.
But reading your post and the the documentation I figured that some additional configuration is necessary. Of course it would be pretty easy at this point to automatically set those settings when the user selects a pre-conditioning profile (even in the easy guided mode), but the problem is: I don‘t know which settings would be correct or good.

It seems like you know a lot about how things are supposed to work. So maybe we could „team up“ for further improvements. You also seem to have experience with Linux which I don‘t have - at all.
I figured that for the app to be of interest for people I needed to add support for Windows instead of making it macOS only. But the last time I had a Windows machine it came with Windows 7. I set up a Win11 for ARM virtual machine on my MacBook just for developing the app. But even getting the Argyll driver for the i1Studio to work was a pain because I needed to disable some system security thing before it would allow me to install it. So Intried to implement a fix for this in the app as well but to be honest I have not yet tested if it works.
So for Windows I have at least a rough idea about how things should be working but I would probably not be able to make this thing compatible with Linux.
 
Top