- Joined
- May 29, 2007
- Messages
- 2,736
- Reaction score
- 1,538
- Points
- 313
- Location
- Ghent, Belgium
- Printer Model
- SC-900 ET-8550 WF-7840 TS705
Thanks to member CLS and his tips of creating a printer profile I did some experiments on both a simple printer profile and a high quality profile. Now the whole thing is about that amazing X-rite Colormunki device, capable of creating amazingly good printer profiles.
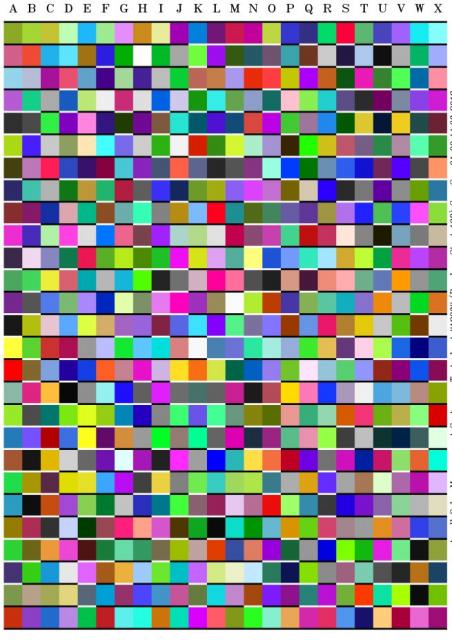
CLS was able to squeeze 675 patches on a single sheet of A4 paper, but I had significant problems to have these tiny patches to be scanned reliably. It was too cumbersome to have these patches read in just one go, so I decided to lower the amount of pathces to 648 (24 rows of 27 patches). Now why 648 ? I used the following calculation: 8 steps in each RGB-direction will yield 8^3=512 individual steps in each XYZ-direction of the RGB-axes and adding 128 grey steps to neutralize black&white printing + 2 patches for white + 2 patches of black makes: 512 + 128 + 2 + 2 = 648
The results are really amazingly good for out of gamut colours and black&white prints, I find it even better compared to the profiles I make with the standard X-rite Colormunki workflow with 2x50 patches + 2 optimization charts, especially in visually rendering the out-of-gamut colours. Argyll CMS created printer profiles tend to work best with the relative colorimetric intent for out of gamut colours, unlike the Colormunki produced profiles, which prefer perceptual content.
What about more patches ? Well, I also created a profile with twice the amount of patches on 2 sheets of A4 paper (1296 in total, including more than 10^3=1000 steps in each RGB-axes). I softproofed with both profiles on a test file (PrinterEvaluationImage_V002_ProPhoto.tif) and I could hardly see any difference (actually nothing at all) in those 2 "different" profiles. To be sure, I also printed the test file using both profiles to compare visually. I cannot see the difference with a profile made with "just" 648 patches compared to the higher patch count profile using 1296 patches. Skin tones are the same, Out of gamut color ramps are equally vivid without any artifacts and the black and white area's of the picture are equally good and neutral.
My workflow (A4profile is the name of the file I have used):
targen -v -d2 -G -e2 -B2 -g128 -f648 A4profile
printtarg -v -ii1 -a0.90 -A0.90 -b -T360 -m0 -M0 -P -p210x297 A4profile
Now the produced A4profile.tif file must be manipulated and cropped in Photoshop to remove the right text column and to crop and resize the whole image to A4 and 360 dpi resolution.
No more 2 or more step printer profiling with the Colormunki software and just one sheet of A4 is enough to produce a more than satisfactory printer profile.

")