Too much ink from 5PGBK ?

martop

Getting Fingers Dirty
Joined
Aug 23, 2008
Messages
56
Reaction score
0
Points
29
Location
Prescot UK
Hello again, tis me, martop the unlucky,

I have been refilling my ip4300 carts for about 2 weeks and not a problem, well thought not a problem till last night when some of the print outs had a black smudge on the leading edge of the paper, so I did a light head clean and also cleaned the bottom feeder with the folded paper fed from the top feeder, I did this untill the paper came out clean, so 'thought' it was sorted. a while later we tried printing on card, again fed from the top feeder and it had a black smudge on its leading edge.

I got fed up with canons method of cleaning so pulled the printer down to my bench to see if any ink had messed up anywhere but, besides the sponge strip the runs under the print head being a little inky, everything looked ok. I checked the carts to see if any had a leak, all bone dry, not even a drop around the head seals. Only thing left was the underside of the print head, so I removed it and found the black print head had black ink spread along its sides, it was quite thick, so wiped it off with a buddy and some clenaing fluid, sticks it back in the printer and loads the carts.

The test prints I did where ok but about 3 hours later the back smudge was back, taking the print head out again I could see it was covered with black ink.... Cleaned it up again and put the head back in but this time loaded a new oem 5PGBK cart, left it over night and this morning tested the printing, seems ok with the oem cart.

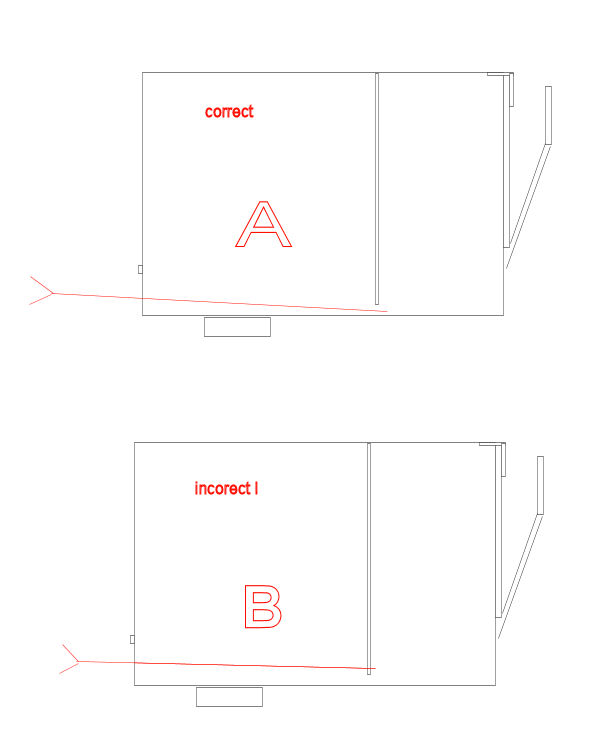
So got to think about this, it seems ( I could be wrong though ) that too much ink was getting through. At the moment I am using the pigment black that came with my redseter from germany so surely that cant be too thin, then gave the refill method some thought, as I cant find any plugs to seal the top fill hole method I opted for the german method, this led me to examine the cart I refilled, after it was emptied and cleaned I noticed the needle had missed the slot at the base of the cart and had gone through the wall a few millimeters higher. A shows how it should be done and B shows what I beleive I have done, using a sharp needle its easy to burst through the ink chamber.

3527_image1.jpg


I know this is a long winded post so thanks for bearing with me.. so is it possible by missing the slot and making a small hole with a 22 gauge needle to make the cart feed to much ink ? to me, it seems the feed hole aready in the cart is big enough for a needle to pass through but not big enough to overfeed the ink. I know some cheap inks may mess the heads as well as a leaking cart but this cart is well sealed. I even tried pressing the sides of the cart to expell about 5 drops of ink, not easy as it seemed reluctant to part with any ink.

If making a hole in the wrong place has messed the cart I may seal the holes in the other ones with melted polypropelene and use the top fill method but will have to wait till I get those plugs from hobbicolours as the ones I have came from a refill kit and do not make a seal and dont fancy using a glue gun.

Next question, is it normal for the black print head to have some ink on its underside and can anything else cause the black ink to smear the leading edge of the paper, I hope its not a fault with the printer as sending this back for a repair or service will cost half the price as a new one in postage alone !

martop
 

Guardian

Getting Fingers Dirty
Joined
Sep 8, 2008
Messages
12
Reaction score
0
Points
22
That's a tough one.

Haven't tried the German way yet, and I'm quite reluctant to leave the filling hole open. That said, I'd probably try to refill another PG5BK by the book and see if it helps. Bottom of the printhead can be (and with Canons very often is) mucky, it shouldn't affect the printing.
There's another black in IP4300, double check it too :]

Also, how old is your printer and do you use it a lot? Perhaps waste ink tank is overfilled? Sorry, those all are long shots... :/
 

martop

Getting Fingers Dirty
Joined
Aug 23, 2008
Messages
56
Reaction score
0
Points
29
Location
Prescot UK
Guardian,

thanks for your reply, your suggestions are not long shots, The info about the under side of the print head was usefull, I managed to clean it and the long sponge thats under the print head.

Powered off the printer in its off position. lifted the sponge by the left side and carefully pulled it out. Soaked it in warm soapy water and gently pressed it till the ink came out and water ran clear. dried it by laying it on a folded kitchen towel and gently pressing the water till dry.

cleaned the tray under it with a dr wipe damped with warm water.

1) powering up the printer and open the lid to bring the carraige into the service position. power off the printer
2) remove the ink carts and print head.
3) I folded a non fluffy dry wipe into 4 long was, damped with water laid the folded dry wipe flat under the head unit, pressing it flat with one hand and guiding it under the print carraige .

4) slid the carraige to the right and left so the bottom wiped on the dry wipe underneath.

repeated steps 1 to 4 till the wipe was clean.

Replaced the print head and carts and it seems to print with no marks, well so far it does.

The printer is just under 9 months old not sure how much its been used but its on the 5th set of carts now.

I did another check of the print head and its clean so its got to be this cart I messed up, well it was the first time I refilled it just seems I was to eager to drive the needle in :-( with hindsight I would have refilled 'by the book' untill I was more confident. that seems the more time tested method and really looking at it, if I do the refilling carefully and plug the vent and drain the drops into the bottle I should make no more mess than I do lumbering around with a sharp needle !

It is odd that this printers 9 months old and as dirty inside as my 7 year old hp920c. As the ink monitor has not ben disabled I could send it for a repair if it turns out to be faulty, but am worried about the cost of postage here in the uk as well as what happens to my ink carts thats inside, I can foresee it coming back with empt carts :-(
 

on30trainman

Printer Guru
Joined
Jan 22, 2006
Messages
310
Reaction score
0
Points
109
Location
Philadelphia, PA area
martop,
I have an ip6000D that I use exclusively for photo printing. I started getting the black smudge on the trailing left edge of each print coming out of the printer. Even occasionally I would get a smudge on the leading right edge of the print. This had just started recently. I pulled the printhead and saw some black ink on the printhead at the edges of the ceramic rectangle near the printed circuit strip. cleaned it off and printed - no smudges for several prints, but it started up again. It was then I noticed that I had loaded many sheets of photo paper into the rear sheet loader - they had been sitting there several days. They had gotten a definite curve to their face due to sitting in the feeder - the curve was such that the edges were sticking up noticeably. In the past I had mostly only loaded a sheet or two when printing. I took a few pieces and put a slight negative bend to them such that they now sat flat. That took care of the problem in most cases. I have printed at least 30 prints in the past few weeks and only one of the prints had a smudge - maybe didn't bend the edges enough. I only load one sheet at a time now and always gently bend back the edges. The paper I use is Kirkland Glossy from Costco. Never had the problem with the Staples Matte paper I sometimes use, but that paper seems to stay very flat. The Kirkland paper seems to get the slight curve even when stored in the box. If this might be your problem, just don't overbend the paper. Only a slight pressure to flatten the paper out. Has never happened on the very few times I use regular printer paper - like when I do nozzle checks or such.

Steve W.
 

avolanche

Print Addict
Joined
Jun 5, 2007
Messages
247
Reaction score
64
Points
178
Location
East Tennessee
martop,
First,I really doubt if the hole in the "divider" amounts to anything at all.The German method is great.I started out with filling through the original fill hole in the reservoir and have now gone all German-method.I did it mainly to be able to purge.The plugs,for me,are not fail-proof and I got some leaks, so I'm using stainless steel screws AND hot glue once the empty has been purged.Then I make the small hole and do the German method.If I ever have to purge again,I'll remove the glue and screw.

The black ink problem is somethinh I've had a few times.Usually a "cleaning" from the menu fixes it.I have also removed the head and used a lint-free cloth to clean any areas I could access.Sometimes there was an excess of ink "down in the innards".

The other thing you might chech is to make sure you don't have an overfilled or leaky cartridge.I always like to squeeze the sides once to make sure there is not excessive ink.
 

Aussieinker

Getting Fingers Dirty
Joined
Sep 5, 2008
Messages
41
Reaction score
0
Points
22
Location
Melbourne
I used a modified German method on the 5PGBK by drilling the hole half way up the face and using a modified syringe with a 50mm needle adapted onto a garden hose with heatshrink tubing (internal glue type), then hose out the residual ink (almost like reverse liposuction) when finished run a couple of syringes of distilled water through the sponge, then with a small air compressor use the drilled hole to blow out any remaining water from the sponge. With a 50mm needle the tank port can be reached to refill with ink. This method is best done outside to keep sweet with the Cook.

I have been through the wall down low as you describe but it did not seem to result in too much ink.

Th flushing method above works well on CLI-8s the colour of the dye dissappears in about 20 seconds and leaves a perfectly clean cart. If any liquid goes into the ink chamber place the needle in like you are going to refill and suck it out.

When flushing do not use full pressure!! the cart and needle stopped 5 Meters away.
 

martop

Getting Fingers Dirty
Joined
Aug 23, 2008
Messages
56
Reaction score
0
Points
29
Location
Prescot UK
on30trainman,

Thanks for the info regarding bent card, I had not considered the card bending as such, even though the card we used does have a slight curve when it leaves the printer, I cleaned the under side of the print carriage only because I beleived ink may have built up enough to smudge card as its thicker than paper. There was a fair bit of ink there.

This bending of the card you mentioned led me to look at the card thats in the pack it came in, it is in fact curved and flexible so this could be why the smudges affected this card more than other ones we use, as it comes under the print carriage it actualy scrapes it and picks up a small drop of ink, then the carriage spreads it ;-(

I think this problem is worse with this type of card as its pre folded for making cards. glad to say that since cleaning the carriage there does not seem to be any marks on the card, however as in your case, it may return but now I think its the card not the printer allthough a clean wont hurt the printer. The card was fed in one at a time and a test here showed it does bend when placed in the top feeder, something I never considered befor.

I may try applying a slight negative bent as you suggested you do or may look for a better brand of matt card as this is a wilko own brand.

Thanks again for your reply, most usefull.
 

martop

Getting Fingers Dirty
Joined
Aug 23, 2008
Messages
56
Reaction score
0
Points
29
Location
Prescot UK
Aussieinker,

Thank you for your reply, It does seem odd that ive used the german method on all the other carts but this one cart seems to be giving more ink to the head, after some thought I believe there may be more too it than just 'more ink' it could be the ink ( not sure as its a good quality ) or in fact a fault with the cart as so far a new oem cart is not causing problems. Maybe the pigment cart is more prone to this as its a wider cart or maybe I did more than just make a new hole in the divider wall, I will only know this when I was the cart out and take a look inside.

I did purge this cart as it was laying around for a few months, I did put the orange cap back on and stored in in a air tight box but being new to refilling.... I discovered a thing called the vent hole months too late !! the way I washed the cart was to remove the ball plug and connect a hose to the cart and turn on the water, this resulted in the cart flying across the kitchen as the plastic hose I have is not that easy to fit on the outlet hole, you can imagine the mess.

It could also be that I put too much ink in this cart and its dripped to make a mess under the print head, there was ink on the corner of the head on the contact side. so far I think the cleaning and changing the cart has solved it but as on30trainman mentioned, bent card is something of a problem :-(

I am more carefull about washing the carts out after my first attempt, I really do have to keep the cook happy as she supplies the latex gloves and other bits used for this new adventure.

I take it when you mean 'modified german method' your method moves the drill hole from near the base of the cart to higher up so you refill by going in at an angle to reach the ink chamber ? That sounds interesting as then you are drilling near the low density sponge.

Thanks again for you reply, its given me more ideas !
 

avolanche

Print Addict
Joined
Jun 5, 2007
Messages
247
Reaction score
64
Points
178
Location
East Tennessee
Martop,
Leaks are most often due to overfilling.....or too much air getting into the cartridge during use(like a poorly sealed fill hole in the reservoir-one more good reason for using the German method).I really see no advantage to making the hole higher up the wall(German Method).Keep it as small as possible and avoid having to bend the needle.If you are really worried,tape off the needle hole after fills.

Did you squeeze it to make sure there is not excess ink?Another thing that happens is that the sponge moves slightly upward inside the cartridge.Just hold it in normal position as it would be in the printer(label up) and tap it on a hard surface to seat the sponge to the bottom of the cartridge.

The sponge will often dislodge during a purge or due to the needle pushing through it(especially a blunt large gauge needle will move it) and you must tap it to place.
 

Aussieinker

Getting Fingers Dirty
Joined
Sep 5, 2008
Messages
41
Reaction score
0
Points
22
Location
Melbourne
Avolanche

The reason I drilled higher up was to avoid being near the exit sponge, seems to work ok for me I have never had to reseat one yet.

Does anyone know what the purpose of the vertical grooves just near the ink crossover point inside the cart.

Also how to buy Propylene Glycol in less than a 200Lit drum.

Martop
It's easy to punch through in the vertical groove area but a hell of lot harder away from that, have just spent a bit of time stripping a 5PGBK and the sponges don't seem all that different in density,maybe packed tighter but on teasing the fibres apart look the same.
 
Top