Sealing the refill hole BCI-6 BCI-3

phipham

Newbie to Printing
Joined
Jan 28, 2007
Messages
2
Reaction score
0
Points
6
this may seem anticlimatic but when i refill canon cartridges, i just pull the original plug from the old cartridge and reinsert it after i refill.

To do this i just use needle-nose pliers and a small screw. Heat up the tip of the screw on my gas stove till i can see a slight glow, then i embed it into the plug (not all the way through). Once it cools enough, the plastic will harden. at that point, i just pull on the screw and the plug should follow. cool in running water and break the grip of the screw (you may have to use pliers but make sure you sandwich the plug with some paper or you may damage the plug with the teeth on the pliers). The point is to have the screw loose enough to unscrew from the plug after you insert it back on the cartridge.

the beauty of this is you only have to do this once. any subsequent refills, you just have to use the same screw to thread onto the plug and pull.
 

mikling

Printer VIP
Platinum Printer Member
Joined
Jul 2, 2006
Messages
3,239
Reaction score
1,471
Points
313
Location
Toronto, Canada
Be careful with this process because in my experience I have found that after a few re-insertions it does not reseal perfectly sometimes. This is however, the best way to remove the ball and leave the inside hub intact for the 8-32 screws that I use. With this hub, you can tighten the screw enough that it can actually distort the cartridge. This ability to tighten with reckless abandon ( not that you should) means you can have perfect seals without o-rings since you end up deforming the plastic edge against the taper of the countersunk screw.
 

Tin Ho

Print Addict
Joined
Apr 24, 2006
Messages
866
Reaction score
26
Points
163
Wouldn't it be easier to drill a new hole and use a plug to seal the new hole? I thought I saw you posted in a thread introducing a plug from a company in Canada? I found it much more difficult trying to extract the original sealing plastic ball used in OEM cartridges. Using a soft plug would be much easier. If you can extract the ball easily then using a screw to reaeal will be easy too.
 

mikling

Printer VIP
Platinum Printer Member
Joined
Jul 2, 2006
Messages
3,239
Reaction score
1,471
Points
313
Location
Toronto, Canada
Using a ring eye self tapping screw with the aid of an initial hole made by heating a metal wire into the ball makes the process foolproof. Thank Lilla for that suggestion which I have now done numerous times and works superbly! Plugs can slip and just didn't have the sealing power as the screw does. The investment in time on removing the screw pays dividends down the road when one considers the OEM carts might last a very very long time with flushing.
 

Lilla

Getting Fingers Dirty
Joined
Oct 20, 2006
Messages
98
Reaction score
0
Points
34
Location
Seattle WA area
phipham said:
this may seem anticlimatic but when i refill canon cartridges, i just pull the original plug from the old cartridge and reinsert it after i refill.

To do this i just use needle-nose pliers and a small screw. Heat up the tip of the screw on my gas stove till i can see a slight glow, then i embed it into the plug (not all the way through). Once it cools enough, the plastic will harden. at that point, i just pull on the screw and the plug should follow. cool in running water and break the grip of the screw (you may have to use pliers but make sure you sandwich the plug with some paper or you may damage the plug with the teeth on the pliers). The point is to have the screw loose enough to unscrew from the plug after you insert it back on the cartridge.

the beauty of this is you only have to do this once. any subsequent refills, you just have to use the same screw to thread onto the plug and pull.
Thank you. This is a common sealing method and it belongs in my list of various screws used. I added it along with a pointer to your post (see post #159 this link.)

Actually, I did it your way for many years. I sealed my Canon BCI-6 OEM cartridges by putting a small eye-screw through the ball in the original fill hole using the instructions here. These instructions are similar to yours, except it is a step-by-step instruction with pictures.

I recently decided to convert my cartridges to use nylon screws with rubber o-rings because...

IMG_3914_3909_web.JPG


o I confirmed that a cartridge was leaking air (not much, just a little), and I suspected this could be happening with some of my other cartridges. The next point below explains what I think caused this.

o I discovered that some of the small eye-screws had been inserted at a slight angle, such that the end of the screw was sticking out the side of the ball just slightly but enough that each time the screw + ball was inserted and removed the tip of the screw scratched/cut against the edge of the hole. I believe this (especially over time) is enough to allow some air to get through.

o I decided the procedure was too error prone for me. If you don't have a good eye and a steady hand it can be difficult to get the small screw to go straight into the center of the tiny ball as desired. At least, the ocassional one is apt to wind up sticking out the side creating the problem described above.

o I discovered that some of my eye-screws were not stainless steel; a few rusted enough that they broke off when I tried to remove them. I had a devil of a time removing the balls with embedded rusted screws broken off in them.

Lilla
 

Defcon2k

Printing Ninja
Joined
Dec 1, 2006
Messages
105
Reaction score
2
Points
94
Location
Germany
It seems the possibilities of sealing the refill hole are endless... :)
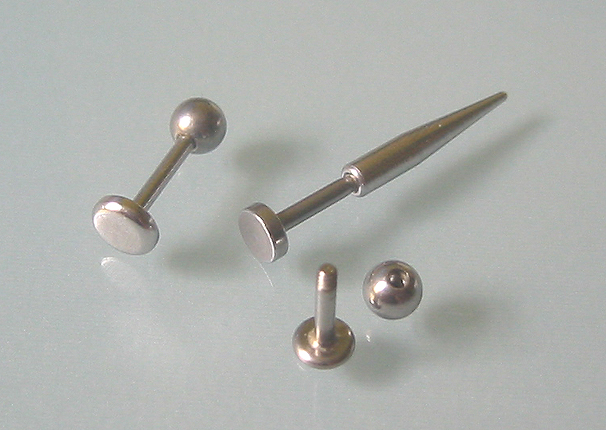
Gismo2911 from a german forum likes to replace the original canon balls with stainless threaded piercing balls. Just put the screw on the ball if you want to remove it for refilling.

piercing5g0.jpg

Labrets.jpg
 

InkMon

Getting Fingers Dirty
Joined
Apr 16, 2007
Messages
93
Reaction score
0
Points
29
Location
Australia
Just to add my spin and I apologise if I missed this method mentioned. I refill and to seal I use Hotmelt which is quick and if you leave a bit proud it can be pulled out easily. It conforms to the hole and with the Epson tanks where the fill position is underneath the tank, leakage would be a big problem as would any large protrudance.

The one precaution I take is in having a spare set of carts refilled and wrapped in tissue to show any leaks before use.

Terry
 

Defcon2k

Printing Ninja
Joined
Dec 1, 2006
Messages
105
Reaction score
2
Points
94
Location
Germany
Here's another interesting method: special carts where you don't have to seal the hole at all and which can be refilled inside the printer.
I have no idea if this works well, though.
 

Frogroo

Newbie to Printing
Joined
Sep 4, 2007
Messages
2
Reaction score
0
Points
6
Hi there from "Down Under"
What a shame you guys did not come here for the APEC instead of Bush (I don't think he would be a great help with Cartridge Refilling!)
I just went through my first go with my Canon IP4000 and finally seem to be on top.
My Aussie kit had a lousy little screw (to tight for the needle) and a square cm of putty we call here "Blue Tack" . At first it leaked 'cause of the original paper around the filling hole was soaked with ink and lifted the putty, now it seems ok after 2 days. I keep my fingers crossed! ( I should add I was also a lousy operator - did not read the instructions whatever they were, and did not search on the net but after!)
When I'll recover from the "ordeal"! I will give your screw a go.
One should not stress enough the need for reading, thinking and preparation before attempting this.
Now I've got a large shallow plastic tray lined up with 2 sheet of paper, two containers (with clean and dirty water), tape scisors rags sponge putty and all and even a bucket of water - oh and plastic gloves as my first attempt left me with hands like if I was from Mars! I don't like the gloves but it's better than scrubing with bleach and h20 (1/20)!
It's very nice from all of you to share your findings in this way
Thank you again
 

Jane

Getting Fingers Dirty
Joined
May 18, 2005
Messages
45
Reaction score
0
Points
22
Lilla said:
phipham said:
this may seem anticlimatic but when i refill canon cartridges, i just pull the original plug from the old cartridge and reinsert it after i refill.

To do this i just use needle-nose pliers and a small screw. Heat up the tip of the screw on my gas stove till i can see a slight glow, then i embed it into the plug (not all the way through). Once it cools enough, the plastic will harden. at that point, i just pull on the screw and the plug should follow. cool in running water and break the grip of the screw (you may have to use pliers but make sure you sandwich the plug with some paper or you may damage the plug with the teeth on the pliers). The point is to have the screw loose enough to unscrew from the plug after you insert it back on the cartridge.

the beauty of this is you only have to do this once. any subsequent refills, you just have to use the same screw to thread onto the plug and pull.
Thank you. This is a common sealing method and it belongs in my list of various screws used. I added it along with a pointer to your post (see post #159 this link.)

Actually, I did it your way for many years. I sealed my Canon BCI-6 OEM cartridges by putting a small eye-screw through the ball in the original fill hole using the instructions here. These instructions are similar to yours, except it is a step-by-step instruction with pictures.

I recently decided to convert my cartridges to use nylon screws with rubber o-rings because...

http://www.nifty-stuff.com/img/files/IMG_3914_3909_web.JPG

o I confirmed that a cartridge was leaking air (not much, just a little), and I suspected this could be happening with some of my other cartridges. The next point below explains what I think caused this.

o I discovered that some of the small eye-screws had been inserted at a slight angle, such that the end of the screw was sticking out the side of the ball just slightly but enough that each time the screw + ball was inserted and removed the tip of the screw scratched/cut against the edge of the hole. I believe this (especially over time) is enough to allow some air to get through.

o I decided the procedure was too error prone for me. If you don't have a good eye and a steady hand it can be difficult to get the small screw to go straight into the center of the tiny ball as desired. At least, the ocassional one is apt to wind up sticking out the side creating the problem described above.

o I discovered that some of my eye-screws were not stainless steel; a few rusted enough that they broke off when I tried to remove them. I had a devil of a time removing the balls with embedded rusted screws broken off in them.

Lilla
I went through a similar series of things with pulling the Canon ball and reinserting as Lilla did except for the rust which I didn't get from the BRASS eye-screws I was using. I did have an additional problem of it sticking up to far from the top of the cart with the latest printer I have as mentioned in Lilla's link above.

I have read Lilla's article and have now gone on a search for a local (and not through the roof price wise) source to go to the nylon screw & O-ring method and have questions and comments.

I found the equivalent to the nylon screw Lilla uses at Ace Hardware for 20 (US) each but they wanted 69 EACH for an o-ring. I found o-rings to fit at a local oil well service/plumbing supply store for .05 EACH. I now have a set of 6 of the supplies needed.

I found a version of the screw driver (also, in stuff of my Dad's, but probably an antique version compared to Lilla's as my Dad was born in 1903 and died in 1963!). It is labled as QUICK WEDGE 17?4 and US PAT 2445388. Now to see if it helps in starting these screws. I do question if it is really necessary to cut the screws off how big a deal is it to turn them a few more times?? Really would appreciate an answer to the cut off question!

I have learned a lot from this group over the years and sure hope it continues!
 
Top