Refilling Canon Pixma ip4700 ?

Trigger 37

Printer Guru
Joined
Dec 23, 2006
Messages
607
Reaction score
4
Points
136
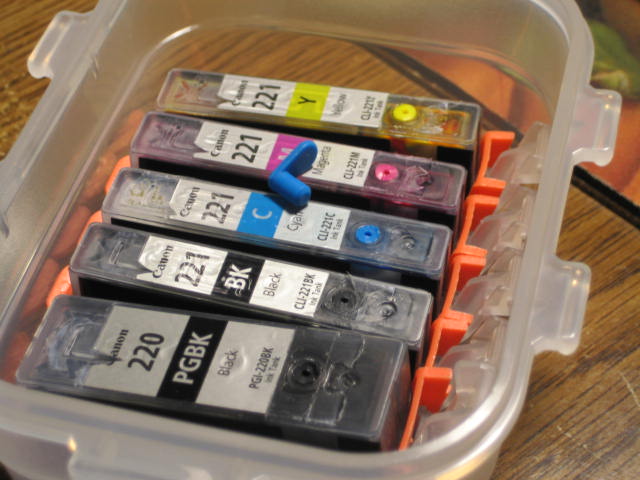
Well I may have to eat my words. After my post yester day I started testing the ink cart clearance in my MX860 and was shocked at what I found. When the top cover is opened and the carriage comes to the center,...it first moves all the way to the left side of the printer where the ink monitor station is located. At this point the entire carriage is "Raised another 1/4" or more and then move back to the center so ink cart can be replaced. At his point the top of the ink carts only clears the inside housing by 10+mm. While the housing does come up just about at the exact same point where the Canon refill ball is loccated, the housing has a "Rib that matches the same height as the rest of the housing. This means it is "Impossible for me to do what I wanted to do,,..ie,.. cut away the edge of the housing to get some clearance. The housing extends all the way to the side. It is the same for both sides. I would have to cut out a hugh portion of the housing on both side just to get clearance. I'm not going to do that. It is clear that Canon has done this to stop people from installing ANY ink cart,..theirs or Compatible,.. and use the top refilling process. There is possibly one exception and that would be to use "Very thin plugs" or Hot Glue gun for plugs. Mike at Precisioncolors has told me he has the exact plug and sells them with his CLi-221 refurbished Canon ink carts. This entire design could really create a terrible jam if even one ink cart "Popped" out of it's holder while the carriage is moving. As fast as the carriage is moving from side to side,..can you imagine what would happen if the ink cart jammed into the top cover. I have half a dozen of the thin Green plugs and I plan on doing some simple tests. I am also going to experiment with Hot glue gun. I've used it before but when it came time to refill again,..it was a bitch to get out.

If Canon has gone this far to stop the refilling,.. I would not put it past them to modify something in their cart design that would prevent anyone from using the German refill process.
 

mikling

Printer VIP
Platinum Printer Member
Joined
Jul 2, 2006
Messages
3,239
Reaction score
1,471
Points
313
Location
Toronto, Canada
Trigger I can think of at least two ways to stop the German method but then if I wrote it out then Canon would use it and we wouldn't want that would we?

There was a mould revision on the MX860. I know because on an MX860 I had for a couple of weeks, the plugs worked fine and cleared. So it looks like they decided none of that and added something. The MP560 I also have allows plugs as well. Again, if others have found otherwise, then there were mould revisions to stop it. Somewhere along the way..some exec gave orders.
 

Trigger 37

Printer Guru
Joined
Dec 23, 2006
Messages
607
Reaction score
4
Points
136
Mike,... I just checked my iP6600D and it does the same basic movement by raising up the carriage once the move it away from park. I also have to use flat head screws on the ink carts for that printer. It is just that Canon has cut the spacing down to abosolute minimum. As far as molding changes,..they did come out with the MX870 and I've check the spec's and I can see no difference between that one and the MX860,..they must have changed something. If anyone has one maybe they can post the info here.
 

joseph1949

Getting Fingers Dirty
Joined
Jan 24, 2011
Messages
188
Reaction score
0
Points
49
Location
Albany, Oregon, USA
To: Trigger 37

Based on your post #41 your observations on the MX860 are the same as for my observations on my MX870.

They are:

1. There is a major clearance problem.

2. When the print head moves across the carriage the print head does not move in a flat level line. The print head moves from side-to-side and up-and-down. This little dance causes two problems: the jerkiness will loosen the plug and the clearance problem is exaggerated from what it is when the print head is at rest on the right side.

3. Major cutting is involved to remedy the problem(s).

The easiest way to fix the problems is to use hot glue. I know that hot glue is a real pain, but I believe in the long run it is the best solution if you want to use the top fill method. You can use a very low profile silicone plug instead of the hot glue plug. Because of the jerkiness of the print head you will have to babysit the silicone plug until you are sure that the silicone plug will keep a good seal. In my opinion this will be an ongoing ritual. As time progresses the fill hole will be enlarged and thus, the silicone plug will not seal properly and/or the silicone plug will become smaller around its diameter and thus not providing a proper seal. If you use hot glue you will not have these problems.

Note: Even a very low profile silicone plug may not be low enough. You may have to remove some material from the cap. The cap should be no more than 1/16 high.

For information on how to solve top fill clearance problems please go to the following thread:

Top fill clearance by mrelmo

Pay special attention to the use of a Dermal tool to remove the printers case.

One of the major problems with using hot glue as a plug is that it is sometimes difficult to remove the plug cleanly. The following is what I do to remove a hot glue plug:

1. You will need to obtain 99 % isopropyl alcohol.

2. A soft removing tool. A sharpen pencil will do. You can make a removal tool from the handle of an old toothbrush. You can try a toothpick or you can use your fingernail. Do not use a hard metal object like a small screwdriver. The hard metal will cut into the plastic and thus, you will not get a good seal.

3. Cotton swabs

4. Dip the cotton swab into the alcohol. Remove the excess alcohol and dap the plug with the swab. Wait for a minute or two. Using the soft removing tool carefully pry-up the plug around its edge. Go all around the plug. After the plug is loosen around its diameter add more alcohol to the plug. You do not want to drown the plug in alcohol. You want to wait for the alcohol to loosen the glue that is in the fill hole. The key here is the edge/fill hole process: loosen the outside edge of the plug, add more alcohol, wait, and carefully pry-up the ENTIRE plug including the glue in the fill hole. YOU NEED TO BE GENTLE. EASE DOES IT!!!!!!!!!!!!!!!!

Note: You can facilitate removing the glue from the fill hole by doing the following:

Note: Do not add alcohol on the plug while you are performing the stepsalcohol and a flame do not mix!!!!!!!

1. Straighten out a metal paper clip.

2. Using a cigarette lighter heat-up the end of the clip. It should be red hot. Keep the flame away from the alcoholbig time.

3. With the tip red hot stab the plug. The hot tip should go all the way through the plug.

4. Remove the clip. The hole that you made in the plug will help remove the glue in the fill hole.

5. Now you can add alcohol.

Note: If you are feeling lucky, you can keep the clip in the hole until the glue takes hold around the plug. This could take 10 + minutes. When the glue has had time to set, take a pair of pliers and pull on the clip. If you are lucky the ENTIRE plug will come looseYippee!!!!!

Thank you.
 

Trigger 37

Printer Guru
Joined
Dec 23, 2006
Messages
607
Reaction score
4
Points
136
Joseph,...Excellent information. I appreciate you help and the knowledge about the MX870. I have one other suspecion on why that scrapped the MX860 and jumped to the MC870. In doing initial test of the 860 I find it extremely slow. No matter what fucntion you start if the printer has been setting for 5-6 hours (don't know the exact limits) the unit goes into a full cleaning cycle. In older printer it would only do this if it had been 24 hours since something was printed. This cleaning cycle seems twice as long as the older printers. I suspect they found something wrong in the timing after shipment of 1000's of units and didn't want to issue a firmware update for the expense. The love models so much and they do so many it was just easier for them to come out with a new model with all fixes embedded. Then they could just forget about the MX860 people. Over the last 6 years I have had several All in One printers starting with the MP730, which I still have in storage. Then i moved up to the MP780 and that was really a fantastic machine. Very efficient and very fast. Now my MX860 seems slower on every function. I am also concerned that in doing so many built in cleaning cycles it is really eating up the ink. I don't think most of the Canon customers realize that they just suffered a 25% increase in the cost of ink and a 35 % increase in the usage of the ink. The new ink carts are about 25% smaller, or hould 25% less ink than the originals,..and they cost me. By reducing the size of the ink carts by 25% and raising the cost per cart just a little, they have increased the cost of printing by 25%. If the built in cleaning function continue as they are, the price or Cost of using ink will double. Does anyone know anything about what built in fuction are shut down once a person "Disables the Ink Monitor" The reason I ask this is that I suspect that I'm wasting a lot of ink that is not necessary. I "Know exactly how to take care of printers,..I write books that teach others how to do this" I don't mind using the ink monitor if it is doing a good job,..but when it starts to waste ink doing too many cleanings,..I really get upset. I teach people to use their printers everyday and print something,..no matter how small,.. as this keeps the printhead filled with fresh ink and stops the build of drying ink and prevents clogs. One Canon cleaning cycle uses about 10 times as much ink as is used in printing a nozzle test print. It also gums up the works in the process.
 

mikling

Printer VIP
Platinum Printer Member
Joined
Jul 2, 2006
Messages
3,239
Reaction score
1,471
Points
313
Location
Toronto, Canada
Disabling the ink monitor will shut down the prism low ink warning not to mention the obvious software chip estimator function, but the more important part is the low ink warning which is a PHYSICAL detection and not estimated.

Each time you open the cover and close it, it will trigger (no pun intended) a priming cycle that will take a long time to complete. Despite the duration, the amount of ink consumed is not proportional to duration but it does waste ink though. The worst part is the waiting really.
The recommended course of action is to always use a resetter, have functioning chips and depend on the low ink warning of the prism system to schedule a refill session. That way, opening and closing the cover is not necessary.The Hat and I have pretty much checked this thoroughly and confirmed it recently. Considering what a resetter costs, this is highly recommended.

Finally, do not use a power bar to remove power from the printer. Startup will take a long time thereafter, the details of this I have not researched thoroughly to determine what exact conditions will make the long start. I just leave the printer on all the time or at most use the on off button.

It is obvious that Canon has added routines to bring ink to the printhead more frequently over what was done on the prior generation. Whether this was to waste ink? I'm not sure, but is more likely to protect the nozzles. The Pro9000 also suffers this tedious routine despite the CLI-8 generation.

When the parking station seals are in good condition and the purging unit working properly, the separate tank printers can go weeks even months and start up fine. While the frequency of printing stuff is a good thing, At this point, with a printer in good condition and refilled properly, I am no longer that concerned about frequency of use. Of course that period varies with the condition of each printer.

A good bed time reading of the service manual might reveal a lot of details of what conditions initiate what actions. the printer will take.
 

The Hat

Printer VIP
Platinum Printer Member
Joined
Jan 18, 2010
Messages
15,628
Reaction score
8,698
Points
453
Location
Residing in Wicklow Ireland
Printer Model
Canon/3D, CR-10, CR-10S, KP-3
A good bed time reading of the service manual might reveal a lot of details of what conditions initiate what actions. the printer will take.
Gee Whizz I use to read only fairy tale stories to my kids at bed time, darn.. :barnie :lol:
 

mrelmo

Print Addict
Joined
Apr 1, 2007
Messages
427
Reaction score
36
Points
161
Location
Buffalo, New York
here is a picture of the plugs that mike sells, after the plug is inserted i took a razor knife and cut the top of the plug flush to remove the plug just take a pin or other "pick" and pry the plug out, after doing this i have let the cartridges sit for several weeks in the cartridge clips and checked them for leaks which there was none, some might say that the cartridges will not leak when in a cartridge clip but that is not true, if you do not have a good seal from your plug when you remove the cartridge clip there will be an excessive amount of ink in the clip, it is normal to have one drop of ink in the clip from a refilled cartridge but not a lot of ink

2123_img_0263.jpg
 

mikling

Printer VIP
Platinum Printer Member
Joined
Jul 2, 2006
Messages
3,239
Reaction score
1,471
Points
313
Location
Toronto, Canada
I really did not want to recommend doing this to the plugs not because if would not work but rather for the fear that some plugs will slip inside when trying to get it out. I haven't tried this yet but rather than using a pin, I suspect if a screw is used to grip the plug, it will also work. Again. I have not tried this yet.
The sealing of the plugs does not take place on the top but rather at the bottom of the tunnel where it constricts a bit and creates a cinching effect to seal.

I think I might indeed try a few things with this method and see what bears fruit. Even when using the German method to refill, the removal of the plug makes for a much simpler and effective flush so mrelmo's suggestion is indeed worth further investigation and possible refinements.
 

Bertil

Getting Fingers Dirty
Joined
Dec 23, 2006
Messages
44
Reaction score
1
Points
24
I just use silicone to fill the hole I made to purge the cartridge.Now I wonder if you think I should use something else instead.Sofar I have had no problems with that.Would the silicone-when dry- affect the ink?
Bertil
 
Top