cmonkey
Getting Fingers Dirty
Some of you may have seen a link to a pdf of this method that I developed way back when...
I'm posting this with some additional notes on my experiences....
I've refilled BCI6, BCI3, and will soon be refilling my CLI8 tanks.
Enjoy
Heres an easy way to refill your Canon ink tanks over and over again.
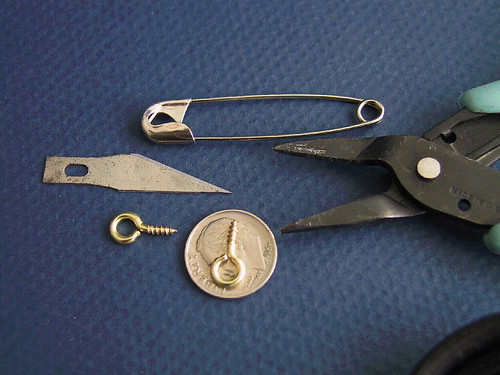
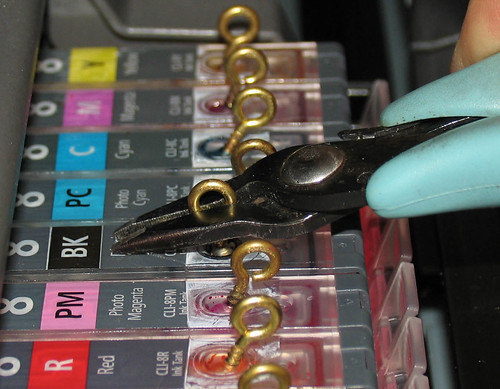
First youll need a knife, a safety pin or heavy-duty sewing needle, a pair of pliers and some small screw eyes
(I used size 216 ), rubber bands, and the original orange tabs to seal the tanks during filling.
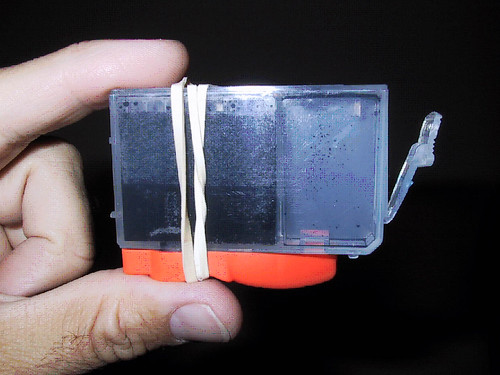
Reseal the tank with the original orange tabs.
With the knife, carefully score the label just below the text indicating the color.
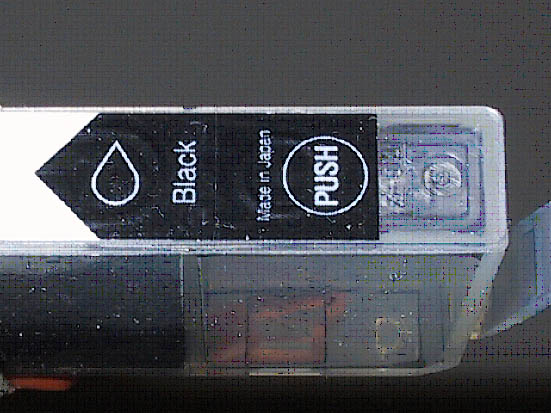
Carefully peel back the label to expose the nylon ball sealing the tank.
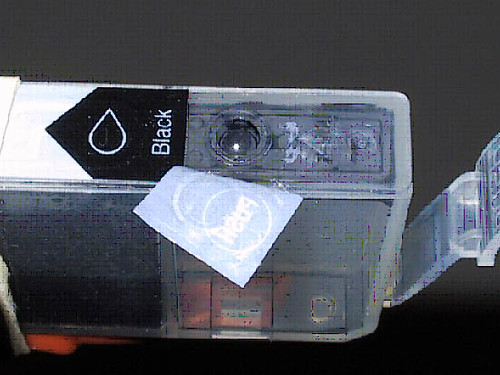
With the safety pin and pliers, start a pilot hole for the screw eye in the center of the nylon ball.
Only push the pin in about 2-3mm.
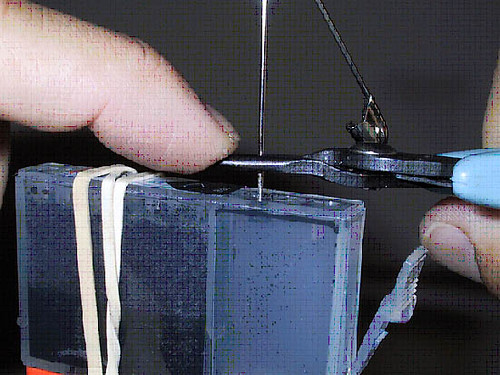
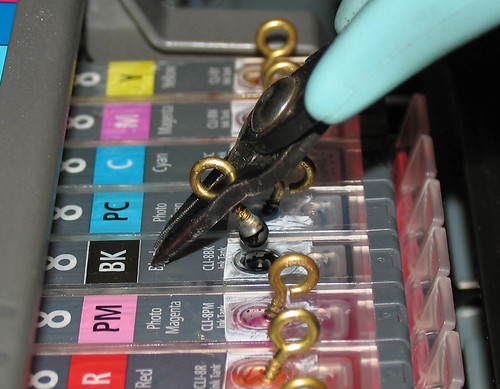
Insert the screw eye and turn until tight. 2-3 full turns should be enough.
(You want the tip of the screw just past the halfway mark)
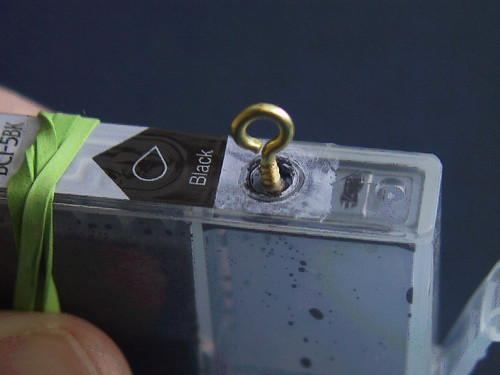
Putting a screw eye into the center of the nylon ball will actually expand the ball to the
point where you probably wont be able to drive the screw eye all the through the ball.
This is a good thing, as it will help create a nice tight seal when replaced.
(Also, you don't want a reaction between the ink and the metal of the screw)
Using a nail or the pliers, remove the nylon ball.
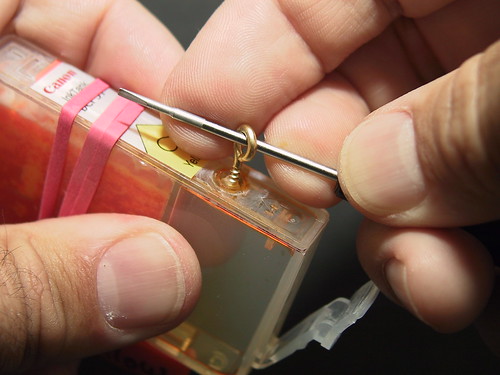
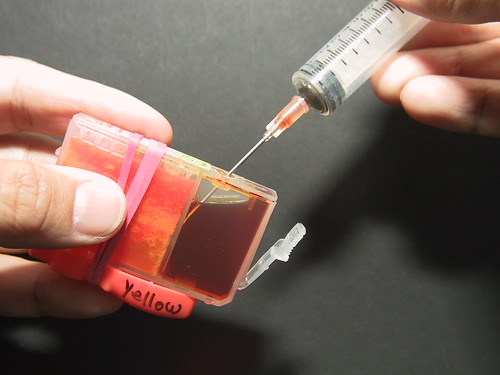
Once the ball is removed you can refill.
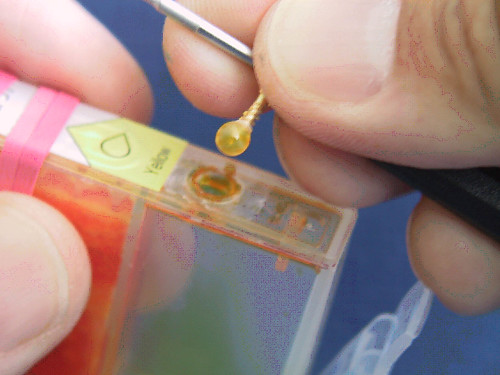
During the refill process, it may take some time for the sponge to soak up the ink.
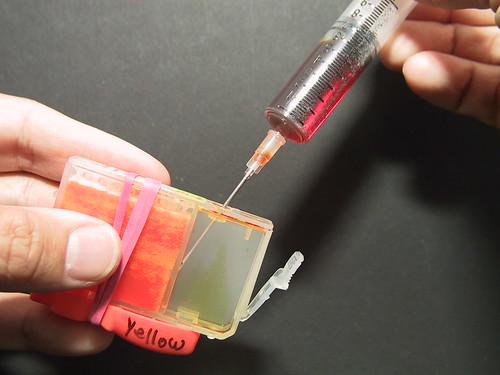
Once the sponge has soaked up the ink, top off and pop the ball back in.
TIP: Squeeze the tank mid sponge while replacing the nylon ball. This will help suck up any excess ink from the bottom of the sponge when you remove the orange tab. Once the tab is removed, again give the tank a gentle squeeze mid sponge and blot up any excess ink that dribbles out of the feed hole. This will prevent your jets from dribbling excessively when you replace the tank.
For topping off the tanks in the printer, I just grab the screw...
and lever it out...
Some notes on filling the tanks while they're still in the printer.
Obviously, as with any container, a hole on the bottom + a hole on the top = ink flow.
When I top off my tanks in the printer, it is only after quite a bit of usage.
And while I'm topping off, the sponge is soaking up quite a bit of ink, so there isn't too much risk of excessive ink flow through the print head.
However, leaving the ball out for more than 5-10 seconds may sometimes result in an undesired ink flow.
The end result being blobs of ink on the first print out.
If I want to fill a tank to it's maximum capacity, I will pull it from the printer and use the method shown above.
With the bottom part of the tanks sealed, I can leave out the sealing ball longer, allowing the sponge to soak up the maximum amount.
Over the years of refilling, I've seen the tank sponge absorption rates change over time.
When I pull the plug, sometimes it'll take 5-10 seconds for the sponge to suck up everything in the tank (for tanks both in and out of the printer). On older tanks, the sponge may lose the ability to absorb any ink at all, and when I pull the plug, nothing happens.
On these older tanks I've actually had to pressurize the reservoir to force ink into the sponge, but performance was noticeably lacking. I eventually replaced these tanks.
One more item of note. Sometimes the tanks you have may not seal 100% in the printer head. Either because of the age of the printer head, or because of a slight deformity in the tank itself. So if you do decide to top off your tanks while they are still in the printer, you may want to check for any overflow near the transfer area.
David
I'm posting this with some additional notes on my experiences....
I've refilled BCI6, BCI3, and will soon be refilling my CLI8 tanks.
Enjoy
Heres an easy way to refill your Canon ink tanks over and over again.
First youll need a knife, a safety pin or heavy-duty sewing needle, a pair of pliers and some small screw eyes
(I used size 216 ), rubber bands, and the original orange tabs to seal the tanks during filling.
Reseal the tank with the original orange tabs.
With the knife, carefully score the label just below the text indicating the color.
Carefully peel back the label to expose the nylon ball sealing the tank.
With the safety pin and pliers, start a pilot hole for the screw eye in the center of the nylon ball.
Only push the pin in about 2-3mm.
Insert the screw eye and turn until tight. 2-3 full turns should be enough.
(You want the tip of the screw just past the halfway mark)
Putting a screw eye into the center of the nylon ball will actually expand the ball to the
point where you probably wont be able to drive the screw eye all the through the ball.
This is a good thing, as it will help create a nice tight seal when replaced.
(Also, you don't want a reaction between the ink and the metal of the screw)
Using a nail or the pliers, remove the nylon ball.
Once the ball is removed you can refill.
During the refill process, it may take some time for the sponge to soak up the ink.
Once the sponge has soaked up the ink, top off and pop the ball back in.
TIP: Squeeze the tank mid sponge while replacing the nylon ball. This will help suck up any excess ink from the bottom of the sponge when you remove the orange tab. Once the tab is removed, again give the tank a gentle squeeze mid sponge and blot up any excess ink that dribbles out of the feed hole. This will prevent your jets from dribbling excessively when you replace the tank.
For topping off the tanks in the printer, I just grab the screw...
and lever it out...
Some notes on filling the tanks while they're still in the printer.
Obviously, as with any container, a hole on the bottom + a hole on the top = ink flow.
When I top off my tanks in the printer, it is only after quite a bit of usage.
And while I'm topping off, the sponge is soaking up quite a bit of ink, so there isn't too much risk of excessive ink flow through the print head.
However, leaving the ball out for more than 5-10 seconds may sometimes result in an undesired ink flow.
The end result being blobs of ink on the first print out.
If I want to fill a tank to it's maximum capacity, I will pull it from the printer and use the method shown above.
With the bottom part of the tanks sealed, I can leave out the sealing ball longer, allowing the sponge to soak up the maximum amount.
Over the years of refilling, I've seen the tank sponge absorption rates change over time.
When I pull the plug, sometimes it'll take 5-10 seconds for the sponge to suck up everything in the tank (for tanks both in and out of the printer). On older tanks, the sponge may lose the ability to absorb any ink at all, and when I pull the plug, nothing happens.
On these older tanks I've actually had to pressurize the reservoir to force ink into the sponge, but performance was noticeably lacking. I eventually replaced these tanks.
One more item of note. Sometimes the tanks you have may not seal 100% in the printer head. Either because of the age of the printer head, or because of a slight deformity in the tank itself. So if you do decide to top off your tanks while they are still in the printer, you may want to check for any overflow near the transfer area.
David