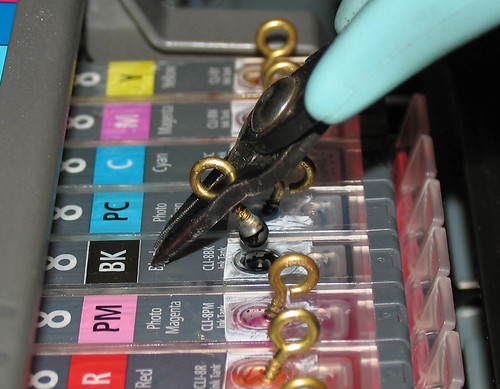
Refilling Canon BCI & CLI Tanks - With step by step pics

cmonkey

Getting Fingers Dirty
Joined
Jan 3, 2010
Messages
11
Reaction score
0
Points
27
Location
Near Disneyland
Some of you may have seen a link to a pdf of this method that I developed way back when...
I'm posting this with some additional notes on my experiences....
I've refilled BCI6, BCI3, and will soon be refilling my CLI8 tanks.

Enjoy

Heres an easy way to refill your Canon ink tanks over and over again.

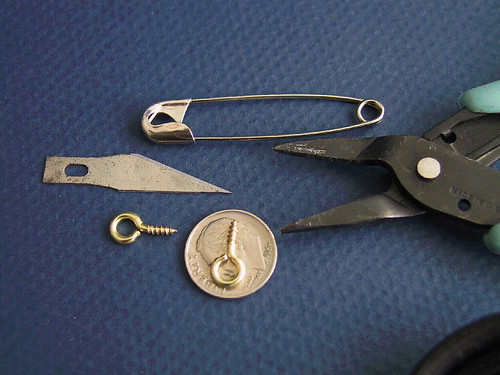
First youll need a knife, a safety pin or heavy-duty sewing needle, a pair of pliers and some small screw eyes
(I used size 216 ), rubber bands, and the original orange tabs to seal the tanks during filling.
4261849508_f325d96c72.jpg


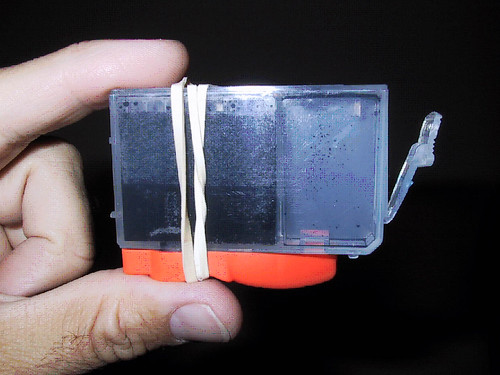
Reseal the tank with the original orange tabs.
4261095505_86456d54f3.jpg


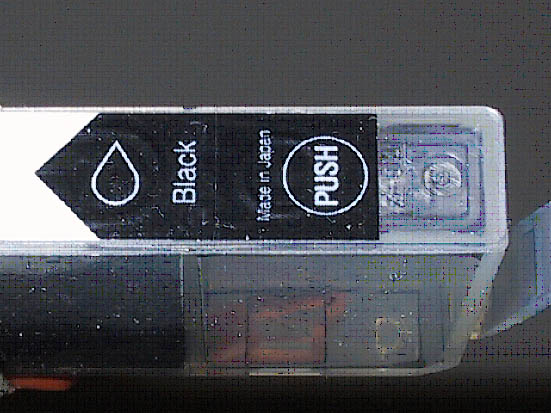
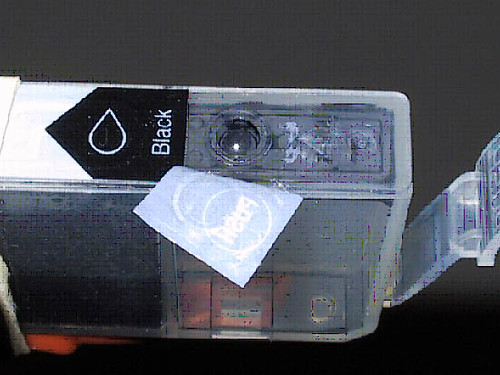
With the knife, carefully score the label just below the text indicating the color.
4261095515_05dc04854b_o.jpg


Carefully peel back the label to expose the nylon ball sealing the tank.
4261849556_86d7456012.jpg


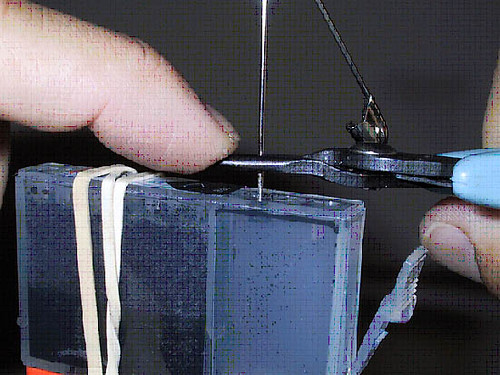
With the safety pin and pliers, start a pilot hole for the screw eye in the center of the nylon ball.
Only push the pin in about 2-3mm.
4261095533_b7b6d46d22.jpg


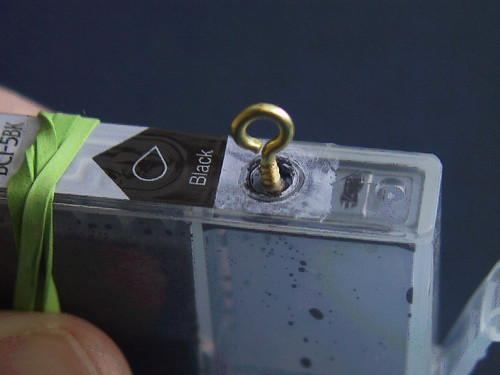
Insert the screw eye and turn until tight. 2-3 full turns should be enough.
(You want the tip of the screw just past the halfway mark)
Putting a screw eye into the center of the nylon ball will actually expand the ball to the
point where you probably wont be able to drive the screw eye all the through the ball.
This is a good thing, as it will help create a nice tight seal when replaced.
(Also, you don't want a reaction between the ink and the metal of the screw)
4261095579_fb134959e6.jpg


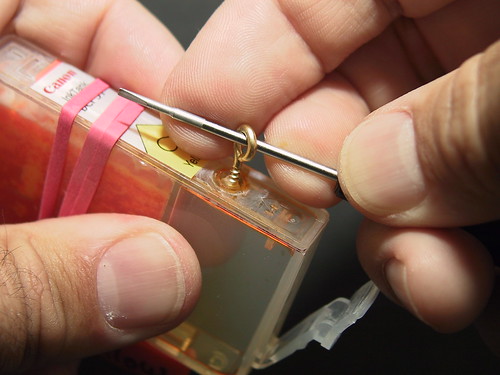
Using a nail or the pliers, remove the nylon ball.
4261095041_8afa0971f0.jpg


Once the ball is removed you can refill.
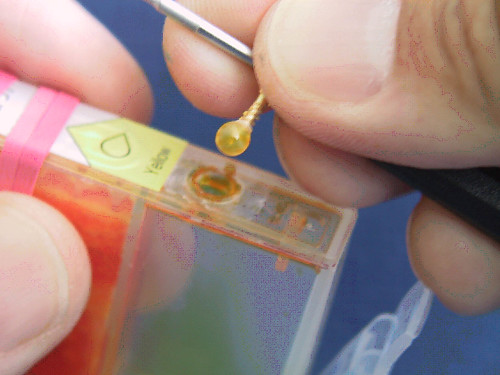
4261849662_463faecea4.jpg


During the refill process, it may take some time for the sponge to soak up the ink.
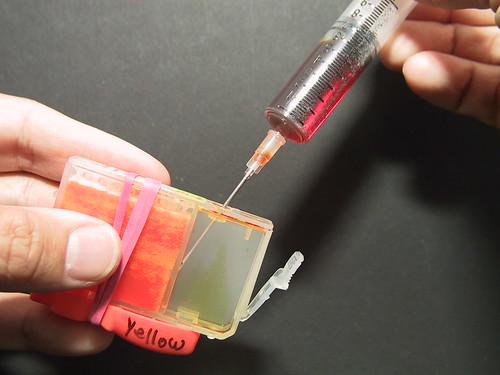
4261849278_8fd1c4fcc2.jpg


Once the sponge has soaked up the ink, top off and pop the ball back in.
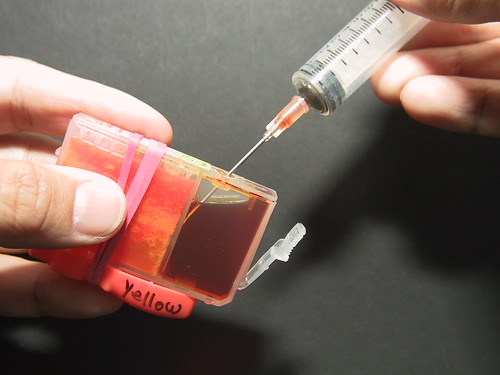
4261849444_5a7602728b.jpg


TIP: Squeeze the tank mid sponge while replacing the nylon ball. This will help suck up any excess ink from the bottom of the sponge when you remove the orange tab. Once the tab is removed, again give the tank a gentle squeeze mid sponge and blot up any excess ink that dribbles out of the feed hole. This will prevent your jets from dribbling excessively when you replace the tank.


For topping off the tanks in the printer, I just grab the screw...
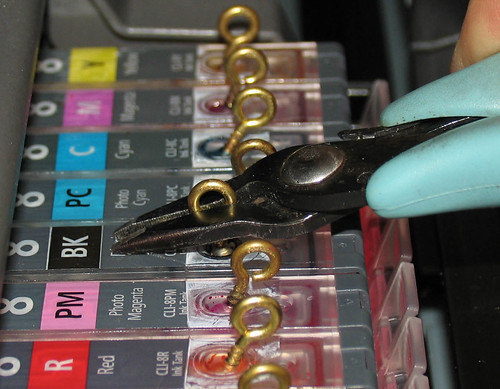
4264025696_7346d702d7.jpg


and lever it out...
4263275665_11f6baa23e.jpg


Some notes on filling the tanks while they're still in the printer.

Obviously, as with any container, a hole on the bottom + a hole on the top = ink flow.
When I top off my tanks in the printer, it is only after quite a bit of usage.
And while I'm topping off, the sponge is soaking up quite a bit of ink, so there isn't too much risk of excessive ink flow through the print head.
However, leaving the ball out for more than 5-10 seconds may sometimes result in an undesired ink flow.
The end result being blobs of ink on the first print out.

If I want to fill a tank to it's maximum capacity, I will pull it from the printer and use the method shown above.
With the bottom part of the tanks sealed, I can leave out the sealing ball longer, allowing the sponge to soak up the maximum amount.

Over the years of refilling, I've seen the tank sponge absorption rates change over time.
When I pull the plug, sometimes it'll take 5-10 seconds for the sponge to suck up everything in the tank (for tanks both in and out of the printer). On older tanks, the sponge may lose the ability to absorb any ink at all, and when I pull the plug, nothing happens.
On these older tanks I've actually had to pressurize the reservoir to force ink into the sponge, but performance was noticeably lacking. I eventually replaced these tanks.

One more item of note. Sometimes the tanks you have may not seal 100% in the printer head. Either because of the age of the printer head, or because of a slight deformity in the tank itself. So if you do decide to top off your tanks while they are still in the printer, you may want to check for any overflow near the transfer area.


David
 

on30trainman

Printer Guru
Joined
Jan 22, 2006
Messages
310
Reaction score
0
Points
109
Location
Philadelphia, PA area
The picture you show of modified CLI-8 cartridges - what printer are they in?
The problem with that method and CLI-8 cartridges in either my ip4200 or ip4500s is that the screw-eye will stick up too far to clear the area between the top of the cartridge and the printer housing. When the printhead tries to move it would get snagged. I use a 3/8" #8-32 flat head stainless steel screw I recently bought on E-Bay to seal where I remove the nylon ball and the clearance is not much. I see you have a Pro 9000 Mk II - is the clearance enough in that model?
I still top fill - guess I am one of the last of the top fillers, but it works so well for me. Even if I went to the German method I would still remove the nylon ball to make cartridge purging a breeze. Before you stick a modified CLI-8 cartridge into a printer, check the clearance carefully.

I am looking into the Pro 9000 Mk II also - there are some pretty good prices on the local Craigslist recently. Guess they were bought with Canon cameras and not wanted/needed. Probably don't have a transferable warranty, but for $200+ for an unopened printer it might be well worth it to get wide format printing capability.

Steve W.
 

cmonkey

Getting Fingers Dirty
Joined
Jan 3, 2010
Messages
11
Reaction score
0
Points
27
Location
Near Disneyland
The screw eyes stick up 3/8 of an inch.
The picture of the CLI-8 tanks is from my 9000 Mark II.
There is an inch of clearance from the tops of the tanks on each side of the printer.
Plenty of room for the screws, or even a continuous ink system.

How much room do you have?
If you put some tiny screws into the ball, you could just cut off the excess.
With a small pair of needle nose pliers, you'd be able to easily pull out the sealing ball.

David
 

ghwellsjr

Printer Master
Platinum Printer Member
Joined
Jun 16, 2006
Messages
3,645
Reaction score
85
Points
233
Location
La Verne, California
Printer Model
Epson WP-4530
I guess you don't bother resetting the chips in your CLI-8 cartridges if you leave them in the printer for refilling, but do you ever reset them?

I have been wondering why cartridges fail to work after many refills. I believe there are two possible failure mechanisms, first the lower sponge may fail to pass ink for whatever reason and second the upper sponge may fail to pass air because it has too much dried ink in it. I have never refilled the same dye ink cartridges enough to have this problem so I cannot determine if either of these two failure mechanisms is possible but if I do get one, I will drill a hole through the top of the cartridge down into the upper sponge close to the wall separating the two compartments to allow another air path down to the groves in the bottom half of that wall which allows the air to get into the reservoir to replace the ink that seeps out of it. Of course this will destroy the normal functioning of the cartridge so it is not meant to be a way to restore operation to a failed cartridge, it is merely a test of the failure mechanism. The next time you get one of these failed cartridges, maybe you could try the same test.

If it turns out that this is a failure mechanism for refilled cartridges, then I think it is safe to conclude that it is caused by top filling which saturates the upper sponge as well as the lower sponge unless you take special precautions. The German method is immune to this potential problem as long as you only fill the reservoir and don't allow any ink to flow into the sponge compartment while refilling which is a very easy thing to do.
 

mikling

Printer VIP
Platinum Printer Member
Joined
Jul 2, 2006
Messages
3,239
Reaction score
1,471
Points
313
Location
Toronto, Canada
I must warn you that sometimes the balls do not reseal perfectly so be careful about reusing the balls. Perhaps when you insert the eyelet screws you are enlarging the ball size a bit that makes them fit tighter and resealing comes about. Why not use plugs that are more pliable?

I don't think that the saturated upper layer sponge is blocking the air. Here's why. if you saturate the upper sponge, the ink that the printer uses will exahust that area first. You can test this yourself by simply absorbing the ink from the bottom outlet with a sponge that has the upper sponge saturated. You will notice that the upper sponge always releases as much ink as it can before the reservoir begins to give up its ink. The other thing to think about is that integrated head cartridges upper sponge areas are typically saturated as well ( Essentially like the CLI-8 without a tank side) yet it allows ink to flow down. What does happen is that sometimes when the sponge is oversaturated ink enters the air inlet labyrinth on the top and seals the passage. This I think is more likely to be the situation.

There is a triple balance occuring within the printhead and cartridge interface, sponge compartment and reservoir. Remember the sponge is there to control the ink from just flowing out, in an oversaturated state it will allow ink to drip down, without exhausting the reservoir. It will do this until the pressure just equals the pressure required for the tank to release ink. At this point the sponge will remain in a constant saturated level until the reservoir is exhausted. How much is this pressure? Well I earlier wrote something that the Mariotte bottle principle on a CISS is actually similar to the Canon tank. Essentially the depth of the separating wall is the depth of the dip tube on the Mariotte bottle. If you inspect the seaparating wall carefully, you'll see some grooves on the side that facilitates air to travel down to the tank opening. The same funtion of the dip tube.

Once you grasp the principle of operation you'll also understand why the german fill method can work and is unlikely to leak through the hole on the sidewall. Whats is important is that the reservoir will keep the sponge at a constant saturation level as long as there is ink in the reservoir side. You'll also grasp that as ink viscosity increases, the ability of the sponge to "grab and hold onto" ink increases. This then requires higher capillary forces to get ink down to the printhead. If this force is greater than what the ink can muster we then get the ink starved head leading to kogation or what most call clogging. The end result is a clog but not because of ink drying from the outside of the nozzle but rather inside. The other issue of locked up cartridges can also be attributed to thick ink that does not want to release or separate from the wall on the sponge side. The film strength of the ink becomes too strong and then this blocks the little grooves from allowing air through.

If you understand the above, then you'll come to understand the major pitfall of sponge cartridges and how the tank alleviates that and also why Epson HAD to move away from it because their head design is intrinsically more sensitive to ink levels within the sponge.
 

ghwellsjr

Printer Master
Platinum Printer Member
Joined
Jun 16, 2006
Messages
3,645
Reaction score
85
Points
233
Location
La Verne, California
Printer Model
Epson WP-4530
Mikling, can you propose a test to indicate which failure mechanism is causing a lack of ink flow after many refillings?

If it is caused by a blockage in the air vent path, wouldn't drilling a hole through the top of the cartridge above the sponge prove if that is the problem?
 

cmonkey

Getting Fingers Dirty
Joined
Jan 3, 2010
Messages
11
Reaction score
0
Points
27
Location
Near Disneyland
I do plan on resetting the chips, I'm just waiting for my supplies to arrive.

As for the sealing ball not sealing, by making sure the screw is dead center in the ball, and it's tip goes past the halfway mark, I've never had a problem with leaky tanks.

As for sponges not working after a while (i.e absorbing), there are different possible factors.
Here are some of my thoughts on the matter.

The sponges are deteriorating chemically and are becoming hydrophobic. (wild guess)
If the sponge was deteriorating physically, I would expect to see clogged nozzles sooner than later (I've had a number of tanks last for 3yrs+ without any noticeable loss in performance).
The air channel on the top of the tank could be impeding the air being displaced by the ink. (This was not the case with my tank)
Or you could be developing some biologic culture in your sponge. (I've had one bottle of ink develop a strange coagulation. I don't know if it biological or chemical. If it was biological, maybe it got stuck in my sponge. That also might account for some clogged nozzles).

I've never bothered to investigate further since buying a replacement tank once every few years is a lot easier than trying to flush and recover the tank.

Dave
 

mikling

Printer VIP
Platinum Printer Member
Joined
Jul 2, 2006
Messages
3,239
Reaction score
1,471
Points
313
Location
Toronto, Canada
Assuming that the cartridge was properly refilled i.e air inlet not blocked, lack of ink flow after many refillings would generally point to a sponge ink interface that is no longer proper. Flushing resolves this issue completely. It is difficult ot devise a test since in doing the test would require a bank of many many printers all subjected to the same conditions and printing exactly the same things. Even with this setup the problems may not crop up at an identical time. Using one sample is not valid so a sure reason would be hard to come by. We can only go with observations and then do some likely solutions. Using one sample to test two solutions is not valid and getting two identical samples with the same exact problem is also difficult.

Another difficult thing about this flushing business is that the need will vary depending on many factors. For example, using the same inks, my MP500 has gone over over 15 to 18 refills without flushing but colors are only used now and then. It is not used as a photoprinter. My prior i9900 could never do this. I attribute this to possible factors that the 9900 uses ink so quickly with its high speed printing that the carts eventually can't keep up or that the printhead on the i9900 is more sensitive to cartridge condition. Regardless, using the same inks I could come to two different conclusions that explains why some say flsuhing is not necessary and others have found it to be necessary. What is important is that we recognize the situation and somehow rectify it, flushing has always fixed it so I would say it is due to old ink and the changed sponge ink interface.
 

ghwellsjr

Printer Master
Platinum Printer Member
Joined
Jun 16, 2006
Messages
3,645
Reaction score
85
Points
233
Location
La Verne, California
Printer Model
Epson WP-4530
I realize that there can be more than one reason that cartridges fail to work and can be fixed by flushing, but if just one cartridge can be shown to start flowing simply by drilling a hole through the top above the sponge, that is proof that in that particular case, it has a clogged air vent. And if drilling a hole in that cartridge doesn't fix the problem but providing an air path through the upper sponge to the groves does fix the problem, then that is proof that the problem is in the upper sponge.

Of course, finding one example doesn't mean that every cartridge that has a similar problem has the same cause, but that is why I'm asking other people to perform the same experiment.
 
Top