@ThrillaMozilla It dosent really matter to me if you are printing from Linux these days or not. The only way I can improve this thing is through feedback. You have very good points

Let's go one by one
1. I'll probably get this done at some point but I suspect I might be the only one to ever use it. (but hey, if my program is usefull to ME, of course i'll do it lol)
2. Paper size and image size are two separate things. Paper size will come from the driver. For the image size, I offer preselections and custom size. As an example, the layout engine will let you place two A6 sized images on a single sheet of A4. The idea here is to be able to take say a dozen snapshots and print them on standard size sheets. This is similar to what Qimage does. If you want print an image and fill up an A6 sheet, A6 is not the correct image size. "Fit to page" would be the correct option (because hardware margins will not allow it, even borderless might not allow it if the driver reports something a bit off from A6)
3. You are correct on all counts. The paper size and margins are pulled from the CUPS drivers. The hardware margins are the dashed blue lines. You are allowed a manual border value that is higer than the hardware margin but not lower. The solid blue lines is the cell where you image will fit when you select the image print size. None of these lines appear on the actual print or TIFF export.
4abc. By popular demand, the program as of 15 minutes ago allows four individual borders. I was already pulling the information from CUPS but for simplicity, I was using the highest of all values all around the page. For the handful of printers I was testing with, it was fine and it was a good place to start. This should allow to set a border for whatever needs you have be it special image placement, binding, etc. combined with "fit to page" and the crop editor, you can probably come up with the exact layout you need
Borderless prints are handled by the CUPS driver. You'll typically see sizes where "Borderless" is indicated. When that happens, CUPS will simply return 0 mm hardware margins
4d. Currently, the center option will exclude an image from mecanism that can place multiple images on a page. It will give the image it's own sheet of paper and print it centered at what size you specified in the image properties. What I think you refering to would be some sort of anchor points for centering. fully centered, on top or bottom but horizontally centered, left or right but vertically centered. I'm not what the use case is but i'm sure it could be done. This was part of your #3 but I want to eventually add a freehand placement option using the mouse. I would probably isolate the image to it's own page to make this happen like I do for the center option.
5. Drag and drop dosent work. you can highlight the image and double click or press "insert". It could be a cool idea and I think it would be easy. Drag and drop could probably add the image the queue and the layout engine would handle the rest.
6. I havent really had any issues since switching back to linux from Windows 11. I didn't really have any problems either when I was running Linux between 2010-2016. I might have stumbled with CUPS initially because I have an old turboprint licence. If it helps, this is how I'm doing it now, using Guttenprint drivers. First you choose your media type and print quality. Unrelated is the "Shrink page" settings. It always needs to be set to "preserve dimensions". Your software is supposed to send output that fits and does not get cropped (gimp does this, vibeprint does as well). This is super important. If your print output is off, it's probably because the driver is allowed to scale.
Color correction needs to be Uncorrected. Anything else will skew the output
This can also be done in vibeprint itself

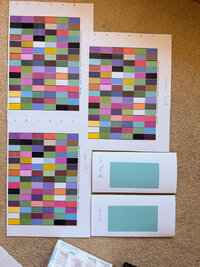
Of course, your profile needs to be built with these exact same settings. Vibeprint currently does NOT have a target printing mode because it needs to bring in multiple images into a common color space (I use a linear version of Prophoto RGB which is basically what lightroom does). I just print targets like this after settings defaults lp -d Epson-Stylus-Photo-R2000 -o scaling=100 -o cm-calibration=1 target.tiff the "cm-calibration=1" is KEY to an uncolormanged print. This is basically how I defeated double profiling.. Vibeprint applies the profile and all steps from there to the paper are neutral and modify none of the RGB values in the image. There is one situation where things might not be perfect. If there is no guttenprint driver, the CUPS will install it as driverless. This is a mode where CUPS will just send some standard commands to the printer and all color is managed by the printer itself. Linux calls it IPP, Apple calls Airprint but it's exactly the same under different names. You can't really profile in uncorrected mode but you can still create a profile for the "blackbox" that it is. I'm almost certain that the Epson ET-8550 falls into this category on Linux (unless you use Turboprint). The profile will probably just a marginal improvement but it still helps. I'm doing this for my brother MFC and it did correctly compensate for my third party catridges. Keith Cooper does something similar with a Canon on MAC
7. The paper borders are WYSIWYG (dotted blue line). The per-image border is decorative and optional. "Outer" will expand the image cell (A6 + outer border becomes a bit more than A6). An inner border will preserve the selected cell size but the image will become slightly smaller to accomodate the border. Here is an exagerated border so you can see what it does. Currently it's always black but I eventually plan to add a color picker.
8. There is no way around this. Say you bring in a 800x600 image at A6 size and another one at 3000x4000 in the same print queue, then print it, there has to be some resizing done. When you send a job through vibeprint, CUPS is informed to not alter colors or size... The exact number of pixels needed to have proper image size, placement and exact border is calculated, then each image is upsized to fit. Then it's sent to the print driver (there is where I wasted countless sheets of paper during development, often chasing thing like a missing millimeter).
I could of chosen an arbitrary value like 180 dpi to make things fast but I wanted to build something that might rival (or at least be close) to Qimage in terms of quality. Epson printer firmware will internally rescale if it dosent receive a multiple of 360. Canon will do the same if not 300 or 600 dpi. It's been known for a few years that resizing the output rather than letting the printer firmware handle it increases the output quality a little bit. I dont think the concept originated with Qimage but Mike Channey did publish some information here
https://ddisoftware.com/tech-archive/articles/july-2011-restless-natives/ If you choose the wrong value, you'll just get a print. It'll probably even be good. If you choose the correct value, in theory you'll get a better print. The important is that your printer's native resolution is a multiple of what we are sending or the firmware might introduce artifacts. I just typically send 360dpi for anything that not 13x19 and 720dpi for the bigger sizes. You shouldnt really need a 1440dpi option but I could always add it later (processing will be slooowwww). My eyes cant see the difference but I CAN spot a non upsized print with not output sharpening from something like GIMP. For the interpolation methods, I wanted to offer more than one but Mitchell-EWA is a good all rounder. I wouldnt recommend using anything else unless you have a specific reason for choosing something else. I didnt invest these models, the math is out there.
9. I havent used EPL but Vibeprint reads the color space embedded in your images even if you dont have the profile installed on your system. As mentionned earlier, internally everything gets converted to a pretty large color space so that images with different embeded profiles can be printed on a single sheet of paper. All you do is select your images and sizes, set your printer profile and print
Sorry.. super long reply but I figured the info would be useful to everyone not only the both of us




 )
)