ip4600 printhead problem?

FryingSaucer

Printer Master
Joined
Mar 8, 2010
Messages
206
Reaction score
153
Points
203
Location
UK
Printer Model
Canon MX725,MB5150. 3D:Anet A8
ghwellsjr

Thanks for the link to window cleaner in the UK - cheaper and easier for me to buy than isopropyl, apart from any doubts about the latter.

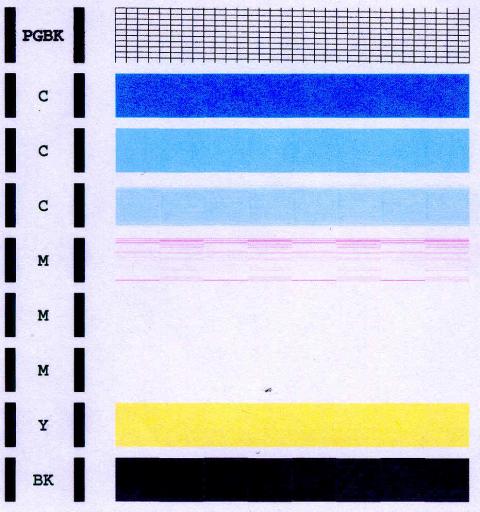
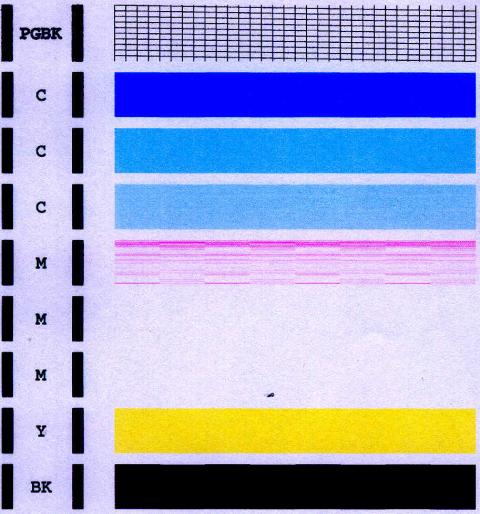
I already did deep cleaning from the printer maintenance menu, and it seemed to use about 1/2 of the color cartridges :( so I'm not sure I can do much there. I'll try your other suggestions once I get some window cleaner.
 

ghwellsjr

Printer Master
Platinum Printer Member
Joined
Jun 16, 2006
Messages
3,645
Reaction score
85
Points
233
Location
La Verne, California
Printer Model
Epson WP-4530
If you have some "empty" cartridges, you can easily make some cleaner cartridges by turning them upside down and dripping window cleaner into the outlet port until the sponge is saturated. This will keep you from wasting ink as the print head cleanings do use up a lot of ink in regular cartridges. Mixing the ink with window cleaner in the sponge will allow you to see when the nozzles start working again. And I wouldn't do deep cleanings as they really use up the ink fast.
 

FryingSaucer

Printer Master
Joined
Mar 8, 2010
Messages
206
Reaction score
153
Points
203
Location
UK
Printer Model
Canon MX725,MB5150. 3D:Anet A8
ghwellsjr said:
The UK alternative to Windex is Halfords window cleaner, I would recommend you use that and not alcohol or any other solvent except maybe water.

I also do not recommend removing the print head from the printer until you have exhausted letting the printer clean its own nozzles.

You need to make sure your purge system is working. Put some window cleaner on the pads where the print head parks and make sure it gets sucked away when you do a normal cleaning. Also put some on the screen under the cartridge where the magenta ink goes into the print head.
ghwellsjr: Thanks for all your advice.

I have replaced 3 of the cartridges with emptied ones containing window cleaner as you suggested, and executed 4 cleaning cycles. I have replaced the magenta cartridge with another full one (though this is not an OEM one). There is no change to the magenta in the printout.

The cleaning fluid I deposited on the pads on the right disappeared after the clean. There was still some fluid on the screen under the magenta cartridge, but then there was some fluid/ink underneath some of the other cartridges too, so I'm not sure what I should be expecting to see here. I'm assuming the screen is in the little cylinder the cartridge fits on to.

I did notice there was a lot of magenta stains round the pads on the right. Also, the nozzle check pattern for the magenta shows a pattern of boxes, as shown below (scan parameters changed to show this more clearly). I don't know if either of these observations has any significance.

5331_nozzlecheck1.jpg
 

nanosec

Printer Guru
Joined
Dec 15, 2007
Messages
125
Reaction score
5
Points
103
In my own experiences, whenever I see those boxes such as those in red, it usually means (for me anyways) that the printhead is well and truly done.
But as you can see by my recent posts I do get nailed on dumb stuff. Those blocks you see is the outline of the printhead.

I've been through a lot of printheads and when the check looks like this I get a sinking feeling. Maybe somebody else has made it through this kind of check, I haven't.

Again, this is just my own experiences with nozzle checks that come out looking like this. Because there are so many random things that can affect why a printer is not printing you need to go through the process of elimination.

Because you are using non oem, there is a slight chance that the cartridge is not forming a proper seal. Some people ship rubber gaskets with their cartridges that slip round the screen on top of the existing seal.


Looks like this:

http://img.alibaba.com/photo/222486869/CISS_accessories_for_canon_black_gasket.summ.jpg


You can also cut up a silicon baking sheet and use a hole punch to fashion one. (silicon baking sheets are 2 bucks here at the dollars stores in Canada.)


If you can, check the rubber seal that sits round the screen, check it for nicks and cuts (you can pull it up for further inspection)
 

ghwellsjr

Printer Master
Platinum Printer Member
Joined
Jun 16, 2006
Messages
3,645
Reaction score
85
Points
233
Location
La Verne, California
Printer Model
Epson WP-4530
Isn't the nozzle check shown in #13 just an enhanced version of the same one shown in #1? Has there been no change since doing all the cleanings? The magenta patterns should look just like the cyan patterns except for the color difference.

Yes, "the screen is in the little cylinder the cartridge fits on to". You should see the screen absorb the window cleaner when you deposit a drop or two on it. It looks like you have major clogging of almost all the magenta nozzles. At least this would be the indication if it doesn't change between cleanings. Is that what is happening?
 

FryingSaucer

Printer Master
Joined
Mar 8, 2010
Messages
206
Reaction score
153
Points
203
Location
UK
Printer Model
Canon MX725,MB5150. 3D:Anet A8
ghwellsjr said:
Isn't the nozzle check shown in #13 just an enhanced version of the same one shown in #1? Has there been no change since doing all the cleanings? The magenta patterns should look just like the cyan patterns except for the color difference.

Yes, "the screen is in the little cylinder the cartridge fits on to". You should see the screen absorb the window cleaner when you deposit a drop or two on it. It looks like you have major clogging of almost all the magenta nozzles. At least this would be the indication if it doesn't change between cleanings. Is that what is happening?
Yes, well spotted. I did use the same scan in #13 as #1. However, I did this because it appeared the same as the most recent nozzle check after all the cleaing cycles shown below.

5331_nozzlecheck2.jpg


OK now I understand better how to check the screen, I put a drop on the cyan screen and it was sucked away but on the Magenta screen it stayed there.

nanosec said:
In my own experiences, whenever I see those boxes such as those in red, it usually means (for me anyways) that the printhead is well and truly done.
But as you can see by my recent posts I do get nailed on dumb stuff. Those blocks you see is the outline of the printhead.

I've been through a lot of printheads and when the check looks like this I get a sinking feeling. Maybe somebody else has made it through this kind of check, I haven't.

Again, this is just my own experiences with nozzle checks that come out looking like this. Because there are so many random things that can affect why a printer is not printing you need to go through the process of elimination.

Because you are using non oem, there is a slight chance that the cartridge is not forming a proper seal. Some people ship rubber gaskets with their cartridges that slip round the screen on top of the existing seal.
I inspected the seal round the screen as suggested. There was no obvious sign of damage.


So, from the previous posts it seems very likely I will be unable to fix my problem by attempting to clean the printhead nozzles, and I risk losing the ability to print in greyscale if I do try. I would be better leaving the current printer as is while I consider what printer to get as a replacement. I'd appreciate any comments on whether this is a reasonable course of action.
 

ghwellsjr

Printer Master
Platinum Printer Member
Joined
Jun 16, 2006
Messages
3,645
Reaction score
85
Points
233
Location
La Verne, California
Printer Model
Epson WP-4530
Your new nozzle check looks to me like there is an improvement but I have a question: there is a black spot just above the yellow block. Does this always happen when you do a nozzle check? Do you know what it is?

I wouldn't give up on your print head just yet but I wouldn't use your printer for any other purpose besides doing nozzle checks until you get this resolved.

The important issue is whether when you do nozzle checks do you get exactly the same pattern on the magenta or does it change slightly from nozzle check to nozzle check (even without doing cleanings in between)?
 

FryingSaucer

Printer Master
Joined
Mar 8, 2010
Messages
206
Reaction score
153
Points
203
Location
UK
Printer Model
Canon MX725,MB5150. 3D:Anet A8
Yes, you are correct there is a difference between the original nozzle check and what I get now. There are now more fine bands at the top of the first magenta pattern. However, I can't see any difference between successive nozzle checks done now (i.e. a few minutes apart without doing any more cleans).

I was ready to give up, but I have seen some reports of success after a large number of repeated cleaning cycles. What do you suggest?
 

ghwellsjr

Printer Master
Platinum Printer Member
Joined
Jun 16, 2006
Messages
3,645
Reaction score
85
Points
233
Location
La Verne, California
Printer Model
Epson WP-4530
My next suggestion is to remove all your cartridges and then your print head and see if there is a lot of dried ink on the bottom of it. Try not to turn the print head upside down because you don't want residual ink to flow on to the electronics. Fold a paper towel into quarters and lay it on a counter top. Soak a small area about the size of the print head with window cleaner and blot the bottom of the print head to clean the residual ink from the bottom of the print head. Don't wipe it because that will just spread the ink around. Keep blotting it with a fresh section of your folded and soaked paper towel until you can see the patterns of the nozzles in different colors. Make sure you don't get too much window cleaner on the bottom of the print head. Then put the print head and nozzles back in the printer, don't do an alignment, but do a nozzle check and let us know if it shows any improvement.
 

FryingSaucer

Printer Master
Joined
Mar 8, 2010
Messages
206
Reaction score
153
Points
203
Location
UK
Printer Model
Canon MX725,MB5150. 3D:Anet A8
There was some ink on the nozzles, but not a lot. I dabbed the printhead on the soaked towel many times (about 50) until the colours were visible. There was an improvement in the magenta. See next post for the printout. I included the wrong one here


If you think it is worth persisting, maybe cleaning, I will have to decide what cartridges to use. I have a set of compatibles with varying degrees of ink, plus two half full magenta.

I have empty cartridges I could use for cleaning by soaking the sponge with windows cleaner. However, this was not entirely satisfactory before - the printer complained the cartidges were empty. I might get a kit, which I think websnail sells, to let me refill the cartridges with window cleaner by the german method. This would make cleaning a lot simpler.

But my problems have probably stemmed from using compatibles, and I'm considering refilling OEM cartridges in the future, on this printer or its replacement. I don't want to purchase a complete set of Canon cartridges for this printer unless I have a fairly strong expectation I will be able to fix the printer.

I don't feel very confident I will get this printer working, and I am thinking I should get a replacement, but you guys have the experience of this. What do you think are the chances?
 
Top