How to confirm printhead failure

Trigger 37

Printer Guru
Joined
Dec 23, 2006
Messages
607
Reaction score
4
Points
136
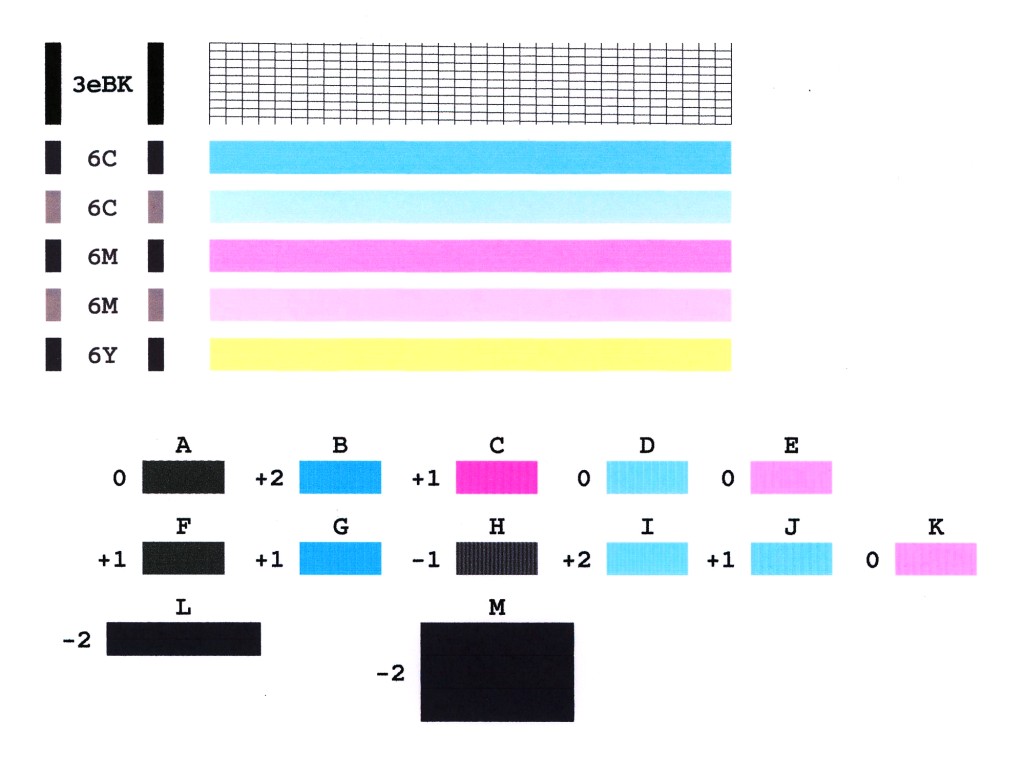
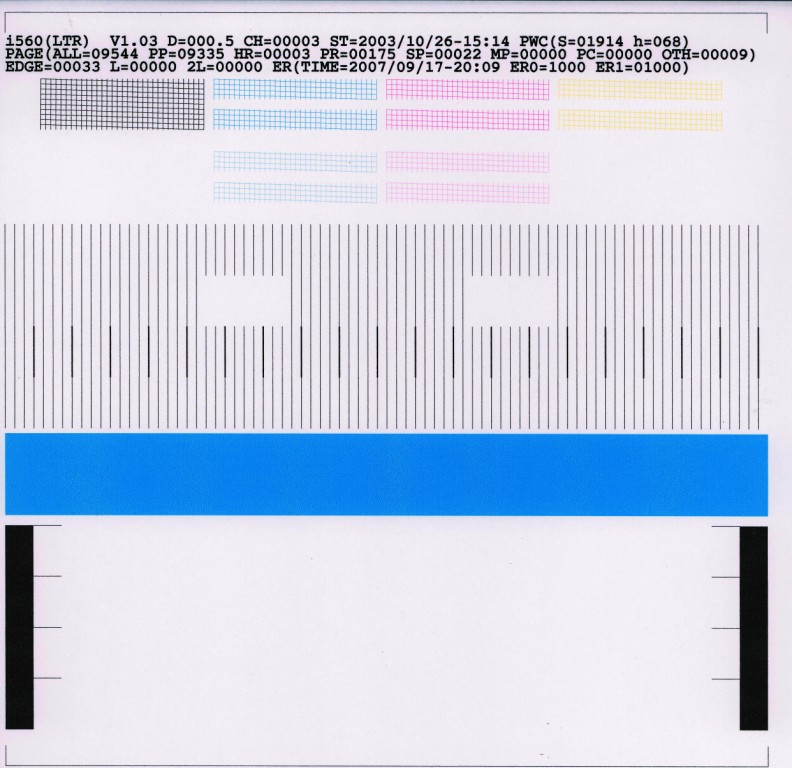
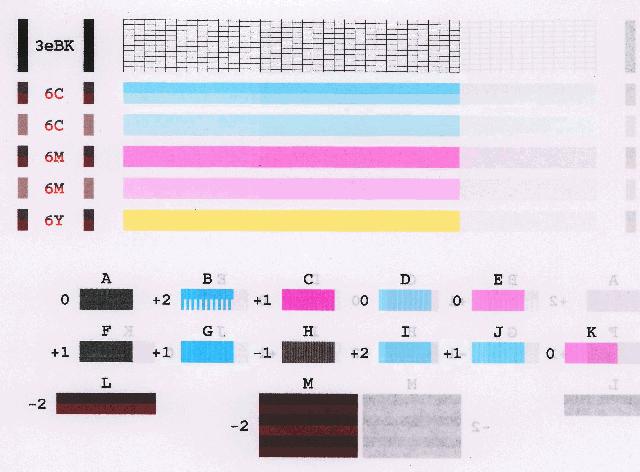
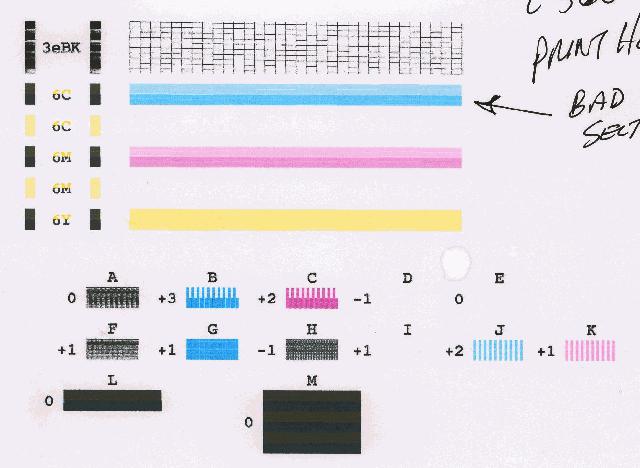
Grandad35, I've just double check the Service test pattern for the i560. If you look close that the service test print below, you will see there are 4 grid prints of Cyan, 4 for Magenta and only 2 for yellow. The specification say that there are 4 banks of Cyan (4 x 128=512), 4 for Magenta, and only 2 for yellow (128 x 2=256). Two banks of each color are for the large ink drops, which I think is 5pl, and 2 banks are for the photo cyan or 2pl ink drops. If you look at the pin assignments in the Service Manual, the pins are labeled;

Pin 3 -Cyan even column nozzle data signal
Pin 9 -Cyan 2pl odd column nozzle data signal
pin 21 - Cyan 2pl even column nozzle data signal
pin 31- Cyan odd column nozzle data signal

And then there is the printhead power signals that control firing.

Color heater drive voltage
Color GND heater drive voltage
Color Nozzle heater enable (odd/even -odd block)
Color Nozzle heater enable (odd/even - even block)

To control the data, a clock and data line pass data to the printhead which does the decode down to individual nozzles. The printhead is just a large semiconductor substrate with all kinds of transistors and diode matrix integrated together with the actual nozzles, which are also just part of the semiconductor substrate.

The bad news for me is that I now have two printer that both need a new printhead. UGGGHHHH.

It is clear from the above control signals that the only way to disable 1/2 of one bank is via the decode matrix that is built right into the printhead. In the pictures that you have been working on, you can see standard integrated decode logic in either diode or transistor matrix. Therefore I conclude the failure is in the printhead. The eeprom has nothing to do with printing. It just collects and stores data like, Head changes, temperature, etc.

If we could prove exactly which data signal controls which bank of nozzles it would be easy to help others when we see a print symptom of a missing bank or even both banks of a given color. Like I said earlier, it should be easy now with the exact pin list, to run a test by blocking one pin at a time and observe the print test. The Service test print shows the results. I conclude that each one of those Cyan or Magenta grid patterns is controlled by one pin on the head. Two are 5 pl, and two are 2pl, and I will bet the top one is "0" and will be the EVEN grid. The next one will be "1" and it will be the ODD grid. Engineers always start the numbering at "0". The bottom two are clearly the 2pl nozzles.

The height of a color bar in the nozzle test is exactly the same height of the grid in the Service Test. If you look close at the service test, the grid is 4 horizontal lines and if you count the number of vertical lines it is 32, and 4 x 32 = 128 nozzles. Each grid has tested all 128 nozzles in one bank. This makes my point earlier about how important the Service test print is. The nozzles check print combined with the data from the Service test print can provide the answer probably 85% of the time.
 

Trigger 37

Printer Guru
Joined
Dec 23, 2006
Messages
607
Reaction score
4
Points
136
Grandad35,... You're not going to believe this,... and I guess we have to start all over thinking about what is a bad printhead. Somehow this printhead has come back to life. It is not only back, it is one of the cleanist set of tests I've seen except for a brand new printhead, in a new printer. That is saying quite a bit. I've included both the nozzle check and the Service test print of the results to show you the success. I could not believe it when I ran the first test,.. I almost fell off my chair. How I did it is described below. Here is the nozzle check pattern.


I have scanned the test print and enhanced the colors and the contrast so it is much more visible, so all the colors are much richer and vivid. As you can see, there is no problem what so ever with the Cyan nozzle check or any other nozzle. I also did an Head alignment and it was very good. No spaces anywhere, and the black bar test which comes after the head alignment was the best test I've seen in a long time. The is really not black as it is an alignment test of all the colors done at one time, so it is a combination of all the nozzles to product black with out any streaks. Fantastic. Here is the Service test print to show you that all nozzles of every color are printing just fine.


From the Service test pattern you can see for yourself, there is not one vertical or horizontal line missing in any color. All of the registration lines are in perfect condition. Not a bad job considering I just took this printer apart down to the base. removed the Purge unit to clean it and of course to remove that I had to take off the automatic document feed mechanism. Then I had to put it all back together.

So your question should be, what majic did I use to make this happen. When I had just finished reading the latest Harry Potter book, and I was fascinated by one of the new spells he was using,... and so I tried it. LOL.

Ok, now for the real story. I had all but given up on that printhead as you can see from my last post. I was convinced that the failure was in the printhead and it could not possible be any kind of clog. So I decided to proceed with the total cleaning of the unit and get it ready for a new printhead. I took out the old head and just to put is somewhere, I rinsed it in the sink they way I do all other printhead and set it in a small container with about 1/2" of water to soak while I worked on the printer.

This printer was very dirty, and there was paper dust and other dust everywhere. As you can see from the Service test print, the last owner had printed almost 10,000 pages. When I got it, the Waste Ink was at 45%. To take everything apart and to get down to cleaning things, like the purge unit, requires that a lot of connectors be unplugged. Normally I only have to take out the main power and the two purge unit connectors, but the i560 wiring is routed a little different, and whoever put this one back together had the wiring in strange place. It was all connected correctly, but just routed poorly. So I decided to unplug it all, including the 3 ribbon cables from the main logic board that drive the carriage asm. Most people won't touch these as you have to know how to carefully plug them in to get them back together.

So I cleaned everything and rinsed the purge unit, and then I went out to play a round of golf,.. and to let everything dry. Tonight, after dinner, I put it all back together, re-installed the old head and inks just to do a physical check on the printer and to make sure I did not screw anything up. I did one regular cleaning cycle just to prime the printhead since it had been totally cleaned again and dried, and then I printed the nozzle check pattern. I was shocked when I saw the results. All of the color bars were perfect. However, one of the head alignment patterns, ietm "B" was just as it had been before but the rest were perfect. I then printed the Service test print you see above and was again supprised, as I could not see any missing nozzle data anywhere. I went back to regular mode and printed another nozzle check and this time even the "B" pattern was correct. I then printed 1/2 page of the 6 color bar test pattern to see if there was going to be any banding or streaking anywhere. It was perfect.

So,.... what miracle made this printhead come back to life. Was it the soaking of the printhead for 6 hours? Was it the unplug and replug of the cables to the carriage assembly that supply all the printhead signals, data lines, clock signals, power voltages, etc. It is obviously not a bad printhead anymore.

Here is my guesses, and these are guesses as I can't think of a way to verify any of them. I don't think that the additional cleaning of the printhead or the soaking was the fix. However, after I had soaked it for 6 hours, the water it was sitting in turned almost black, which is a sign that a good quantity of ink came out. Was it sufficient to clear some clog in the Cyan nozzles,... who knows. What I feel is that the unplugging and re-plugging of the 3 ribbon cables that drive the printhead was the fix. One of the first things I leaned in the development of computer system and high end storage systems is that the first thing to try when you have a problem with some part of a system, remove and re-seat the logic card that drives that section of the system. Electrical contacts in connectors have a way of becoming contaminated over the years. As you can see from the Service test print data, this printer was first put into service on 10/26/2003, so it is almost 4 years old.

At any point, the next time I see a printhead problem that looks to be electrical, which means it is very symetrical, I have a new test to try. The bad news is, there are very few people that follow this web site that will go to the trouble of taking a printer apart as deeply as I did. However, once you get the covers off of any iSeries printer, you can get at these cable on the logic board,... so it is possible to do the test. However, you better know what you're doing so you can get these cables plugged in again.

I would greatly appreciate any other suggestions I might have over looked. I just thankful right now that I have a fixed printer and the qualtiy is a good a new. By the way, I just got a look at the finished pictures that were uploaded, and any of the faded sections of black in either picture are really not there. I don't know what happens in the upload, but there are no faded sections in the real copy.
 

Grandad35

Printer Master
Platinum Printer Member
Joined
Feb 24, 2005
Messages
1,669
Reaction score
182
Points
223
Location
North of Boston, USA
Printer Model
Canon i9900 (plus 5 spares)
Trigger 37,

Good find! It does seem logical that the problem could have been caused by a bad contact on one of the connectors - given the low manufacturing cost of these printers it is unlikely that they are of the highest quality (gold plated, etc.).

You are right that this isn't a fix for the average user, but it does give another repair option for the adventurous when they encounter these types of printing patterns.
 

Trigger 37

Printer Guru
Joined
Dec 23, 2006
Messages
607
Reaction score
4
Points
136
Grandad35,..sorry for not responding sooner. I was on vacation for two week and was out of the country. I'm getting back to work now and hopefully I will find some new answers and add to this thread.
 

canonfodder

Printer Guru
Joined
Sep 24, 2006
Messages
267
Reaction score
1
Points
109
Location
New Hampshire, USA
Trigger 37,

I have been reading all the posts on this subject and find them very interesting.

Grandad35 suggests that the contacts for the ribbon connectors might not be gold plated. Do you find that is true? Do they look like things might be tin or solder plated?

I manufactured a large amount of electronic consumer items using connectors with tin plating and card edge contacts with solder coating. These products functioned very well for very long periods of time, but that was due to the use of a contact lubricant especially formulated for just that type of contact coating. The purpose of the lubricant was to prevent the microscopic galling of the coating metals, the tendency to grow tin whiskers, and to provide a barrier to the atmosphere and its tendency to corrode. I used Nyogel 760G. There are newer choices too.

If anyone wants to explore the connector lubricant information, read the articles at:

http://www.nyelubricants.com/pdf/nye_connector_lubes_v3.pdf
and http://www.nyelubricants.com/pdf/NEW_8917_Marketing_WP.pdf

The company website is http://www.nyelubricants.com .

Small quantity orders can be placed at TAI, phone 1-877-996-9645. NO, I do not get a commission.
 

Trigger 37

Printer Guru
Joined
Dec 23, 2006
Messages
607
Reaction score
4
Points
136
Canonfodder,... thanks for the kind words. The contacts are infact tin plated ribbon cables that snap into edge connectors. However, I have some new news about the miracle repair of that i560 printer. I had finished it and then took two weeks vacation. When I came home yesterday I tried the printer just to confirm that it was still ok. I did not do a cleaning,...I just requested a nozzle check and the printer did it's usual self cleaning, since there had been no other printing for 2 weeks. To my supprise the cyan nozzle only printed the top half full and the bottom half was faint. This was again a perfect symetrical pattern suggesting a bad connection. However, I did one cleaning cycle of the Colors and reprinted the nozzle check and the full pattern was again perfect. For the i560 printer the Cyan Nozzle chech bar is made up of four nozzle sections. The four sections are shown in the Service Test print. I believe there is a 128 top section of 5 pl Cyan and a 128 bottom section. There is the same for the 2 pl nozzle sets. Therefore it is possible for each individual section to have a clog that can block that section from printing,... and it does not have to be a very big clog because just one cleaning cycle can clear it up. The key to note in all of this is that this is a different section than what was wrong with the printhead in the first place. Once seemed to be fixed by either the extensive cleaning I had done or by the total unplug and replug of the connectors. I am not convinced which one actually fixed the problem since they were both done at the same time. I do know that the last lower quadrant that was bad was fixed by one simple (not deep) cleaning cycle. Of course the printer had only sat for one week without printing. Again, this points out the need to try and print something every day or every other day just to keep the heads clear. Remember, you don't have to request a cleaning cycle, the printer keeps track of how many hours have gone by since you last printed and will force a cleaning cycle to match the hours.

One other item I noticed, since the covers are still off on this printer, is that when I printed my 6 color test chart, it appears as if the print head is only moving the paper 1/8" at a pass and to get the full color of each bar it prints successive overlay of each color. So a full bar of Cyan is actually up to 4 passes of ink jet printing. I could see the colors develop for each left to right of the printhead. It is possible that each pass may be done by separate nozzles. This could also account for some of the "Banding" problems that people have. Any head misalignment could produce banding since the overlays are not correctly aligned.

All of these questions could be answered very easily buy one Canon Engineer,... because they now how and why each nozzle prints.
 

Trigger 37

Printer Guru
Joined
Dec 23, 2006
Messages
607
Reaction score
4
Points
136
I know the information about the printhead in this last i560 has reall been confusing for me and everyone. I will try and summarize what I have observed. I can't say I have any conclusion as I am still puzzled. The problem got more confusing this morning as the I tested the i560 printhead one more time. The problem was back. The bottom half of the Cyan was faint. I tried all kinds of cleaning and Service test prints and nothing would fix it. The picture of the test are shown next.


So I took out the head and did my best cleaning process and let the head soak in Windex all day. Then I got another printhead that I knew was partially bad but at least I knew what was wrong with it. I installed it, did a deep cleaning and printed the nozzle check. It was not great so I did a couple more cleanings and got no improvement. Here is the nozzle check of that printhead.


What I noticed is that this printhead fails in the opposite way as the first head. This is very important, as one of the possibilities of the initial failure was faulty drive circuits coming from the logic board and cables and carriage asm. What this head proves is that all of that circuitry is working fine or else this head could not have printed those pattern. While I had concluded the problem with the first head was in the head, I could not prove it. I believe this test proves the problem was with the initial head.

Now after cleaning the 1st head all day long, re-installing it, priming it, it now test perfect again. So does this prove the problem all along was some kind of clog that each and every time caused a perfect symetrical failure of only one group of 128 nozzles. This is one side of one bank of nozzles. So is it a clog, or is it just and intermitant electrical connection on the back of the printhead. Those gold contact can show signs of wear if you look very close at them with a 5x magnification. The movable contact in the carriage seems to be OK, since a second head could mate with it and have no problem.

To help resolve this I need to find a way to prove which nozzle bank prints which part of the pattern in the nozzle test. I think I know from the Service Test print because the design of that test print only prints one horizontal line for each nozzle in the printhead. If anyone has any more information about nozzle checks or service test print pattern, please post it.

To add one more point of confusion, while I was in the process of doing cleaning cycles of the 1st head in the printer, I printed the following nozzle check. Here is the picture from that print.


You will notice that all the color bars printed correctly. The top and bottom of the Cyan, Magenta are fine. However, look at the test print under "B". You will see the bottom is only half printed. Also, look at the bottom right corner of the "L" print. It is missing some of the color. Each one of the letter test patterns from "A" to "M" use a different combination of color nozzles. For example, the top left section of "3eBK" is printed only with the BCI-3e Blk ink cart. The "6C" and "6M" bars are black made up of all three colors as is the "M" pattern. The "6C" by the Photo Cyan bar is supposed to be light gray bars as it is my by using Photo Cyan + Magenta + Yellow.

Again, if anyone knows where, or how, I can get more information on what nozzles are used to print which patterns, please let me know.

I am also going to put this good head into an MP730 and print that nozzle check pattern as it is a totall different pattern. It is more like the Service test print and just prints nozzle grid lines.
 

Trigger 37

Printer Guru
Joined
Dec 23, 2006
Messages
607
Reaction score
4
Points
136
I finally believe I found the answer to the problem on the i560 printhead. A lot of people have been scratching their heads trying to figure out what all of the symptoms point to as the primary problem. If you go through all of the information that I have posted above, it is very easy to get confused and not come out with any conclusions. I had myself convinced yesterday that it "CLEARLY WAS A CLOG IN THE PRINTHEAD". Well this morning the problem returned after it had gone away yesterday with the complete cleaning. It turns out to be an intermittant connection between the printhead and the carriage assembly. The small gold springs that mate with the gold contacts on the back of the printhead. These contacts are wiped each time the locking mechanism is operated. Apparantly after a lot of insertions and removals, the contacts can get worn and it is very easy to lose contact.

When it failed this morning, I opened and closed the lock lever a couple of times and this eliminated the failue. It appears to be with a couple of pins, not just one. I was suspecting a intermitant connection when I began to see missing segments in the nozzle check. I won't bother to load the prints because I think it is easier to explain them. The top part of the nozzle check would print perfect, nothing missing, but the sections under the letters, like "B", and "L", and "M", would have partially missing printing of Cyan. The missing sections were not even the total width of the pattern, which indicates the missing color was a intermitant signal. In addition, as I was printing the 6 color bar test image on 1/2 a page, the Cyan went blank in the middle for about 1/8" and then went back to normal. This misisng 1/8" was a perfectly clean rectangle, not a fade out or streak. It did this in two different places and in two different sizes.

I used my 5x magnifier to examine the gold contacts and of course they are scratched as would be expected by the seating of the printhead with the locking lever. I'm not sure if the intermitant is gone for good. Each time anyone does a cleaning, or when the printhead is parked to the right side of the printer, pressure is put on the bottom of the carriage and printhead. When a cleaning is done, the ceramic suction squares are pushed up to make a tight seal with the bottom of the printhead while the purge unit sucks in through the total path. This obviously puts a lot of pressure on the gold contacts and they could loose connection. I looked at the possibility to change the position of the printhead slightly so the gold contacts would mate in a different location. However, the printhead sets in the bottom of the carriage asm and is held in place horizontally by two tabs on the bottom of the printhead as well as to locator pins in the bottom of the carriage asm. I don't see any way to change the location. I do wonder if this becomes a permanent problem with a printhead if a very small TIN coating over the gold contacts would improve the electrical connections. I think someone else may have some information about this and I hope they add a post to this thread. I also put the printhead into a MP730 which uses the same printhead and could not get it to fail in that printer.

I have seen many problems posted on this forum that could have been this very condition,...bad electrical connection between the printhead and the carriage asm. How many times have you seen the comment, "It was working fine and all of a sudden it won't print XXXX and no amount of cleaning will correct it". Clogs just don't happen that fast. I saw what I thought was a clog and cleaned the printhead, and the action of taking the printhead out and back in was really what fixed the condition.

Looking forward to more comments.
 

Grandad35

Printer Master
Platinum Printer Member
Joined
Feb 24, 2005
Messages
1,669
Reaction score
182
Points
223
Location
North of Boston, USA
Printer Model
Canon i9900 (plus 5 spares)
It has been apparent for some time that many reported "clogs" were almost certainly due to some sort of electrical problem - your observations could explain the source and intermittent nature of many of these problems. Now, all that we need is a solution - e.g. a light coating of contact lubricant (as canonfodder mentioned) on the gold contacts before the print head is installed.
 
Top