How to confirm printhead failure

Trigger 37

Printer Guru
Joined
Dec 23, 2006
Messages
607
Reaction score
4
Points
136
This post is directed to the inkjet masters of this website. I would like to propose that this thread be used to collect and identify successful ways to confirm or not confirm printhead failure. This thread is not for those people who want to post a question about their printhead, but only for the people that feel they have good knowledge on how to isolate a good printhead from a bad one. Once we begin to get some solid answer, this will then help the 100's of people who are having the problem and don't know whether to buy a new printhead or just keep trying to clean their old one. This thread can also be used to identify how and why printheads go bad.

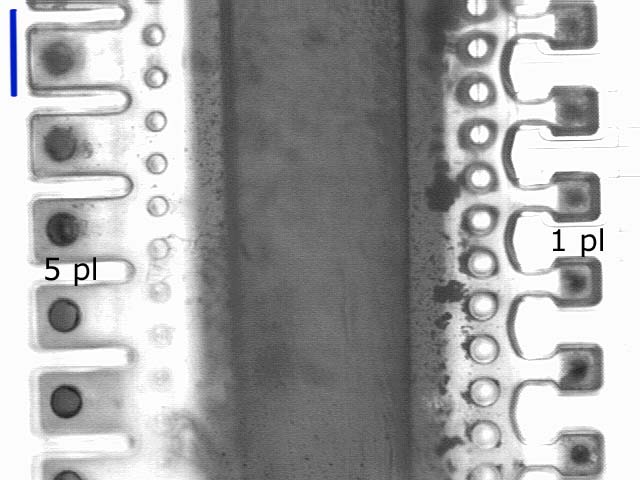
Right now I have about 7 printhead that are in question. One of them finally gave me the answer the other day. I had been trying for days to use every cleaning trick I could to clear up the problem and finally it turned to smoke in front of me. I was testing the Qy6-042 in my MP730 and it quit in the middle of a nozzle test with an error message, "WAIT -COOLING". It would not even let me get the printhead out of the printer. All of these printheads have temperature sensors in them and that is one of the items listed in the Service Test print. After letting it cool for 10-15 minutes, and pulling the power out of the printer and then putting it back, I finally got the printer to move the printhead to the center so I could get it out. It was still very warm to the touch. Under close inspection after some detailed cleaning I saw the burnt spots on outside row of nozzles. Several of them were just melted together. If this was not bad enough, I put another know good printhead back in the same printer, and it would not print at all. So it appears that the short that burnt out the first printhead has also burnt out the printhead driver.

The printer gives not error conditions and continues to try and function, but of course it can't print anything. At first I thought I good be damaging the other new printhead, but as I have several MP730's, I move the good head to that unit and it still works fine. Now I need a way to test the first printer to see if I've blown the logic card, since that is where the print driver is located. I know the odds of fixing this are about 1 in 1000. It is probably a very small 3pin IC high power driver, and of course it will be surface mounted which requires very expensive tools to even attempt to replace. I have the tools to check all the power supplies, but because every thing else in the printer works fine, I suspect the power is OK. If I get really lucky the problem could be in one of the cables or connectors to or on the Carriage Asm. Those cost a lot less than a logic card. This is all work to be done. In one way I'm lucky to have so much equipment that I can cross check a printhead from two different printers. The bad news about this is that if I put a bad printhead into a good printer to test the printhead, it is possible to kill a good printer. So this is the reason I would like to have this forum and this thread accumulate good information on how to isolate good/bad printheads. For example, I could take a known good printhead and do some electrical ohm meter measurements on all the contacts to know points. I have the pin assignments for each contact but not the schematic. I'm not sure this is a good idea since I know how sensitive the input pins are of all semiconductors. IF someone has done this kind of "Static" testing, it would be great to know about.

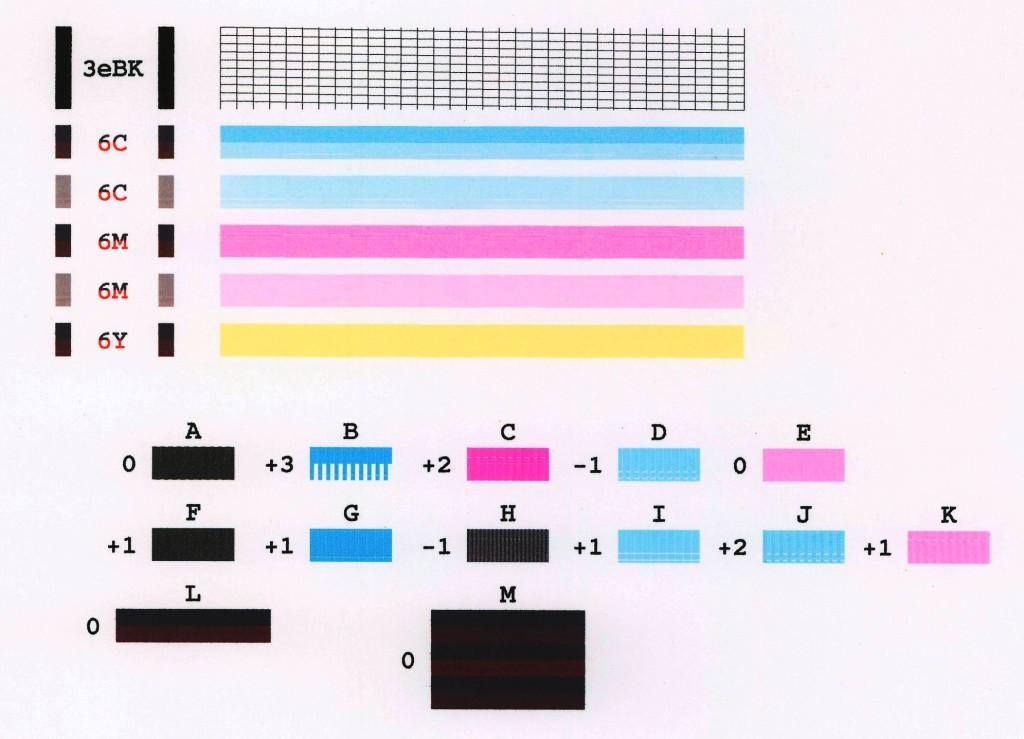
Another printhead problem that shows up many times in this forum is the "Picket fence" printing of the nozzle check pattern. I don't have time today to load an image of what I mean but the characters below will give you some idea.

||| ||| ||| |||
||| ||| ||| |||

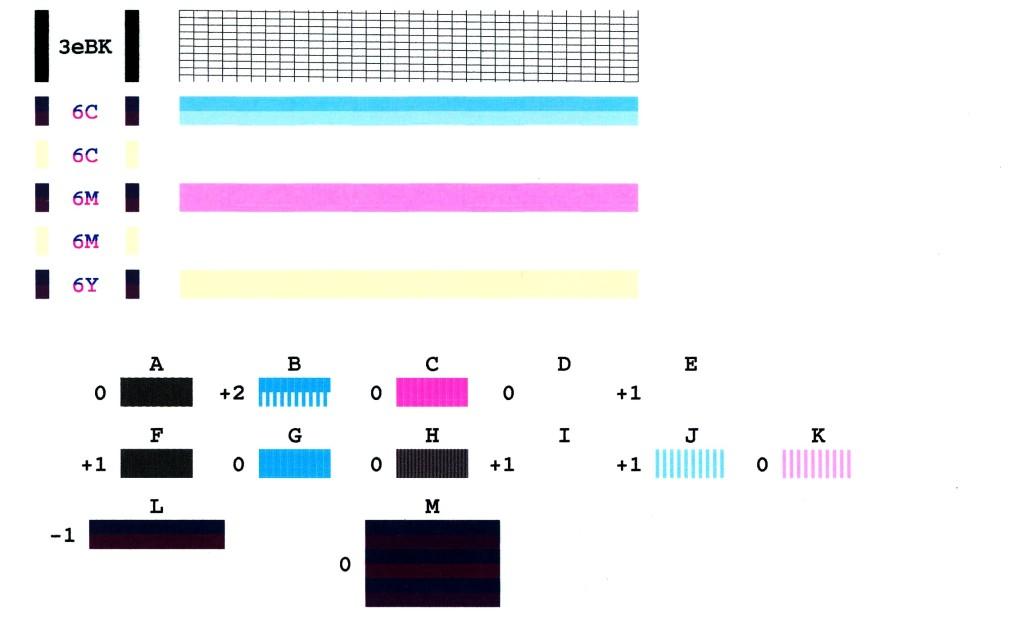
Many people have posted this problem and several people have suggested to them that this is obviously an electrical problem because it is so symmetrical. This COULD be the answer, but not all the time. I was testing another i850 that came to me as defective and I had to replace several parts including the drive belt and the Timing Code strip. Once those were fixed it printed the nozzle test the first time but it was bad since the printer had not been run for over 3 months. The first print of the cyan showed the same "Picket Fence" pattern that would imply some other electrical problem. However, the nozzles that print every other column are from a different bank of nozzles. It is just as easy for an entire bank of nozzles to be clogged as it is for them to go bad electrically. I did 2 deep cleaning cycles and cleared up the Picket Fence and now the nozzle check is perfect. So the answer is, it could have been a contact or it could have been a clogged nozzle bank. In my case it was the latter.

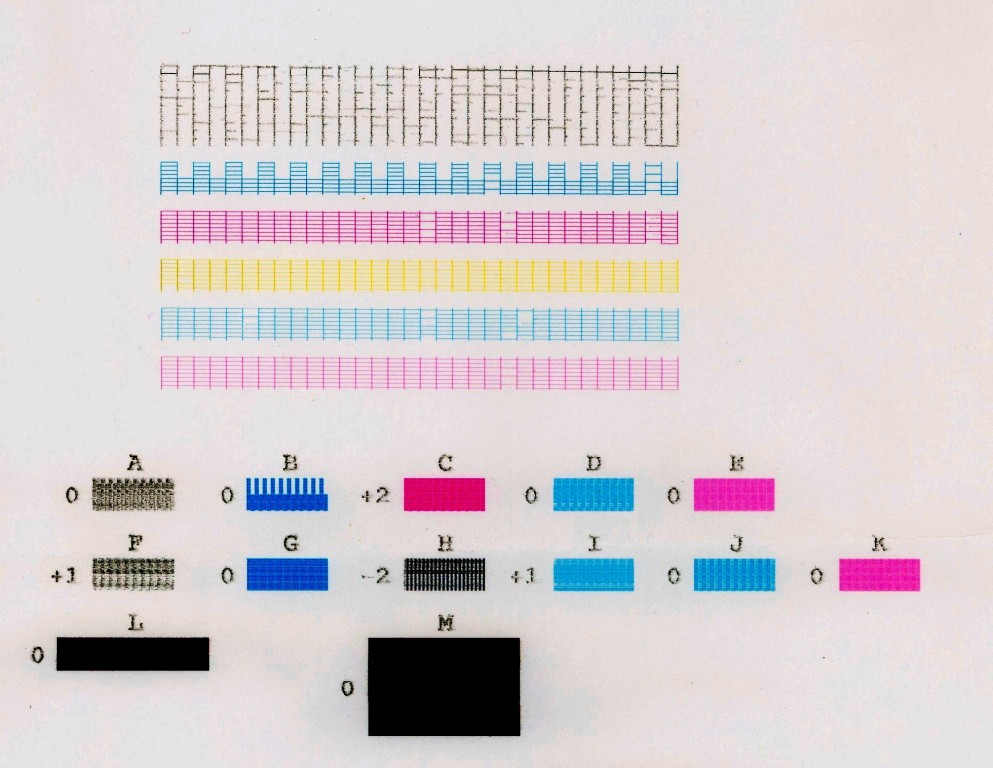
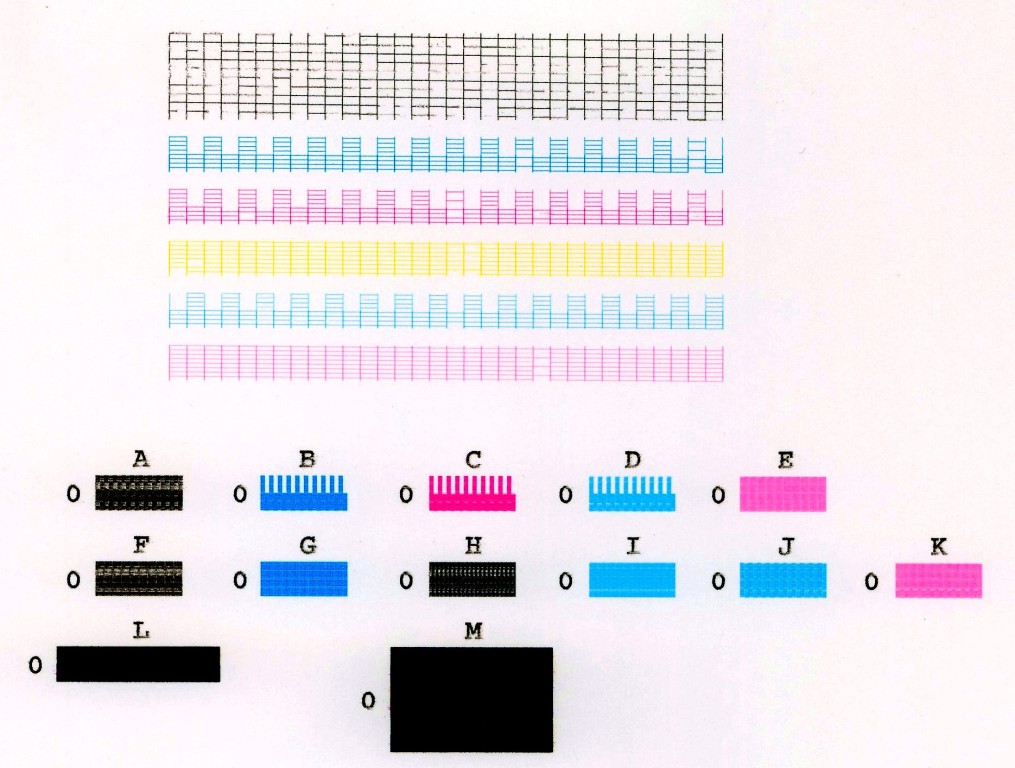
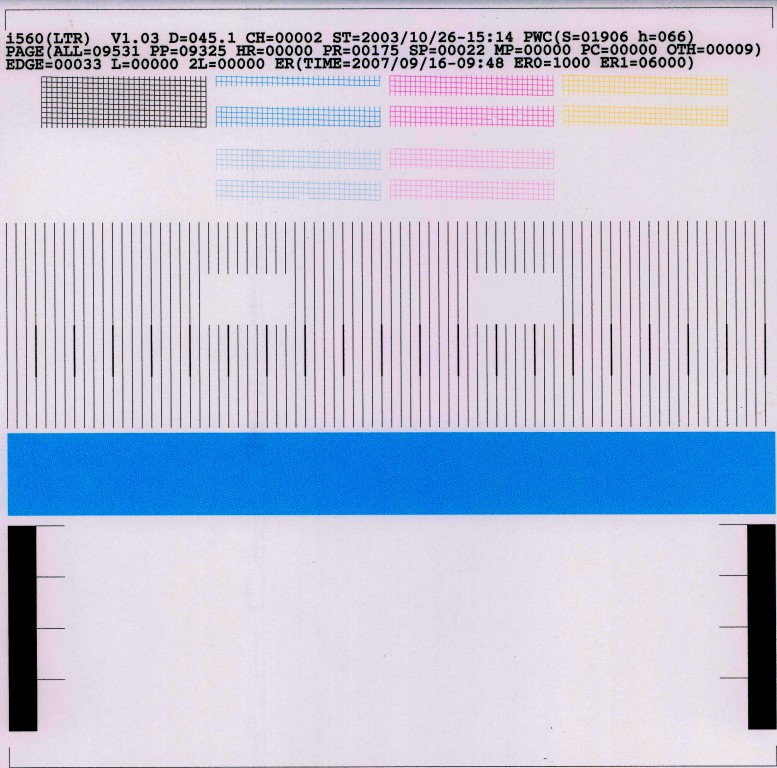
Here is another quick example of problems that people have that cause many to jump in the wrong direction. In the same printer, after I had printed several excellent nozzle check patterns, I put the printer into Service mode and printed the Service Test pattern. This always tells me more about the "TOTAL PRINTER" than just the nozzle check. The reason for this is the nozzle check uses only the very smallest about of ink flow. A real test is to see if it can sustain printing solid color bars of BKCMY. So I printed the color test pattern and in less than 2 inches the black ink faded to nothing, while all the other colors worked ok. This shocked me as I had just refilled the black in cart and tested it with a good nozzle check. I replaced it with another black ink cart (I have about 6 sets laying all over the place) and did another deep cleaning of black and re-ran the test. This time everything was perfect. So what was the problem,... not the printhead. Even though I had just put in a refilled ink cart, that cart was probably clogged internally. I've seen many suggestions that older carts get air trapped inside and the ink can't flow sufficiently.

I believe the inkjet masters of this forum have the knowledge and experience to bring together many answers to these printhead problems and these answers will help 100's of people that use this forum. I'm looking forward to your suggestions.
 

Trigger 37

Printer Guru
Joined
Dec 23, 2006
Messages
607
Reaction score
4
Points
136
This is an example of one of the most difficult printheads I've had to deal with. The nozzle check below is of a MP730 (or i560) printhead just after I received it and did a basic deep cleaning cycle in an MP730 printer.


The black nozzles are very random and appear very clogged. The cyan wasn't all that bad but it shows what I have called the "Picket Fence" pattern. The Magenta has several nozzles that appear clogged and the same goes for the Photo Cyan or Photo Magenta nozzles. These are not actually "Photo" ink carts, just nozzles of reduced size such that the volume of ink in Pico liters is so small, the image appears to have been printer with a printer using Photo Cyan ink carts. After this nozzle test I did my normal cleaning process that I have used on many printheads and it has always worked fine. I basically flush the printhead in the sink with a stream of very warm water, turning the printhead over and over and focusing the stream at both the filter screens and the bottom of the nozzles. I do this until I don't see any more ink. Then I let the printhead soak in hot water (about 3/8") or Windex over night. In the morning a do a quick cleaning with a medium hot stream and see how much additional ink colors come out. When this is done I use an air compressor and nozzle to blow all the water out of the printhead, including from behind the contact board that holds the EEprom. I get the total printhead as dry as possible.

After the cleaning, I re-install the printhead and do a couple of deep cleaning cycles to prime the printhead with good ink. Then I run the nozzle test. If the results are not satisfactory, I do one or two more deep cleanings and repeat the nozzle test. If there is none or very little improvement in the nozzle check, I installed "Cleaning Carts" with 20/80 % solution of ink and cleaning solution I have purchase at one of the major ink suppliers. I then printed the color test bar image of Blk, CMY, with the cleaning carts and see if there is any change in the nozzle pattern.

Of the printheads I have worked on, about 95% are successfully recovered to full functionality. Then there are the other 5% that just don't seem to respond to any kind of cleaning. The image below is the same printhead shown above, but after I have done all the cleaning I have just mentioned. While the black nozzles have shown some good improvement, it is clearly not sufficient. This must have been a very clogged printhead. The Cyan pattern did not change one bit. The magenta pattern for both the 5 Pico liter and the 2 Pico liter nozzles got worse in that they also exhibit the "Picket fence" pattern. I cleaned the contacts on the back of the printhead and on the carriage with Isopropyl alcohol and re-did the nozzle check but there was absolutely no difference.


So the bottom line is that these results suggest either a change in the electrical condition of the decode electronics of the printhead, or somehow the clog in the printhead for the Magenta has expanded to block a portion of the magenta nozzles.

I remember with Grandad35 took one of the printhead apart, the insides showed that there were several open ports or paths where the ink would flow from the filter inlet down to each bank of nozzles. It does not seem likely that only the top portion of any bank of nozzles would be controlled by such a port, and it leads one to accept that some electrical connects has changed in the printhead. If this is true then this puts some part of the cleaning process into a serious question. The question is, which part.

Hopefully I will get some discussion on this.
 

Grandad35

Printer Master
Platinum Printer Member
Joined
Feb 24, 2005
Messages
1,669
Reaction score
182
Points
223
Location
North of Boston, USA
Printer Model
Canon i9900 (plus 5 spares)
Trigger 37,

I applaud your efforts to develop a method to identify when there is an electrical problem or a clogged print head. As has already been stated numerous times, the conventional approach of swapping print heads is risky on Canon printers because a defective print head can blow the mother board and vice versa. The situation is especially difficult for the average user, with a new print heads price often coming close to the price of a complete printer minus the ink carts.

This is why it is necessary to understand the construction of the print head under consideration. For example, the first nozzle check that you posted (copied below for reference) was produced on a printer with dye based C/M/Y and pigment based Black. As you stated, the Magenta and Cyan are printed in two different drop sizes to emulate the Photo inks. This is similar to the print head shown starting at (http://www.nifty-stuff.com/forum/viewtopic.php?pid=13158#p13158). Because the dark Cyan and Magenta tests are generated with ink from two separate nozzle banks, it is possible for an alternating Cyan or Magenta pattern (a picket fence) to be caused by a clog in one of the two ink supply channels. However, since such a clog would also affect the corresponding light Cyan or Magenta nozzle check, this doesnt seem to be the most likely cause of this problem, since both of those nozzle checks are normal. Another indicator that this might be an electrical problem is that exactly half of the pattern is missing. As is shown on (http://www.nifty-stuff.com/forum/viewtopic.php?pid=13256#p13256), there is an electrical discontinuity at the middle of each bank of nozzles, making an electrical problem more likely.


Your second nozzle check (again copied below for reference) shows that both the Dark and Light Cyan are missing the top half of one of the two banks. This missing areas could be from the same nozzle bank or from the second nozzle bank (we dont have enough information to say which), but they are again missing exactly half of the pattern (always the top half). The light magenta pattern indicates good ink flow to both magenta banks, making a clog an unlikely cause for the Dark Magenta problem.


I am not a big fan of getting water behind the contact board because tap water contains lots of minerals that can leave behind conductive salts after the water evaporates. If this area does get wet, use a syringe to inject lots of rubbing alcohol (it isnt pure alcohol, but any water in the alcohol should be distilled and free of minerals) at different angles into the space behind the board. Shake out as much alcohol as possible, then use low pressure compressed air (5-10 psi) to blow out the residual alcohol. Use a hair dryer set on low to heat the outside of the board and evaporate anything that remains before reinstalling in the printer.

Over the years, I have saved industrial printed circuit boards that got soaked (sprinklers were accidentally activated) by taking them to a printed circuit assembly house and running them through the cleaning process used after boards are soldered. Perhaps something like one of these might help (http://www.criticalcleaning.com/CCContact.htm). We have used these type of products to clean up after a bench repair, and they might work in this case (especially if you grind off the nibs that hold the circuit board in place so that you can get the spray onto the EEPROM).
 

Trigger 37

Printer Guru
Joined
Dec 23, 2006
Messages
607
Reaction score
4
Points
136
Grandad35,... Thanks very much for your response. You are correct about having known the risks involved in swapping printheads from machine to machine, as I knew the risks before I did it. I regret it now as I cried for two days after I did it, but that's all water under the bridge. I doubt if that should happen to very many other people as they don't have 5 printers of the same model number, but if I can help solve the isolation problems of bad printheads, it would really help others.

I saw a post by another person on a different web site where he had a similar problem and borrowed a printhead from one of his friends and put it in his printer. It blew out the same set of nozzles and now he not only lost his own printhead but had to buy a new printhead for his ex-friend.

I also agree with you about the cleaning of any water that might get behind the contact board. I have also worried about the many people I've read about that soak their printheads overnight. I know, from my 33 years with IBM as an electrical engineer, just how delicate printed circuit boards and the associated integrated circuits can be. Back then the circuits were well protected from chemical wash as they always go through a cleaning bath that is ten times stronger than anything I could ever do with water or Windex. The circuits were not hermetically sealed, but they are designed to stand up without damage from the cleaning baths required to produce the finished product. That is why I have never worried about the water, except to make sure every thing is totally dry before I put them back into a machine.

Getting back to the main topic, which is to isolate an electrically defective printhead from one that is just clogged, I am still having problems with this same head. As we both agree, the Cyan and Magenta patterns suggest a bad electrical connection or drive to 1/2 of on row of nozzles. The question that I am now working on is the Black nozzle pattern. You can see how random the pattern is and how bad the majority of nozzles are printing. This suggests a very severe head clog. I have continued to work on only the black nozzle bank and have done several more deep cleaning cycles, and I have installed a black cleaning ink cart and have printed many pages of just black bars. After several black pages I have done a nozzle check and still there is not one bit of improvement in the black nozzle pattern. The bad nozzle patterns are too random for any kind of electrical problem so the answer has to be a "VERY SEVERE BLACK INK CLOG". I've installed Cleaning ink carts with OEM cleaning solution, and I have tried a mixture of Windex, Isopropyl Alcohol, and a little black ink as a marker. I've done 6 half page prints of just black color bar and have seen no improvement. This has got to be one of the worst head clogs I have every seen. I'm at my wits end to figure out a better way to clean the black section.

I remember from one of your posts you took a printhead apart and were able to clean it that way. But even this is not going to let you get at the individual nozzles, just the ink supply path. Do you continue to believe that disassembly of the printhead can get one down to the point where physical cleaning is going to be successful.

I've also seen where you and the other "masters" have gone into detailed analysis about the structure of the printhead nozzles. However, I've never seen you or others suggest some tool or process that would allow physical cleaning of a printhead once it was disassembled. The opening is there but I wouldn't think of trying to break up a clog physically. Of course some more aggressive soaking in elevated temperature could be done but I don't know what else. The head I have now is the perfect candidate. It is not sellable to anyone so I plan on taking it apart just to see if I can be successful in cleaning the Black ink Clog.

Any suggestions would be appreciated.
 

Grandad35

Printer Master
Platinum Printer Member
Joined
Feb 24, 2005
Messages
1,669
Reaction score
182
Points
223
Location
North of Boston, USA
Printer Model
Canon i9900 (plus 5 spares)
Trigger 37,

When I disassembled my print head I had a clog that was so severe that not even compressed air or a high vacuum could make it through the PM channel. The clog wasnt in the ceramic print head itself, but in the plastic cart carrier that feeds the ink to the ceramic print head I suspect that it was a piece of assembly debris that broke free and clogged a flow channel. In this case, I dont think that disassembling your print head will fix the black ink problem.

I agree that the black clog appears to be due to clogged nozzles, given its random nature and that it improved between the first and second posted scan. To make sure that it isn't a problem caused by a clogged cart, print a second nozzles check immediately after the first. If the missing bars are in exactly the same places, it is a nozzle problem. If the pattern changes, it is probably an ink starvation problem.

The black on this printer uses pigment based ink, and pigment based ink is far more prone to clogging than dye based ink. Did anyone put dye based ink into a black cart? These two ink types have different formulations, and it is possible that there was an interaction that precipitated some very hard particles inside the nozzles. Also, a pigment based ink not designed for the high temperatures in a Canon print head (e.g. Epson ink) could easily cause problems. The image below shows that the nozzle openings are very small (about 6 and 12 microns for the 1 pl and 5 pl dye ink nozzles, and 25 microns for the pigment black nozzles). Given that a human hair is about 75 microns in diameter, it would be somewhat difficult to mechanically clean the nozzles. I would think that the best approach with the black clog would be ammonia based Windex (the new improved ammonia free version doesnt seem to work nearly as well) and compressed air (5-10 psi) blowing in both directions.
 

Trigger 37

Printer Guru
Joined
Dec 23, 2006
Messages
607
Reaction score
4
Points
136
Canonfodder, yes I have a dozen or more Black BCi-3e cars, and two of them have been filled with various mixtures of cleaning solution. I also have put the same prinhead into an i850 that I have disassembled so I can see the cleaning action and the ink pass thru the purge unit. I have also used the same ink cart with another head in this printer and printed a perfect nozzle check.

I've done about another 6 half page prints of solid black with the cleaning cart and then a couple of more deep cleanings on black and a couple of nozzle checks mixed in. I can see no change. The ink in that printhead must be solid as a rock. I have concluded that this head, while not working very good, can provide me a good test head for other printers that use the -042 printhead. I surely don't want to use a new printhead while testing an unknown printer.

If I can get my hands on a drimmer tool? I will grind off the black tabs that hold the contact card and take apart the head just to see inside a little at the black ink path. There has got to be some real junk in there.

Grandad35, Thanks for the info on the location of the clog you had on that printhead. Also, the suggestion about the back to back nozzle checks is a very good idea. As far as the Windex, I buy it by the gallon size and it is the original forumla.

At one time I saw a note that you or someone else posted that the nozzle check prints right to left and the Service test pattern prints left to right. Since I have the covers off of the i850 I can watch the print cycle, even through it goes very fast, and it is clear that it prints just about all patterns in both directions as well as multiple passes on each pattern. I'm going to have to watch it closer because I think this can also be a very good clue as to which nozzle print in what direction and under which tests. The Service test pattern prints a completely different set of nozzle patterns, as they are compressed in size but still test each nozzle.

One last quick question. I have the service manuals for the MP730 and there is no real way to print a Service test pattern for the MP730. In all other canon's you can get into service mode and force the Service test pattern and they have a lot more information about the calibration of the printer.
 

Trigger 37

Printer Guru
Joined
Dec 23, 2006
Messages
607
Reaction score
4
Points
136
Back again,.. I've moved on to another printer, but it also uses the same model printhead. Again, this is an attempt to gain more knowledge on how to isolate problems with printheads between clogs and bad heads. The first picture below is a nozzle check after I had done only 1 cleaning cycle after hooking up the printer. In all of the pictures I have uploaded, each has been optimized for viewing in this web site by enhancing the contrast and color levels. This makes them much darker than what is real but they are much easier to see.


You can see in this picture that the lower half of the Cyan nozzles did not print. Also, neither one of the Photo Cyan or Magenta printed. Additional cleanings did nothing. Then I removed the printhead and cleaned it using my normal water rinse process and completely dried the printhead with compresses air. I re-installed it and did one deep cleaning process and the nozzle check came out identical.

Then I put the printer into Service mode and printed the Service test print show in this next picture.


As expected the black grid is just fine but the first Cyan grid is missing the bottom nozzles, same as the nozzle check. However, the big guestion is how did the Photo Cyan and the Photo Magenta grid patterns print, since they were both not printing in the nozzle check. While I was in the Service mode I went ahead and printed out the eeprom data and I cleared the waste ink counter since those pads had been cleaned. I don't think this could have any effect on the printing of the nozzle check.

So then I went back out of service mode and printed a new nozzle check, and guess what, now the Photo Cyan and Magenta were printing, but the regular Cyan still was missing the bottom half. The next picture shows the final nozzle check.


So the question to all the expert is,... how could just printing a Service Test pattern cause the Photo Cyan and the Photo magenta nozzles ot all of a sudden print, but also print almost perfectly. They did print rather good grid patterns on the first Service print but the question is , what is any possible connection. You should also notice that on the first nozzle print, there was no pattern printed for "D" or "I", and the "J" pattern was only half bars. In the final nozzle check, every one of these was perfect. It is magic????
 

Trigger 37

Printer Guru
Joined
Dec 23, 2006
Messages
607
Reaction score
4
Points
136
I did some additional test to narrow down the possible things that could cause the problem of 1/2 of a bank of nozzles not firing. I believe the possibility of clogging is totally out as well as bad ink carts. That leaves, 1. a bad connection at the contacts on the printhead, 2. Bad cuircits on the inside of the printhead, 3. Bad signal driver from the logic board.

So to help isolate these, I took another printhead, with know conditions, and put it in this printer. However, first I did a test where I cleaned the contacts on the back of the printhead and those on the carrier with Isopropyl Alcohol and retested. This had no effect. I also did a small change to the printhead using a small piece of cardboard to force the printhead to move to the left as it is seated in the carriage. This will force the contacts to mate with the carriage at a different point. Again, this had no effect.

Now I tried a 2nd printhead. The results was that the section of the Cyan nozzles that did not print before, printed just fine. No need to upload the picture. This test eliminates items 1 & 3 above which leave the problem in the printhead. This also confirms that there is no clogging and that there was no problem with ink carts. It would be a very interesting test, if I ever get time to take each one of the contacts on the back of the printhead and insulate one at a time and then perform a new nozzle check. This should give us a table of symptoms that are 100% confirmed.

So on the last two printers I have worked on both have come up with a similar problem where only 1/2 of the nozzles in a bank of nozzles actually print. The i560 and the i850 have 512 nozzles in 4 banks of 128 nozzles each. As Grandad35 has shown, 2 of these banks are for photo size nozzles and two are for regular. To get the bad printing in the pictures above, the lower half of nozzles in two different banks are somehow missing the firing signal. That points not to wiring but to a decoder circuit. The real sad point of all of this is that Canon technical support people at their main plant have detailed reports and diagnostics to isolate all kinds of fails like this. At IBM we did these kind of "White Papers for each product we ever put out. They were call failure mechanisms. After all Service was our most important product. I don't think I can hold my breath until we see Canon ever put out information like that.

If there are people out there that know more about how the decoders work and what specifically could fail to cause this kind of printing, It would solve one piece of our puzzle.
 

Grandad35

Printer Master
Platinum Printer Member
Joined
Feb 24, 2005
Messages
1,669
Reaction score
182
Points
223
Location
North of Boston, USA
Printer Model
Canon i9900 (plus 5 spares)
Trigger 37 said:
...snip...To get the bad printing in the pictures above, the lower half of nozzles in two different banks are somehow missing the firing signal.
As I see your nozzle checks, only one of the two banks is missing its bottom half - the other bank is working normally:
1. The bottom of the "6C" cyan bar isn't completely missing - it's at half strength.
2. The "B" test bar is half filled on the bottom.

These studies are very interesting - we get to see the results while you do all of the work. This study tells us that the problem was in the print head - either a clog or an electrical problem. Given the nature of the print head's construction, it is difficult to see how two banks of nozzles spaced only about 250 microns apart (the width of 3 human hairs) can share the same ink supply channel and have exactly 1/2 of one bank clogged while the other bank functions normally. This sure looks like an electrical problem.

I haven't been keeping track, but does it seem like the bottom half is usually the missing half in this type of failure? As you said, Canon undoubtedly knows what causes these failures.

The real goal is to know when the problem is in the printer and that a replacement print head won't fix the problem (and may be damaged in the process), or when a replacement print head will fix the problem.
 
Top