How many color patches are needed for a (good) profile ?

Ink stained Fingers

Printer VIP
Platinum Printer Member
Joined
Dec 27, 2014
Messages
6,238
Reaction score
7,433
Points
373
Location
Germany
Printer Model
L805, WF2010, ET8550, T3100X
I made another test to compare profiles with based on different patch sheet counts and the impact onto actual prints.

I did this -

- I created several icc-profiles with 96 - 283 -720 - 1440 - 2880 color patches onto the same paper type, a glossy cast coated 210 gr paper by the Action thrift shop.

- I used these profiles and printed a patch sheet with 450 patches - the same patch sheet with the same printer setting - rel col rendering intent and no Black Point Compensation with the different profiles. . I used a patch sheet and not a regular image to compare because I let 1Profiler do the print comparisons and do the statistical values.

- I scanned these 5 sheets and let i1Profiler do the comparison of the scanned patch sheet data - aways against that profile created with 2880 patches.

The software compares all thes 450 patches and calculates the average DeltaE for all of them

DeltaE = 0.60 for the comparison of a profile created with 2880 vs. 1440 patches
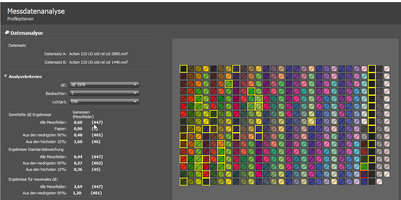
2880-1024 patches.png
The program displays as well the max peak value of an individual patch, in this case 2.69 .

DeltaE = 0.91 for a profile from 720 vs. 2880 patches

DeltaE = 1.0 for a profile from 283 vs. 2880 patches

DeltaE = 1.4 for a profile from 96 vs. 2880 patches

96 patches fit easily on a 4 x 6 inch paper sheet, 96 patches appear to be enough in comparison to 2880 patches to create a profile with such small deviations.

This 450 patchcount sheet is printed via a profile which does quite some changes to the actual color values - based on the rendering intent how out of gamut colors are reassigned to color values inside the printer gamut or on the edge of it.

This becomes visible with the Gamutvision program

Gamutvision.png


The screen copy displays both the sRGB gamut and the printer gamut inside of it. Attention is drawn to the lower part of the display - showing some small light arrows pointing from the surface of the sRGB gamut to some points on the boundary of the printer gamut. All colors outside the printer gamut are remapped to colors on the printer gamut as the vectors show, and these vectors have a different direction if you choose another rendering intent. It is apparent that the color saturation and hue changes are significant, these changes are much wider than the small changes between the number of color patches used for the profile generations in this test.
It is my conclusion that I'm already getting quite a good profile just with 96 color patches which does not differ much from a profile created with 2880 patches.
 
Last edited:

pharmacist

Printer VIP
Platinum Printer Member
Joined
May 29, 2007
Messages
2,780
Reaction score
1,585
Points
313
Location
Ghent, Belgium
Printer Model
SC-900 ET-8550 WF-7840 TS705
I think the Colormunki/i1Studio/Calibrite method using the 50 + 50 patch method is actually based on these findings. The difference is the measurement of the first patch set of 50 gives a good idea how the curvature of the RGB-model will be and calculates the estimated end colour, what should be and reads this end colour again and corrects it again what the exact curvature should be and thus estimating the final profile.

The original MacBeth iMatch software 20 years ago has a simple target that only uses 45 patches..... So I understand the Spyderprint 225 patch high quality target is for most of the users more than enough to get a more than satisfactory profile. I was able to squeeze this 225 patch target on a single 10x15 cm photo card and indeed: no difference visually compared to a higher 700 patch target.

Spyderprint 225 patch high quality target 10x15 cm.jpg
 
Last edited:

Ink stained Fingers

Printer VIP
Platinum Printer Member
Joined
Dec 27, 2014
Messages
6,238
Reaction score
7,433
Points
373
Location
Germany
Printer Model
L805, WF2010, ET8550, T3100X
I happened to get access for a short while to an i1Studio spectro, and I ran a few tests with the i1Studio software to create a profile - on the Action glossy paper 210gr. The software splits the action in 2 parts - with 2 patch sheets - the second one for an optimization step. Both patch sheets are of the 5x10 pathes format to be scanned with the i1Studio spectro. Further improvement/optimization steps are possible, but I didn't use that option.
The i1Spectro software recommends to let the patch sheets dry for at least 10 minutes before scanning, I consider that time window much too short, the colors of dye ink prints are drifting for days as I have shown in a test

https://www.printerknowledge.com/threads/fading-of-patch-sheets-in-the-dark.16099/post-142795

I consider 10 min as by far too short to get a good and valid profile. If you go for a day or longer the question comes up how you time the printing and scanning of the patch sheets - specifically the 2nd sheet - you do it directly after the 1st print and a direct scan or you scan a day later , print the 2nd sheet and wait another day with scanning - which would take 2 days overall for such profile. Anyway - that's what I did - both options and created profiles this way.

I created profiles with various numbers of patch colors - from 2880 to 96 colors - this with the i1Profiler software and printed a patch sheet with various of such profiles and used the data comparison function of the i1Profiler software. it reads all patches and I can let it create deltas between such patch sheets and calculate an average of all DeltaE's for all patches. This is a good indicator how well different patch sheets match.

I compare the patch sheet printed with a profile done with 2880 patches against a patch sheet printed with a profile done with 720 patches

2880 - 0720 - 1.83 deltaE

2880 - 0192 - 1.51 deltaE

2880 - 0096 - 1.43 deltaE

This looks pretty good up to this point - even profiles created just with 96 patches still deliver color correct prints which don't differ more than a profile from 720 patches.

If I print with a profile done with i1Studio I get this number - 50 color patches per sheet

2880 - 0100 - 3.60 deltaE -------- this with a short period between the 1st and 2nd scan

2880 - 0100 - 2.84 deltaE -----this with scanning the first sheet after a day and printing the 2nd sheet, and scanning the 2nd print the 2nd day and creating the profile

It appears to me that the i1Studio profile with 100 patches is less accurate than a profile with 96 patches with i1Profiler - on the same paper - with the same inks and the same driver settings - no color mgmt - on Windows 10.

The different timing creates a small benefit for the 2-day cycle, but is probably not worth the waiting time.
 

pharmacist

Printer VIP
Platinum Printer Member
Joined
May 29, 2007
Messages
2,780
Reaction score
1,585
Points
313
Location
Ghent, Belgium
Printer Model
SC-900 ET-8550 WF-7840 TS705
Thanks for the update. Yes I have found the i1profiler giving much more consistent profiles than the Colormunki/i1Studio device with the 50 + 50 patch method that is a bit clumsy to use. I think it has to do with the method the profile is generating (software limitations) that gives the lesser accuracy.....however using the ArgyllCMS method does produce much better and more accurate profiles; not only it is a one step method: time to have the patches to dry properly before scanning, but also the increase amount of patches to sample the RGB colour space much better than the 50+50 method: if the behaviour is not linear between let's say R:100%/G:0%/B:0% and R:0%/G:100%/B:100% the Colormunki/i1Studio software cannot know what the intermediate colours are in this curved behaviour, because it presumes a straight line. For this you need more intermediate measure points to determine the curvature and better estimate how the printer behaves if it is not linear. I might try to make an ArgyllCMS target that is based on the Spyderprint "High Quality Target" with 225 patches that seems to give pretty good printer profiles and can be scanned without the need of a scanning jig on a singel sheet of A4 for comparison.
 

Ink stained Fingers

Printer VIP
Platinum Printer Member
Joined
Dec 27, 2014
Messages
6,238
Reaction score
7,433
Points
373
Location
Germany
Printer Model
L805, WF2010, ET8550, T3100X
This was just a limited exercise; I don't know if there is any improvement with newer software from Calibrite with this type of spectro; the short waiting/drying time recommendation of 10 min is just too short for dye inks anyway, and there are some papers which are more critical than this Action 210gr paper as you point out.
 

pharmacist

Printer VIP
Platinum Printer Member
Joined
May 29, 2007
Messages
2,780
Reaction score
1,585
Points
313
Location
Ghent, Belgium
Printer Model
SC-900 ET-8550 WF-7840 TS705
This was just a limited exercise; I don't know if there is any improvement with newer software from Calibrite with this type of spectro; the short waiting/drying time recommendation of 10 min is just too short for dye inks anyway, and there are some papers which are more critical than this Action 210gr paper as you point out.
Actually not: the ccStudio is just a window dressing version of the i1Studio software. It is still based on the 50 + 50 method for a colour profile and 50 + 2x50 for ABW-mode or colour profile with neutralising grey steps. I find the second method more accurate even for colour printing, BUT it is not possible anymore to do optimization scans based on a ABW-mode profile. Somehow the software blocks optimizations on this type of profiles. The standard colour mode profile can be improved indefinitely if you wish, but I never have done more optimizations than 2 times after the initial profile has been generated. After I had purchased my i1Pro2 device; I only use it sporadically and in combination of with ArgyllCMS that gives much more accurate profiles (and definitely more neutral black and white prints compared to standard colour profile method + 2 extra optimizations), probably my 1 sheet A4 ArgyllCMS patch set with 480 patches has 128 greys steps to maximize sampling of the grey and neutral axis area of the colour space within the limited 480 patch size of the target. It can deal with difficult ink set that are non-linear, like with a faulty LC ink in my previous P800 that causes a strange and sudden colour transitions in blue skies (clipping), that the Colormunki/i1Studio/ccStudio software with its 50 + 50 method could not deal with properly (it presumes a straight behaviour between 2 colour points, wich with my faulty LC towards C was not the case) and cause a sudden strange clipping in the sky blues. The ArgyllCMS method could deal with this strange clipping very well and uses more of the dark cyan (variable droplet technology of the Epson printer) to compensate for the faulty (too light) LC and gives a nice smoot rendition between very light cyan/blue towards dark cyan/blue. This is because the ArgyllCMS measures at least 5 extra points between LC and C.
 

Ink stained Fingers

Printer VIP
Platinum Printer Member
Joined
Dec 27, 2014
Messages
6,238
Reaction score
7,433
Points
373
Location
Germany
Printer Model
L805, WF2010, ET8550, T3100X
@pharmacist - thanks for all the additional information; I returned the i1Studio package already back to a friend of mine, he is happy with it but is not using it very frequently, he tells me that he has profiled all the papers already he is using.
 
Top