This is exactly what I am doing in recent months. While my printers use old transparent cartridges, I only look at the outlet sponge. Once it starts becoming visibly soaked I stop, drawing very little ink as I remove the needle.PeterBJ said:I continued to carefully inject ink until the ink outlet became moist.
You are using an out of date browser. It may not display this or other websites correctly.
You should upgrade or use an alternative browser.
You should upgrade or use an alternative browser.
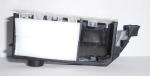
First time refilling opaque cartridges CLI-526/PGI-525
- Thread starter MP640
- Start date
- Joined
- Jan 18, 2010
- Messages
- 16,184
- Reaction score
- 9,134
- Points
- 453
- Location
- Residing in Wicklow Ireland
- Printer Model
- Now have 3 Ender-3 V3 Plus SE/
My original concern with refilling of these opaque cartridges was that our Mr. Joe average
wont have the necessary knowledge, experience or patients to do it the correct way just like you guys do.
Both Tudors and PeterBJs methods work to the point of being excellent and everyone should follow their procedures to get a good and successful refill every time.
The extra effort needed to refill these opaque cart is so worthwhile because youre basically flying blind when its compared to refilling a clear cartridge, but most Joes may well not see these good advantages at all.
Our average Joe will take the smartest, shortest and most convenient route (They think) to fill their cartridges FULL and cut out all of these unnecessary steps which seem to them to be a total waste of good time.
How do we educate the new Joe on the block to follow these correct guidelines and stay out of trouble with their refilling, these cartridges are pretty small so most will try to get as much ink into them as possible.
More and more printers will and are using these opaque cartridges so there is going to be a Sumani of these questions heading our way, not to mention I think My print head is clogged, Whats wrong i.e. incorrect refilling procedures.
Maybe I am over stating the problem a bit or maybe not, just because it doesnt affect me or many others who dont use these cartridges, but many many more will.
So I reckon we should have one or two recognised safe ways (Like Top & German methods)
pointing to a proper refilling method of the opaque cartridge and avoid any future problems cropping later..
- Joined
- Nov 27, 2010
- Messages
- 5,255
- Reaction score
- 5,164
- Points
- 373
- Location
- Copenhagen Denmark
- Printer Model
- Canon MP990
I agree, given the chance to experiment with the opaque cartridges, that's what I am trying find by testing and discussing variations to the good old tried and tested refill methods to make them suitable for refilling those dreaded opaque cartridges.The Hat wrote:
So I reckon we should have one or two recognised safe ways (Like Top & German methods)
pointing to a proper refilling method of the opaque cartridge and avoid any future problems cropping later..
When we have agreed on a couple of methods being suitable, I could post them in a new thread, named "How to properly refill the opaque Canon PGI-x25/CLI_x26 cartridges" or something similar.
I admit that I like "Average Joe" have made the mistake of not reading instructions carefully enough and missing some finer details, being too impatient. Well, you learn from your mistakes. See this post: http://www.nifty-stuff.com/forum/viewtopic.php?pid=59835#p59835 ,so I think instructions in a new thread should be detailed and with photos. One important item to include is the problems with overfilling a cartridge, and how to avoid overfilling.
- Joined
- May 6, 2011
- Messages
- 505
- Reaction score
- 203
- Points
- 183
- Location
- Cluj-Napoca, Romania
- Printer Model
- Epson L800, 1400; ML-2165W
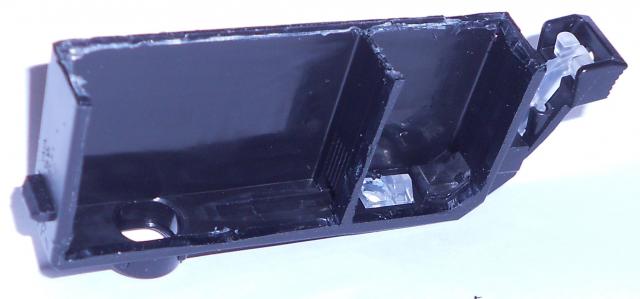
Peter, I took some pictures of the opened CLI-526:
 <-- click to enlarge
 <-- click to enlarge
 <-- click to enlarge
Disregard the hole near the prism, I tried bottom refilling.
 <-- click to enlarge
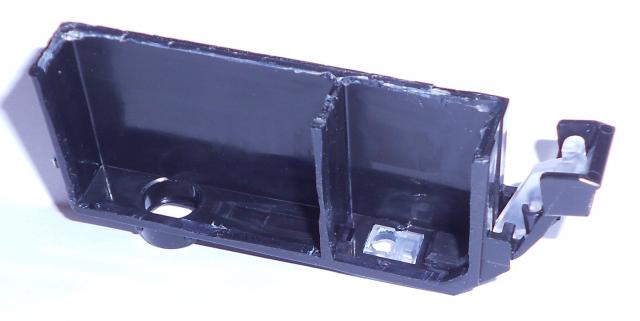 <-- click to enlarge
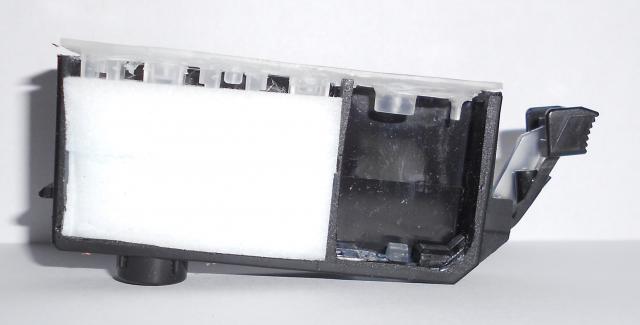 <-- click to enlarge
Disregard the hole near the prism, I tried bottom refilling.
- Joined
- Nov 27, 2010
- Messages
- 5,255
- Reaction score
- 5,164
- Points
- 373
- Location
- Copenhagen Denmark
- Printer Model
- Canon MP990
Thanks for the pictures. As you said in a previous post, the inner works of the cartridge are very similar to those of the CLI-x21, this confirms that the weight of the cartridges also are very similar or exactly the same.
Also thank you for the tip in this post: http://www.nifty-stuff.com/forum/viewtopic.php?pid=62653#p62653 . I will give that method a try to see if that is easier than watching the prism/window at the bottom when doing a German method refill.
I guess that the purpose of the bottom refill was to get access to the ink chamber without piercing the sponges? Some time ago there was a thread about a refilling method injecting ink through a silicone sealing plug. The cartridge was held upside down when injecting the ink, as in the German refill method. I think the method was inspired by these plugs: http://www.rjettek.com/Inkjet-Suppl...i3-CLi8-CLi221-PGi5-PGi220-PGi225-PGi226.html . I think this method could be considered a hybrid of the German and top fill methods. Does anybody remember that thread? I have searched for it without success.
- Joined
- May 6, 2011
- Messages
- 505
- Reaction score
- 203
- Points
- 183
- Location
- Cluj-Napoca, Romania
- Printer Model
- Epson L800, 1400; ML-2165W
That can be used to see ink level in oem cartridges with the label intact when they are installed.PeterBJ said:Also thank you for the tip in this post: http://www.nifty-stuff.com/forum/viewtopic.php?pid=62653#p62653 .
The german refill method can be used with 526 and you can see when the chamber is full by looking through the window near the prism. But... you have to go through the sponge, maybe disturb it, maybe push the ink that is already in the sponge through the breathe hole... It's too much trouble for my taste.
I remember I was excited about that method, but... it still has the risk of pushing the ink that is already in the sponge through the breathe hole.PeterBJ said:Some time ago there was a thread about a refilling method injecting ink through a silicone sealing plug. The cartridge was held upside down when injecting the ink, as in the German refill method. I think the method was inspired by these plugs: http://www.rjettek.com/Inkjet-Suppl...i3-CLi8-CLi221-PGi5-PGi220-PGi225-PGi226.html . I think this method could be considered a hybrid of the German and top fill methods. Does anybody remember that thread? I have searched for it without success.
The top fill method is ok, but too much of the ink chamber is left empty. Bottom filling should take care of that and combines the two mentioned methods: no overfilling and full ink chamber. But... I had some problems with the first set I refilled using bottom fill. Never tried it again (yet). What I think was the problem: the hole was 4 mm instead of 3.5 or 3. The space beneath the cartridge is less than 1mm, so only the low profile plugs can be used and these are 4mm in diameter.
I made a few photos while top filling a CLI-526M: http://www.nifty-stuff.com/forum/viewtopic.php?id=8604
- Joined
- Nov 27, 2010
- Messages
- 5,255
- Reaction score
- 5,164
- Points
- 373
- Location
- Copenhagen Denmark
- Printer Model
- Canon MP990
I think this problem is common for both the traditional German refill method and the injection through the plug version of the German refill method. But with the injection through the plug there is no risk of needle damage to the sponges.Tudor wrote:
I remember I was excited about that method, but... it still has the risk of pushing the ink that is already in the sponge through the breathe hole.
See this instruction for German method refill by mikling from Precision Colors: http://www.precisioncolors.com/Canon german Method.pdf and note the covering the vent with aluminium tape. I think the purpose of this covering is to avoid getting ink into the vent area.
I have also tried top filling a PGI-525 cartridge. I used the method described in this post by mikling: http://www.nifty-stuff.com/forum/viewtopic.php?pid=40771#p40771 with the extra step of using a wooden toothpick as a dipstick to gauge ink level.
After having removed the sealing ball, I put the cartridge into a storage clip, and filled ink into the ink chamber until the level was approximately 1 cm or 3/8", using the toothpick as a dipstick. I then sealed the vent with a piece of aluminium tape and slowly continued to fill in ink till the ink chamber was full and a little ink was on top of the cartridge. I cleaned away the excessive ink and sealed the cartridge using a low profile/zero clearance plug plus aluminium tape.
The weight of the cartridge was only 33.8 g, but the ink exits the cartridge in a normal way when blowing into the vent, and the performance of the cartridge is also OK when tested in a Pixma 3600. I think at least some of the missing weight is caused by the problem with filling the ink chamber 100% when doing a top fill. The "well" that holds the sealing ball/plug prevents filling 100%.
The prism system should trigger a low ink warning when the ink chamber is empty, and if you refill the cartridge when you get the low ink warning, there is no risk of printing with a slightly underweight cartridge, as long as there are no ink flow problems.
Overfilling a cartridge could cause the cartridge to leak or ink in the vent maze could block the vent and cause ink starvation. So don't try to add the missing ink by dripping ink onto the outlet after an underweight refill. This could cause ink to fill the vent maze. This has happened to me, so I had to flush and dry the cartridge and start over with the refill.
There is also another way of top filling without sealing the vent, and filling only to 75% in the ink chamber. But this method works best with the transparent or windowed cartridges where you can easily see the ink level. This method is described by The Hat here: http://www.nifty-stuff.com/forum/viewtopic.php?pid=40766#p40766 . Using this method with an opaque cartridge would involve a lot of probing the the ink level, so I found mikling's approach more convenient.
I wonder how these cartridges are filled at the factory. Maybe an "upside down" method or vacuum method is involved? Maybe knowing Canon's way of filling might lead to the ultimate refill method?
- Joined
- Jan 18, 2010
- Messages
- 16,184
- Reaction score
- 9,134
- Points
- 453
- Location
- Residing in Wicklow Ireland
- Printer Model
- Now have 3 Ender-3 V3 Plus SE/
PeterBJ
Reading through your thread and Tudors, I found it interesting that sealing the air maze is making a big comeback, which I dont particularly promote myself.
I found that I could get away without covering the air maze while refilling the clear cartridges
and also liked the assurance it gave me when my cartridge dribbled a little before I inserted them into my printer.
However I can see how vital it is to cover the air maze during the refilling of opaque cartridges and we should emphasise the importance this has in preventing the over filling of these cartridge.
With nearly all of the Canon cartridges now been opaque maybe its time I changed and edited my refilling methods, to include this extra step just so everybodys is singing from the same hymen sheet while refilling all Cartridges..
- Joined
- May 6, 2011
- Messages
- 505
- Reaction score
- 203
- Points
- 183
- Location
- Cluj-Napoca, Romania
- Printer Model
- Epson L800, 1400; ML-2165W
Brian, the best method I found for filling a pgi-525 after flushing is overfilling using "the freedom method". This way I take it to 34.5-35 gr. If I try topfilling it... ink just wont get sucked into the sponge. Before filling pgi weights ~15gr.
How do you fill the pgi after a flush?
How do you fill the pgi after a flush?
- Joined
- Jan 18, 2010
- Messages
- 16,184
- Reaction score
- 9,134
- Points
- 453
- Location
- Residing in Wicklow Ireland
- Printer Model
- Now have 3 Ender-3 V3 Plus SE/
I turn my cartridge upside down and put about one ml of alcohol into the outlet,Tudor said:Brian, the best method I found for filling a pgi-525 after flushing is overfilling using "the freedom method".
This way I take it to 34.5-35 gr. If I try topfilling it... ink just wont get sucked into the sponge. Before filling pgi weights ~15gr.
How do you fill the pgi after a flush?
then gently blow into the outlet for a few seconds while holding my finger over the refill hole.
I then reverse the procedure and blow vigorously into both the air maze and refill hole individually
covering each hole in turn, then I cap off the outlet hole with the orange clip and start my refilling.
However I will now cover the air maze before I start, which Ive never done before,
so even an auld dog like me can learn something new on this wonderful great forum..
")