Canon Smartbase MP730 won't print

KMEC

Newbie to Printing
Joined
May 23, 2008
Messages
1
Reaction score
0
Points
7
When I print, all colors work, but the black is faded on approximately every third line. I've done all the maintenance steps in the menu, so now I want to clean the areas where the ink flows.

Where are the print heads? and how do I clean them?
Thanks, KMEC
 

dan_uk_1984

Getting Fingers Dirty
Joined
Jul 2, 2007
Messages
36
Reaction score
0
Points
27
Location
Wiltshire, UK
It's probably best if you look around the forum, there are plenty of people who have had similar problems - It's also worth using the search feature before you post as this can often get you the answers quicker that waiting for people to reply to your post - often people dont want to repeat themselves as they have already answered the same question in another post etc.

It may be worth reading your printers manual, as this gives instructions and details as to where your printhead is, how to remove it and associated cautions.

Regards,

Dan
 

Trigger 37

Printer Guru
Joined
Dec 23, 2006
Messages
607
Reaction score
4
Points
136
KMEC,...This problem should have been posted to the "Inkjet General" forum, not to the Announcements. If a modirator could move this to the correct forum, it would help alot.

Sorry to hear you are having problems with your MP730. I will be
relisting all of the Repair Manuals on eBay early next week.

In the mean time,..tell me more about you problems. What brand of ink
carts are you using. Do you refill your ink carts, and if so what brand of
ink are you using. Have you every taken out the printhead and attempted to
clean it yourself manually?

Here is how to take out the printhead and clean it. I have attached the
original Canon Easy-Setup guide that comes with the printer when it is new.
This guide shows many things and one is the steps necessary to install the
printhead and then the ink carts. This is shown in steps #8 and #9. To
"Remove the Printhead", first take out all of the ink carts and cap each one
of them at the exit port so they will not leak ink. You can do this with
standard masking tape.

To remove the printhead, raise the locking lever as shown in step 3 of
section #8. The printhead sits in the carriage Assembly like a cradle.
Grasp the printhead at the top sides and slightly press down and then pull
forward and up. The printhead will come out.

Take the printhead to your laundry room sink and run warm water over each of
the filter pads where the ink carts sit. This will rinse out the ink.
Turn the head over and allow the water to run directly onto the nozzles at
the bottom. Use water as hot as you can stand and still hold onto the
head. Keep turning the head over to see if ink is coming out of each
filter on the other side. Repeat this until you see no more ink coming
out. Now you must blow dry the head to get all of the water out of all
sections of the head, including the back where the circuit board is located.
Water gets in behind that circuit board and you have to blow it out and get
it totally dry. Set the head on a paper towel and let it dry for several
hours.

When the head is dry you can put it back into the printer. Make sure there
are no finger prints on the contacts on the back of the head. Use a tissue
and some rubbing alcohol and wipe off any ink, grease, prints, etc. Just
set the head in the Carriage asm and it will typically fall in place.
Gently close the locking level to make sure the head is in the correct
position. Open and close it a couple of times as this "Wipes" the gold
contacts together and improves the connection. Now test each of you ink
carts for the proper flow rate. Remove any masking tape that you used and
hold the ink cart over a folded paper towel. Gently blow with your mouth
into the air intake at the top rear of the ink cart. One or more drops of
ink should fall to the towel, and if they do not, blow a little harder. If
you can't get the ink to drop, you cart may be blocked and you may need a
new one. Once you verify that the ink carts are flowing ink, install them
in the printer and run a "Cleaning Cycle" from inside the print driver.
Since you totally washed all ink out of the head the cleaning cycle will
"Prime" and head with new ink. Now print only the nozzle check. If it
comes out good, you are ready to print. If some nozzle don't print, you
need to do a deep cleaning cycle and re-run the test. Repeat until you get
a good nozzle check. It should be fine in at least 3 cycles. If not, you
have other problems, possible with the purge unit the "Sucks" ink out of
each ink cart down through the head.

If you need new ink carts, I suggest you buy them from "Inkforsale.net"
They are about $1.50 each.

Good luck. Trigger
 

Trigger 37

Printer Guru
Joined
Dec 23, 2006
Messages
607
Reaction score
4
Points
136
I'm posting this added information that was sent outside of this forum. This will help others understand the details.
------------------------------------------------------------------------------------------------------------------------------------
From KMEC,...


Well, I cleaned the print head, but still have problems.
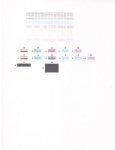
I printed and scanned your email so you will be able to see the problem.
The first line of the email (first paragraph), the top portion of the
letters are faded and barely there, then the next line prints fine. The
first line of the next paragraph, the top of the letters print fine and the
bottom of the letters are faded and barely there, then the next three lines
print fine. In the third paragraph, lines 1, 2, & 3 print fine and line 4
is faded at the top and the bottom of the letters print fine, then the next
two lines print fine and the next line prints ok at the top and faded at the
bottom of the letters...and so on.

Any clue what might cause this?

I have only used Canon ink cart and never refilled, only bought new. I am
the only one that uses this printer, so it hasn't been abused or anything.
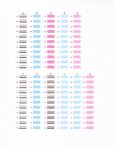
Also when I printed the Nozzle check, the "L" & "M" box printed perfectly,
but the "A" "F" & "H" boxes printed almost striped...see scan. Also the
numbers didn't print very good, but the letters did print good. Also I have
put in a new black ink cart after the head cleaning, just to be sure there
weren't any ink "boogers" in the old cart.

I've done:
Nozzle check - twice
Head Cleaning
Head Refreshing
Align Print Head
Roller Cleaning

I hope I have provided sufficient information, but please feel free to call
or email any additional questions.
It's really puzzling as it worked perfect last Sunday then Monday it began
printing like the example.

Again, Thanks for any help you can provide.

Here are the first images.


Nozzle check;
 

Trigger 37

Printer Guru
Joined
Dec 23, 2006
Messages
607
Reaction score
4
Points
136
To KMEC;

Thanks for the wonderful pictures. It shows me that you know
what you are doing and believe me this is very important when it comes to
following instructions and getting things done.

The answer is very clear. Looking at you nozzle check, the problem is that
the lower portion of the Black nozzles are clogged up and can't get any ink
through them. When you say you clean the head, I assume you mean you
followed my instructions and rinsed out the ink in the sink and then dried
the head with compressed air or a blow dryer. It would have been good to
see a sample of the nozzle check before and after the cleaning to see what
improvements were made. It seems that your clogs are a little harder that
just standard clogs. So now we have to do some more serious cleaning of
the head.

Follow the instructions again and remove and seal the ink carts and remove
the head. Hopefully you have a sink that has a hand sprayer that puts out
a rather strong stream. Rinse the majority of the ink out the same way
you did the first time. Then, turn the water to hot and full blast and
focus the spray onto all of the black nozzles and move it around. Turn the
head over and see if you are getting anymore ink out of the black filter
screen. Get a saucer and a folded paper towel and place the paper towel
in the saucer. Heat up a cup of "Filtered" water or distilled water to the
same temperature you would drink hot coffee,...no hotter. Use an eye
dropper to flood the black filter screen (and the other screens). The
water will flow through the head and wick into the paper towel. Come back
in 5 minutes and repeat. Check every now and then to see if any new black
ink has come out. Re-heat the water in the cup to get it back to the right
temperature and repeat the soaking. You may have to drain the saucer and
replace the folded paper towel. Do this one more time before you go to bed
and let the head sit on the paper towel all night. Repeat the hot cup of
water in the morning several times. Now you can dry the printhead again
and re-install it in the printer. Do a standard cleaning cycle and then
one nozzle test. The do a deep cleaning cycle on "Black" only and repeat
the nozzle check. You may have to do at least two deep cleanings of black
and hopefully you will have removed the clogs. You don't want to continue
to print anything more than a nozzle check until you get a totally good
nozzle check pattern.

The very top black matrix is the absolute best test of the printer.
Printing other things, like pictures or letters while the nozzle check is
not good could damage the head. The matrix print starts by all nozzles
firing at once to make a vertical line. Then the entire nozzle bank is
divided into 10 groups of 32 nozzles each. The first nozzle in each group
of 10 is fired continuously for about 1/8" and this produces the first set
of horizontal lines. The all nozzles are fired again to produce the 2nd
vertical line. After this the 2nd nozzle in each group of 10 is fired for
the next 1/8". This is repeated towards the right until every last nozzle
has fired. When you look at the results, especially with a 5x magnifier,
you can see the results of every nozzle in the printhead. This is why this
test gives you the best information. The same is done for the colors.

The problem with clogs is that they are very tiny, less than 1/10th the
diameter of a human hair. When ink dries inside the nozzles, a bubble of
ink can not be created and ejected from the nozzle. The heating elements
inside the head that heat the ink to produce a bubble still try and heat the
ink to produce the bubble, but the ink can't get out,.. so those nozzles
will continue to get hotter the more they are fired. This is why it is not
a good idea to print documents when you know you have a clogged head.
Eventually the nozzles will burn out. One burnt out nozzle can cause a
short circuit in the micro-circuitry in the print element and this will
destroy the head.

One suggestion,... when you scan the next nozzle check into a .jpg, use some
picture program, like Microsoft Picture editor, to enhance the contrast of
the image to make the lines more visible. This way I can see them a lot
better and so can you. Be patient with this cleaning, It is not like you
can get a scrub brush down inside this burnt casserole dish and clean it
out. You have to dissolve the gunk and flush it out.

I wish you had posted this problem on the nifty-stuff forum so that as we
process though the steps to fix your printer, others would have learned how
to fix their own printers. If you don't mind, I would suggest you post the
results of your next test to the forum and I can respond to that post.
This way many others get help at the same time.

Trigger
 

Trigger 37

Printer Guru
Joined
Dec 23, 2006
Messages
607
Reaction score
4
Points
136
From KMEC,

Whoo Hoo!!!!!
It worked!

Thank you so much.

If you'd like I can copy my email to the forum and you can copy your
response as a reply...just let me know.
Thanks a million!
 

jru

Printer Guru
Joined
Dec 22, 2006
Messages
121
Reaction score
4
Points
131
Location
Central NY, USA
Thanks for posting this thread, trigger & KMEC...
I found it very helpful, and a good way to help others learn.
 
Top