A basic guide (see post #1) to setting up ARGYLL CMS profiling on your computer

Emulator

Printer Master
Platinum Printer Member
Joined
Jan 4, 2012
Messages
1,675
Reaction score
1,308
Points
277
Location
UK
Printer Model
Canon Pro9000 II
Yes, you are right, if you didn't create the profile, you will not have the files. But it would be relatively easy for you to create your profiles from scratch if you have a spectro, such as a ColorMunki Photo and ArgyllCMS installed.
 
Last edited:

Ink stained Fingers

Printer VIP
Platinum Printer Member
Joined
Dec 27, 2014
Messages
5,863
Reaction score
6,985
Points
363
Location
Germany
Printer Model
L805, WF2010, ET8550
Do you have both of the .tif patch files available discussed in posting #313 above and can you compress them both into a zip file here ? The colors may be spread differently but the Lab view would show directly whether they overlap or not.
 

pharmacist

Printer VIP
Platinum Printer Member
Joined
May 29, 2007
Messages
2,567
Reaction score
1,269
Points
313
Location
Ghent, Belgium
Printer Model
Epson SC-P800,WF-7840,XP-15000
I wil upload these files again this evening. I am now at work.
 

martin0reg

Printer Master
Joined
May 9, 2010
Messages
1,058
Reaction score
746
Points
273
Location
Germany Ruhrgebiet
... it would be relatively easy for you to create your profiles from scratch if you have a spectro, such as a ColorMunki Photo and ArgyllCMS installed..
That's what I did - with your CAP480.bat - result looks good so far, after a first quick and dirty profiling. But the other target is only the image file, therefor:
I wil upload these files again this evening. I am now at work.
Thank you in advance
Do you have both of the .tif patch files available discussed in posting #313 above and can you compress them both into a zip file here ? The colors may be spread differently but the Lab view would show directly whether they overlap or not.
This is in fact the question which is bothering me too.
Just tried to zip and upload, but the files remain almost as big as unzipped (3mb each), result: "too big to process"..
 

Ink stained Fingers

Printer VIP
Platinum Printer Member
Joined
Dec 27, 2014
Messages
5,863
Reaction score
6,985
Points
363
Location
Germany
Printer Model
L805, WF2010, ET8550
I don't know whether you can save the .tif files with an optional LZW compression, that is lossless and should reduce it to 10% since there should not be many colors, or you resize the .tiff files to 50% with no interpolation, which otherwise would create more colors.
 

Ink stained Fingers

Printer VIP
Platinum Printer Member
Joined
Dec 27, 2014
Messages
5,863
Reaction score
6,985
Points
363
Location
Germany
Printer Model
L805, WF2010, ET8550
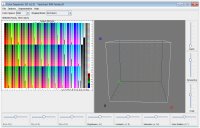
You may try this ColorInspector 3D Java (.jar) program to display your target files, that program is pretty simple and old - 10 years - but it does the basic job, you can view the color spots of the .tiff file directly - without jpg distortions in a RGB or Lab color space or in other color spaces. You can see how well the color spots are distributed across the color space volume - with about equal distance inside and along the edges and the outside boundaries of the RGB cube. You can place your cursor
on one of the color fields left and a marker will show you the place in the RGB cube - (or in the Lab view)
Target Sample Display.jpg
My old Monaco GamutWorks program is not available anymore since a long time, but offers the option to overlay several images - tiff or jpg - with profile data -icc - e.g. the sRGB color space

http://imagej.net/Color_Inspector_3D
and you would need to install Java on your computer.

The link to the documentation does not seem to work anymore.
I don't know which other easily accessible program would allow you a similar visualation, Gamutworks or Chromix ?
 

martin0reg

Printer Master
Joined
May 9, 2010
Messages
1,058
Reaction score
746
Points
273
Location
Germany Ruhrgebiet
Okay here my resized and "zip compressed tif" files.. whatever this means.
I have no idea why the compressed differ so much in size,
the original "09.03.2017" (from the batch process) is 3.2 mb,
the original "480target" (from pharmacist) is 4,3 mb
Hope you can analyze both to see if they are really different..

First try to change the filename, deleting ".zip"
Or try to unzip it.. hope the image is visible ..

edit: I think they are not readable..sadly..
I will try my own "inspection", thank you for the links!
 

Attachments

  • 480target_resized.tif.zip
    1.5 MB · Views: 429
  • 09.03.2017-targen480_resized.tif.zip
    166.5 KB · Views: 389
Last edited:

Ink stained Fingers

Printer VIP
Platinum Printer Member
Joined
Dec 27, 2014
Messages
5,863
Reaction score
6,985
Points
363
Location
Germany
Printer Model
L805, WF2010, ET8550
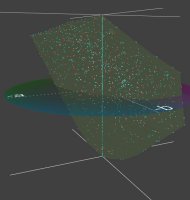
I got it and overlaid both of these files in Gamutworks, together with the sRGB color space shaded in Lab view, the colors of both of your files do not overlap and they are not regularly distributed across the color space as X-Rite and other programs are doing it, with only a few dots at the bottom part, covering the darker colors. One tif file is shown with light blue dots, the other with light red dots. Both cover the gray axis pretty densely which should give a very good accuracy there.
Profile 1.jpg
Gamutworks would let me turn and shift and magnify the view on screen, all this is not possible here which is limiting the view to the details pretty much, but you can use the files in the attached .zip file to display them individually in ColorInspector in Lab or RGB view, and you'll directly see the difference to my patch file view above with the 999 patches.
I don't know which one, which approach to generate such patch files is better actually, the regular distribution by X-Rite or not, I did a 480 colors patch file as well, that shows some fewer dots than this 999 color file and a wider spacing between the color spots but the structure remains.
 

Attachments

  • PK.zip
    199.8 KB · Views: 369

martin0reg

Printer Master
Joined
May 9, 2010
Messages
1,058
Reaction score
746
Points
273
Location
Germany Ruhrgebiet
Six prints (epson r800 and PC ink set on some cheap but decent matte paper "schwarzwaldmühle excelsior light 200g")
using three profiles, from left to right:

Colormunki software 1.2 / 1.1 / argyll with CAP480.bat
View attachment 5174

edit: I had to delete this image, because I have used the wrong rendering intent for the argyll profile - which should be relative colorimetric instead of perceptual. Now with the correct RI especially the red is much stronger than before, less different from the CM profile.
But these profiles, made with different software but the same printer, ink and paper are still more different than expected...
 
Last edited:

Emulator

Printer Master
Platinum Printer Member
Joined
Jan 4, 2012
Messages
1,675
Reaction score
1,308
Points
277
Location
UK
Printer Model
Canon Pro9000 II
Martin, if you have the ICC profiles you can compare them directly in Gamutvision. See my recent post on the subject.
 
Top