What best to replace Cannon MP560

nippyink

Getting Fingers Dirty
Joined
Sep 20, 2010
Messages
22
Reaction score
5
Points
29
PeterBJ and Hat - thanks. have saved that to documents and will look at it all once other problems around the place cleared and I have the time. Should be able to work it all out on the Dell PC with XP....thank goodness I kept it even if all seem to have given up on XP.

If only Canon had built printer with a removable bottom for easy pad change. I don't suppose anyone has done a mod to do just that??? hacksaw and glue on reattachment plastic plates with screws. o_O:D
 
Last edited:

PeterBJ

Printer VIP
Platinum Printer Member
Joined
Nov 27, 2010
Messages
5,054
Reaction score
4,895
Points
373
Location
Copenhagen Denmark
Printer Model
Canon MP990
The printers MP540, MP550 and MP560 are very similar mechanically. The combined Service manual and parts catalog for MP 540 has got a much better drawing of the ink absorbers it is on page 39/58 in the manual which is found here.

The old Dell PC will be perfect for doing the reset.

The parts number for the absorber kit is QY5-0279-000 if you want to do a search, but I think it is nowhere to be found. If you wash the absorbers yourself then a pair of good rubber or PVC gloves is a must, Do only use warm , not hot water, else the absorbers might shrink.

Canon has made a new G series of ink tank printers that are refilled from bottled ink. One or more of these models have a user replaceable waste ink container. See this video.
 
Last edited:

nippyink

Getting Fingers Dirty
Joined
Sep 20, 2010
Messages
22
Reaction score
5
Points
29
I think I am winning. Service tool now on my XP Dell PC and have downloaded and saved service/parts manual to both Apple and Dell computers. Now just got to find time and courage to do reset then strip down to clean pads.

In the Manual do I presume "FCC " is something to do with the cables? "(flexible cable connector " perhaps?
Dennis
 

nippyink

Getting Fingers Dirty
Joined
Sep 20, 2010
Messages
22
Reaction score
5
Points
29
Canon has made a new G series of ink tank printers that are refilled from bottled ink. One or more of these models have a user replaceable waste ink container. See this video.
Just looked at the video.....easier to refill the bottles instead of cartridges and looks easy to remove the waste ink pads....BUT....when the pad full error comes up and shuts printer down (like MP560), then ok pad easy to change (is it?) but how to reset ink counter? presumably there is a way??
 

PeterBJ

Printer VIP
Platinum Printer Member
Joined
Nov 27, 2010
Messages
5,054
Reaction score
4,895
Points
373
Location
Copenhagen Denmark
Printer Model
Canon MP990
As these waste ink containers are user replaceable I think they are chipped like the ink cartridges. So with a new waste ink container the counter is reset. So no need for service mode and a service tool.

FFC means Flat Foil Cable.
 
Last edited:

nippyink

Getting Fingers Dirty
Joined
Sep 20, 2010
Messages
22
Reaction score
5
Points
29
No progress yet still batteling other domestic/car problems.

In service manual - (11) ink absorber replacement - page45/64 it says "5) while being cautious of the ink tube...return print unit to bottom case....."
Dare I hope this tube is what carries waste ink to pads??

1. If so could it be extended and fed through a drilled hole to a waste ink tank as supplied by OctoInk so in future all that needs doing is reset ink counter and emptying tank????? (so no dismantling to get at pads)

2. anyone done such a modification?

3. In new G series printers are the waste containers really chipped so buying new is only way to reset ink counter to zero? (seems like a backward step tying you to spend yet again on what should be a simple wash the pad step)
 
Last edited:

PeterBJ

Printer VIP
Platinum Printer Member
Joined
Nov 27, 2010
Messages
5,054
Reaction score
4,895
Points
373
Location
Copenhagen Denmark
Printer Model
Canon MP990
Yes that tube carries waste ink to the ink absorber pads. It is important the tube is routed properly and not pinched, else this can happen. It seems that in this case Canon was at fault.

1+2. This modification has been made on various Canon printers maybe also on an MP560. Maybe someone who has modified a Canon prionter this way could tell about it?

3. I have washed ink absorbers for Canon Pixmas iP4000 and iP5200. It is a very messy job! If new absorbers had been available I would gladly have bought them. I have seen 10$ price for the MC-G02 ink absorber cartridges for the G-series printer. It is also available from Canon DK at DKK 71 which is approximately 10 $ or €. Unlike the price of ink cartridges I think the price of the ink waste absorber cartridge is very reasonable. No dismantling, no dirty job with the old absorbers and no problems with service mode and service tools, and the ink absorber cartridge should last much longer than an ink cartridge.
 
Last edited:

nippyink

Getting Fingers Dirty
Joined
Sep 20, 2010
Messages
22
Reaction score
5
Points
29
Thanks again....slowly gathering all the information. I am in UK so work in £...GBP.
Just found another small snag...don"t have a USB cable to be able to connect old Dell Windows to printer for reseting. The MP650 has USB type B...the square outlet (shaped with 2 corners cut off) I assume it is the old type B because looked online and various sellers doing USB A to B cables but the B looked a different shape and would certainly not fit the Canon, then eventually found and ordered one that was the square type.

Delay here due to desperately trying to re-assemble/finish rebuild of my 92 year old Austin 7 to take it to the week long celebration for the centenary of the first A7 produced in 1922. No real problem for detailed information and easy for spare parts. If only Canon built the same way and same information available apart from great people like yourselves hunting it out and making it available.....again thanks to all.

Dennis
 

nippyink

Getting Fingers Dirty
Joined
Sep 20, 2010
Messages
22
Reaction score
5
Points
29
I now have the USB A to B cable. Tthis was further confused by there being 2 type B plugs.:(..one on my printer is the square one with small diagonal corners on one side and a second is much larger with an extended bit on one side....Ho-Hum got there in the end.

Do I need to carry out the waste ink reset to zero first before starting to take MP560 to bits to get at the waste ink pads? I ask because printer is locked with print head and ink cartridges in rest position and I think that it would be good/necessary to remove cartridges and head at some stage.
Had quick read through the service manual and initial impression is that it lacks a bit of detailed information......probably because it is aimed at professional repairers who would have a good idea of what is required.
Am a bit concerned at plug removal from PCBs having seen posts elsewhere of people ruining the plug/ribbon connector.
It would be good to know how exactly each plug the manual says to take off is actually released...where/what the catches are, if any, that hold it in place.
I am from the era where plugs were unmistakably held in place with bolts ;)
As always the devil is in the detail.

Dennis
 
Last edited:

nippyink

Getting Fingers Dirty
Joined
Sep 20, 2010
Messages
22
Reaction score
5
Points
29
:):):) Ink counter reset. HOWEVER frustration at first when printer not going into svc mode. Then I realised that (from another source I had seen) the instruction for enter svc mode should have said - with power turned off press and hold down power AND STOP BUTTONS then turn on mains power at plug.
When green power light comes on, with power still pressed down release stop then press and release stop twice.

My set up also allowed me to select which tray the paper for the EPROM settings print came from.

---------------------------------------------------------------------------------------------------------------------------
So for completeness:-
To get the printer into service mode:


i. With the machine power turned off at the plug, press and hold the ON button and the STOP button. (DO NOT release the buttons.)

Then switch mains plug on.

ii. When the green Power LED lights, while still holding down the ON button, release the STOP then press and release the Stop button 2 times, and release the ON button. (Each time the Stop button is pressed, the Alarm and Power LEDs light alternately. NO they did not, first press of stop orange came on and stayed on till power released and green on


iii. When the Power LED shows a constant light, the machine is ready for the service mode operations.


iv. The display will now show "Service mode" and "Idle"

now follow this procedure for the reset:

When the printer has entered service mode Windows will probably install a new printer or a "device". just allow this.

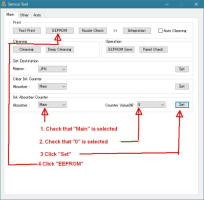
Now open the service tool. Check that "Main" is selected in the ink absorber counter, and "0" is selected in the "Counter value%" setting and then click "Set".
A small window "A function was finished" opens. Close this window by clicking OK.
(Make sure there is paper in both the cassette and the rear paper feed as you cannot predict which paper source the printer will use.)
My SVC program allowed selection of rear or cassette for print out paper.
Now click the EEPROM button to get a print that verifies that the absorber counter has been reset. D should now be 000.0 or very close to 0.

So again big thanks to all for getting me this far.
Just got to pluck up courage to start the dismantle with photos during process.

Here is a screen shot with explanations:
 

Attachments

  • 1654964298839.png
    1654964298839.png
    119 KB · Views: 97
Top