New technique to clean BCI-6 carts

fotofreek

Printer Master
Platinum Printer Member
Joined
Nov 5, 2004
Messages
1,811
Reaction score
434
Points
253
Location
San Francisco
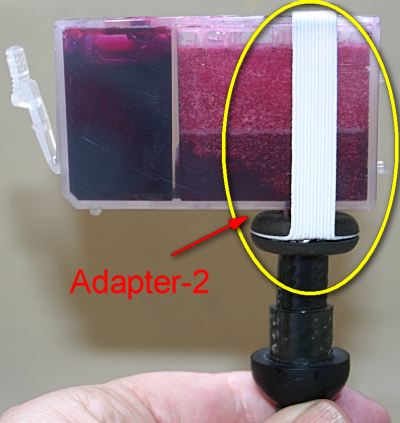
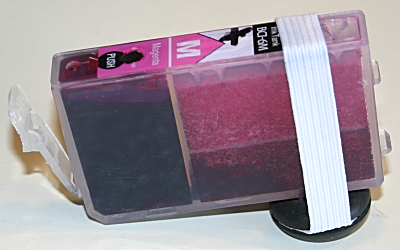
I haven't used any solvents in the carts a I would be concerned that any residual solvent would cause problems with the ink when you refill. At one point I ordered the starter ink set from Hobbicolors just for the carts. Because I am happy with MIS inks I gave the hobbicolor inks to a friend who was using them. The carts work well and were well worth the price of the starter kit. I didn't like the plastic screws in the fill hole and replaced them with stainless steel phillips pan head sheet metal screws with tight fitting O-rings.

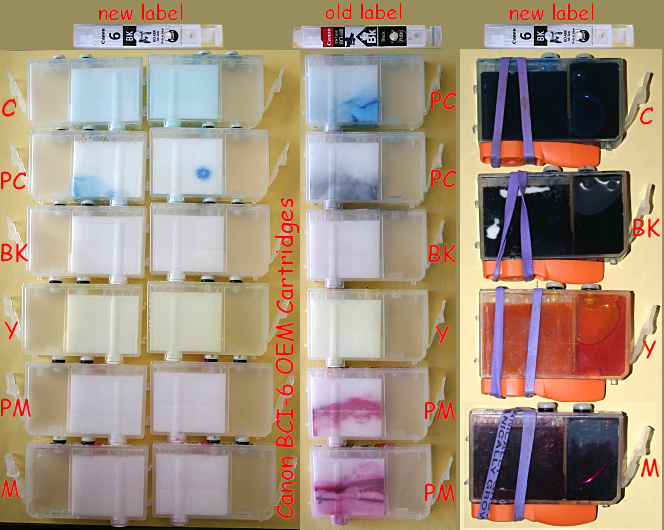
The used carts I picked up from the recycle bin at CompUSA weren't sealed in any kind of container at all. My guess is that these were the starter carts when the printer was new as there were lots of cheap looking aftermarket carts in the bag as well. The OEM carts cleaned well in spite of their questionable storage.
 

Grandad35

Printer Master
Platinum Printer Member
Joined
Feb 24, 2005
Messages
1,669
Reaction score
182
Points
223
Location
North of Boston, USA
Printer Model
Canon i9900 (plus 5 spares)
Lilla said:
If I come across a nice OEM cartridge that doesn't work well after flushing with plain water, adjusting the sponges, etc. is it worth trying to flush it again after first soaking with a commercial cleaning solvent such as the one you bought from CompuBiz (inkjetsaver.com) or a homemade cleaning solution? I think I recall someone suggesting 50/50 water and alcohol to soak cartridges; followed by flushing with plain water I assume.
If a cart doesn't clean with hot water, I would throw it away. Inks are over 90% water, so everything in the ink must be soluble in water. Solvents may clean better, but will they degrade the foam?
 

Lilla

Getting Fingers Dirty
Joined
Oct 20, 2006
Messages
98
Reaction score
0
Points
34
Location
Seattle WA area
Grandad's technique is amazing! I cleaned my first cartridges today using my "Purge Hose" (see post #52 this link). To aid in the process I made two simple adapters, both are shown below.

Grandad made a "purge clip" to aid in cleaning carts (see post #12 this link). Since I didn't have a cartridge clip or a suitable fitting I started thinking about alterative solutions and came up with Adapter-2 shown below.

My Purge Hose (O.D.) is the same size as the cartridge's ink exit port (O.D.) so one option is to simply press the purge hose directly against the plastic rim around the exit port. However, when I use the hottest water the faucet provides, the water can spill out onto my fingers and ouch, it's too much! So, I made Adapter-1; it helped, but not enough. My next idea evolved into Adapter-2. Using Adapter-2 the water doesn't spill out onto my fingers so I can use the hottest water longer; of course if I try to use too much water pressure or don't hold the hose into the adapter tight enough, then water will spill out. Another plus, is that when using Adapter-2 I can still see whats going on inside the cart Im cleaning.

Adapter-1
=======
IMG_3368_web.JPG


Adapter-2
=======
IMG_3396_web.JPG

IMG_3384_web.PNG

IMG_3377_web.PNG

IMG_3395_web.PNG


Instructions for making Adapter-2
=========================

Rubber Grommet. The one I used (shown in picture) is 7/8 O.D., 3/8 I.D., 1/4" Thickness. The outside diameter isn't critical. A thicker grommet might work even better. The inside diameter matters, it is the size needed to accommodate my purge hose. I checked McMaster's catalog and found there are different types of gromments, the ones called "regular type" have a groove around the middle, as shown in the pictures. The groove is important, as I used this groove to make a harness for the grommet using elastic. The part number for the grommet I used is "AN931 7-11" (written on the grommet itself) in case that helps.

Elastic. Some 3/8 wide elastic; you can buy it at a fabric store. Cut a length about 7 inches long. Fold the elastic in half length wise. At the center point of the fold, using a pair of scissors, make a cut long. When you open the elastic you will now have a long slit in the elastic piece.

Fit the rubber grommet into the slit you just made in the elastic piece. When you are done, the elastic will be resting neatly in the groove around the rubber grommet.

Take a Canon BCI-6 ink cartridge. Push the ink outlet port at the bottom of the cartridge into the hole in the rubber grommet. My grommet has raised writing (the part number) on one side, the other side is smooth. Assure that the smooth side rests against the cartridge, with the raised lettering face down. The reason for doing this is that the smooth side will form a tighter seal against the cartridge. Stretch the elastic around the cartridge and pin it in place using a safety pin. From now on, just leave the safety pin in place unless you want to adjust the tension. The elastic will enable you to easily add/remove the adapter as desired. You can cut off any excess elastic.

Insert the Purge Hose into the hole in the rubber grommet.

When you turn the water on, push the hose into the adapter while the water pressure cleans the cartridge.
 

Defcon2k

Printing Ninja
Joined
Dec 1, 2006
Messages
105
Reaction score
2
Points
94
Location
Germany
Would the techniques described here also be okay for the carts with chip (CLI-8)?
 

Nifty

Printer VIP
Administrator
Joined
Nov 3, 2004
Messages
3,048
Reaction score
1,409
Points
337
Location
Bay Area CA
Printer Model
CR-10, i560 ,MFC-7440N
WOW!!!

That's just amazing Lilla, great write up and excellent pictures!!!

BTW, only difference / addition I'd make is trying to use some Velcro on the elastic? Maybe not necessary if you aren't doing much adjusting.
 

fotofreek

Printer Master
Platinum Printer Member
Joined
Nov 5, 2004
Messages
1,811
Reaction score
434
Points
253
Location
San Francisco
I used reenforced high pressure air hose with an inside diameter the same as the outside diameter of the outlet port. It is tight enough to snap onto the outlet port and rigid enough that it doesn't stretch with heat or use. I still have to hold the hose against the cart as the pressure would blow it off, but it works very well.
 

Lilla

Getting Fingers Dirty
Joined
Oct 20, 2006
Messages
98
Reaction score
0
Points
34
Location
Seattle WA area
fotofreek said:
I used reenforced high pressure air hose with an inside diameter the same as the outside diameter of the outlet port. It is tight enough to snap onto the outlet port and rigid enough that it doesn't stretch with heat or use. I still have to hold the hose against the cart as the pressure would blow it off, but it works very well.
For cleaning carts, I like your hose very much, and I have it in mind to find some of this hose to make an adapter for my purge hose.

I made my purge hose to fit the print head intake ports, the small round metallic screens, so I can use it to clean my print heads. To clean cartridges, I add an adapter to this purge hose. The other way I could have done it, would be to make my purge hose to fit the cartridge exit port (as you did) and then add an adapter to clean print heads.

I have a vacuum attachment that I use to vacuum my cartridges using a wet-dry shop vac. The hose on this attachment looks like same material as the top section of your hose (clear reinforced hose); this hose it fits neatly over the cartridge exit port. I say neatly as opposed to snuggly as you describe your hose to fit. I think my vacuum hose would allow a little watter to escape from around the sides. Sounds like yours would not allow any water to escape around the sides.

Lilla
 

Lilla

Getting Fingers Dirty
Joined
Oct 20, 2006
Messages
98
Reaction score
0
Points
34
Location
Seattle WA area
nifty-stuff.com said:
WOW!!!

That's just amazing Lilla, great write up and excellent pictures!!!

BTW, only difference / addition I'd make is trying to use some Velcro on the elastic? Maybe not necessary if you aren't doing much adjusting.
Thank you! Glad you like it.

I thought about using velcro, but decided it was not needed.
I've cleaned 18 cartridges so far, and have never not moved the pin at all.

Lilla
 

Jane

Getting Fingers Dirty
Joined
May 18, 2005
Messages
45
Reaction score
0
Points
22
Any suggestions for drying when you don't own a wet/dry vac?
Jane
 

Lilla

Getting Fingers Dirty
Joined
Oct 20, 2006
Messages
98
Reaction score
0
Points
34
Location
Seattle WA area
I had a problem I could not resolve with my i960 print head. I wound up buying a new print head. While I was waiting on the new print head, I cleaned my cartridges using A Technique to clean Canon BCI-6 cartridges by Grandad35.

This is my first time to clean cartridges, I cleaned 18 of them, all are Canon BCI-6 OEM carts. To clean them I used my homemade "Purge Hose" (see post #52 this link).

My cartridges are sealed with #8-32 x 1/4" nylon screws with o-rings (see Post #159 this link).

As you will see in my pictures, I added a second hole to the top of my cartridges in the "hole to nowhere". I decided to add this hole because some of my cartridges were hard to clean (especially the grooves); they should have been cleaned a long time ago, way before I found this forum and learned that I needed to clean my carts periodically to restore their ability to provide adequate ink flow to the print head. This second hole is NOT required to use Grandad's cleaning technique. However, if you want to add a hole over the sponge chamber, Grandad said "the hole to nowhere" is a good place to add it (see #54 this link and "Top of Cartridge" image at #44 this link).

Below are my notes and pictures of my cleaned cartridges before and after they were filled.


Notes.

o The "old label" PC cart looks like BK, but it is a PC cart, trust me. This cart was accidently filled with black and stored that way until I discovered it some time later.

o These carts were filled with ink form Inkjetgoodies.com. There is a known problem with their BCI-6 PC/PM inks, they go bad faster than their other colors. For more on this read Inkjet Goodies Bacterial Glop. The odd circle of blue ink on the cleaned sponge of the PC cartridge does not go through to the other side of the sponge.

o The two "new label" black carts had a scattering of very tiny black particles in the sponge that reminded me of pepper. After I added the second hole (but not before) I was able to flush these particles out.

o These carts were stored in sealed containers with paper towels wet with water plus alcohol. Even so, some of them had a dry'ish thin crust of ink on part of the filter that was hard to clear with the purging hose alone. To clear it I used two methods. 1) Used an eye dropper to saturate the filter with iso alcohol to soften the ink in the filter, then flood the filter with water. 2) Etch the area with a fine sewing needle, then flood the filter with water. Remove any loose pieces of dried ink using the side of the needle. I didn't want to drive this dried ink into the filter. After this dried ink was cleared, I then cleaned the cartridge in the usual way using the purging hose.

o The sponge on most carts filled fully and automatically, the ink just flowed over and up from the ink reservoir side. On four carts, I had to use the pressure syringe method just a little bit to force the ink to fill the very top area (about 1/4") of the sponge. Pressure syringe method: Seal the syringe to the fill hole by putting the end of the needle (or syringe with needle removed) through a small piece of soft rubber tubing, like the nurse uses to take your blood pressure. Press the syringe (fitted with rubber) tight against the fill hole and then inject the air and the ink will rise in the sponge section.

o On the "new label" BK cartridges (both of them), no ink moved from the ink tank into the sponge automatically. So I used the pressure syringe method (described in the note above) to force the ink to move into the sponge. There were a couple of small areas, see the white spots in the picture of the filled BK cart, that refused to accept the ink.

o One "new label" M cart had a clogged vent that was hard to clear. I cleared it by blowing canned air into the air vent entrance. For more on this read Air vent blocked, I cleared it by...

o I filled all of the "new label" carts, and am using them in the new print head. I'm on day four of using the new print head with these cleaned carts. The daily nozzle check, run at the start of each day, have all looked good. Daily printing has included about 10 double sided pages on Inkjet brochure paper that is coated on both sides using the plain paper setting, plus 1-3 pages on Kirkland Pro Glossy Inkjet Photo Paper using Photo Paper Pro setting. These cleaned carts are feeding ink like new cartridges. I have not yet filled any of the "old label" carts, so all I can say is that they passed the tests that I performed when I cleaned them. I think it is possible that even the ugly ones will work fine.

IMG_3847_3855_3864_3877_3878_web.JPG


IMG_3504_3509_web.PNG
 
Top