RWP
Getting Fingers Dirty
I did a search here on the subject but so far haven't found the specific info I'm after -- particularly new thinking on purging Canon OEM carts without creating holes below the ink line. I have a few ideas...
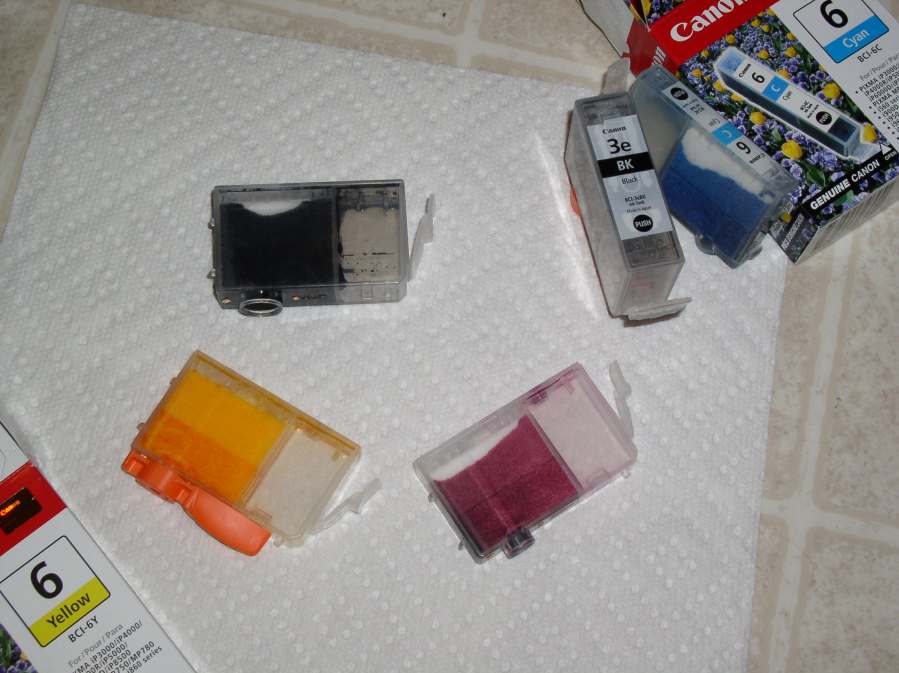
I have a collection of OEM BCI-3e and BCI-6 carts that have been sitting in my recycle bin for one or two years now. Now that the refilling bug has gotten me I'm intrigued about the possibility of resurrecting them, providing it can be done with a minimum of hassle. Otherwise, I'll just buy some new compatible carts or refill the carts currently in use before they are empty and need a purge. I'm impressed by the quality of Precision Colors ink for my Epson and plan to use this vendor's Canon-compatible bulk inks, too.
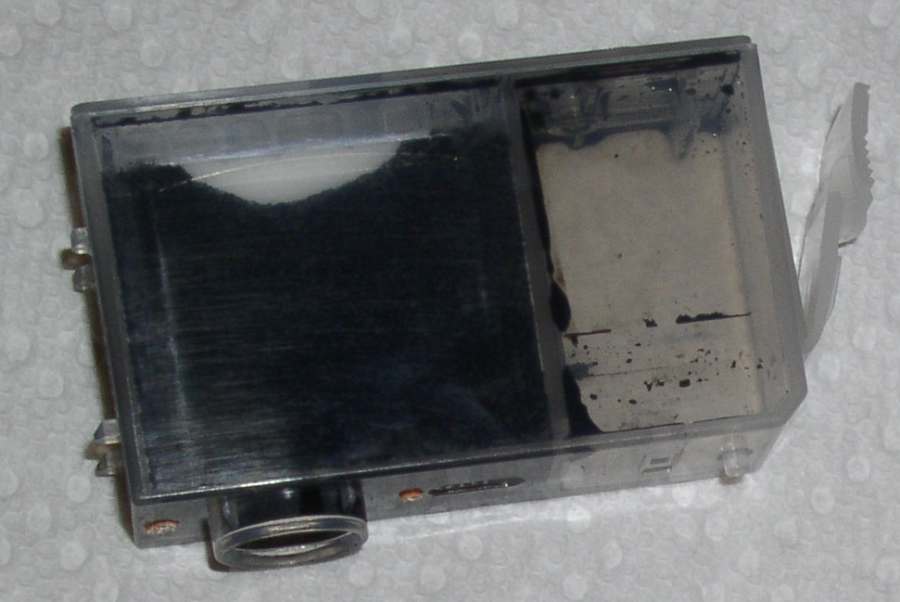
So these empty carts have all dried out. The PG blacks look worst, as they appear to have dried clumps of hardened pigment that may not readily dissolve during flushing.
The color carts have no dried clumping and the dye residue is very thin and looks readily dissolvable -- although some of them have a fully saturated sponge missing the typical white area at the top.
One advantage to having a dry, empty transparent plastic cart is the ability to see the ink path design. Looks very simple: ink reservoir at one end, with a small passage on the bottom leading to the sponge/outlet section. A very small vent on the top of the sponge section serves as a vacuum break during printing, but is small enough to prevent leakage or siphoning out the print head. Theoretically, all one must do is fill the ink reservoir and also saturate the lower part of the sponge, ensuring there are no air pockets and the laws of physics will take over from there, once installed on the print head. But have to clean the dried up carts first...
Here is my idea for flushing: Why can't I simply drill a hole at the top or upper region of the sponge side (in a spot where it won't interfere with the vacuum break vent, the cart's structural integrity, or cartridge retainer); remove the factory fill hole ball; and use some method of pressurized water or solvent to induce flow though the bottom print head feed port and out the top holes? Flush until the sponge and reservior appear clean and then pull a vacuum out the bottom to remove most of the sponge's moisture; then let it air dry for a few days until no condensation remains and then refill as I speculated in the previous paragraph, sealing the fill and purge holes on top when done...
One more thing. Has anyone here successfully used clear packing tape as an alternative to screws, hot glue or electical tape for sealing cart holes -- and especially for sealing the bottom port during storage? Packing tape is tougher than and has better adhesive than electrical tape, is flatter than a screw and non-destructive to the hole, and not brittle/subject to leaking if flexed at all like hot glue can be. Also, with clear packing tape you can clearly see the quality of the seal and any early signs of ink trying to leak out. Only a small square of packing tape should be needed and one end can be folded back on itself as an easy removal tab for the next refill or purge. (Of course, for the cart's factory ink reservior hole I'll just use a silicone plug.)
Thanks in advance for your thoughts on this subject! This is a great resource for inkjet printer knowledge!
I have a collection of OEM BCI-3e and BCI-6 carts that have been sitting in my recycle bin for one or two years now. Now that the refilling bug has gotten me I'm intrigued about the possibility of resurrecting them, providing it can be done with a minimum of hassle. Otherwise, I'll just buy some new compatible carts or refill the carts currently in use before they are empty and need a purge. I'm impressed by the quality of Precision Colors ink for my Epson and plan to use this vendor's Canon-compatible bulk inks, too.
So these empty carts have all dried out. The PG blacks look worst, as they appear to have dried clumps of hardened pigment that may not readily dissolve during flushing.
The color carts have no dried clumping and the dye residue is very thin and looks readily dissolvable -- although some of them have a fully saturated sponge missing the typical white area at the top.
One advantage to having a dry, empty transparent plastic cart is the ability to see the ink path design. Looks very simple: ink reservoir at one end, with a small passage on the bottom leading to the sponge/outlet section. A very small vent on the top of the sponge section serves as a vacuum break during printing, but is small enough to prevent leakage or siphoning out the print head. Theoretically, all one must do is fill the ink reservoir and also saturate the lower part of the sponge, ensuring there are no air pockets and the laws of physics will take over from there, once installed on the print head. But have to clean the dried up carts first...
Here is my idea for flushing: Why can't I simply drill a hole at the top or upper region of the sponge side (in a spot where it won't interfere with the vacuum break vent, the cart's structural integrity, or cartridge retainer); remove the factory fill hole ball; and use some method of pressurized water or solvent to induce flow though the bottom print head feed port and out the top holes? Flush until the sponge and reservior appear clean and then pull a vacuum out the bottom to remove most of the sponge's moisture; then let it air dry for a few days until no condensation remains and then refill as I speculated in the previous paragraph, sealing the fill and purge holes on top when done...
One more thing. Has anyone here successfully used clear packing tape as an alternative to screws, hot glue or electical tape for sealing cart holes -- and especially for sealing the bottom port during storage? Packing tape is tougher than and has better adhesive than electrical tape, is flatter than a screw and non-destructive to the hole, and not brittle/subject to leaking if flexed at all like hot glue can be. Also, with clear packing tape you can clearly see the quality of the seal and any early signs of ink trying to leak out. Only a small square of packing tape should be needed and one end can be folded back on itself as an easy removal tab for the next refill or purge. (Of course, for the cart's factory ink reservior hole I'll just use a silicone plug.)
Thanks in advance for your thoughts on this subject! This is a great resource for inkjet printer knowledge!