How did I brake my Pixma TS8350 by lubricating it?

PeterBJ

Printer VIP
Platinum Printer Member
Joined
Nov 27, 2010
Messages
5,165
Reaction score
5,060
Points
373
Location
Copenhagen Denmark
Printer Model
Canon MP990
I once used a free file hosting service for a video about Canon printers doing automated nozzle cleaning one minute after a one page document was printed. I used Mediafire to host the video. I don't know if they still offer a free service? See this post.
 

Pixman

Printing Apprentice
Joined
Jul 28, 2025
Messages
21
Reaction score
0
Points
11
Printer Model
Pixma TS8350
I once used a free file hosting service for a video about Canon printers doing automated nozzle cleaning one minute after a one page document was printed. I used Mediafire to host the video. I don't know if they still offer a free service? See this post.
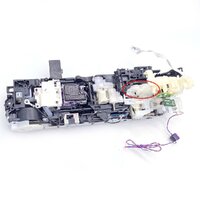
I have uploaded it to Streamable now. You can check it out and maybe tell me what you think causes this noise? Is it the purge pump?

https://streamable.com/wwbbhq

I'm not sure what a purge pump does or how it sounds when it's bad, but the noise is coming from deep inside the right corner of the printer.

I found this picture of a TS8180 pump.
https://www.ebay.com/itm/304587245384

TS8180-pump.jpg

I don't think it's the same as TS8350, but I have used this picture as a reference to mark the area where the noise is coming from in my printer.
 

PeterBJ

Printer VIP
Platinum Printer Member
Joined
Nov 27, 2010
Messages
5,165
Reaction score
5,060
Points
373
Location
Copenhagen Denmark
Printer Model
Canon MP990
It is a good video that clearly shows the problem. That noise would also drive me crazy if it were my printer.

The purge pump is a part of the purge unit. The pump sucks ink through the nozzles and dumps it deep inside the printer in some absorber pads made of a felt like material. All inkjet printers do that to keep the printhead in good working order. The purge unit also has got some wiper blades used to wipe the printhead at some intervals determined by timers and counters. So the purge unit is maybe the most complicated part of the printer. I wouldn't dare to remove or dismantle that.

My guess is that the noise is caused by one or more dry bearings, not the gears. I think more than one bearing is affected as the sound varies depending on which parts are rotating and in which direction. But I'm guessing. Can you try to feel with your fingertips which parts are vibrating? But beware and stay clear of moving parts. With a sufficiently low gearing even a small motor can produce a high torque that might hurt you.

An engine stethoscope as used by car/auto mobile mechanics might be a good help locating the noise and you don't risk hurting your fingers. Some engine stethoscopes are not very expensive, Googling "engine stethoscope" finds several inexpensive tools and also suggests a DIY solution.
 
  • Like
Reactions: x64

Pixman

Printing Apprentice
Joined
Jul 28, 2025
Messages
21
Reaction score
0
Points
11
Printer Model
Pixma TS8350
Judging by the image I just posted with the TS8180 pump, I reckon I would have to do the same disassembly to separate the tiny gears, including the gear with the disc for rotary encoder sensor. It's good thing I stopped when I did. Because this looks like a hell of a job and very messy. I don't have the space to do this kind of dirty work. But it would be fun to take it apart completely one day, just to see what makes it tick and how it was built and assembled in the first place. I have not seen such tricky and compact mechanism design before, and I have taken apart household items and other kinds of things before. I just never took apart a printer before. (Another thing I never took apart that's on my to do list is taking apart a mechanical hard drive.) That's because I don't normally take things apart unless I have to repair it, and knowing me, I would probably take it a step too far and not be able to put it back together again (that's why I wanted to avoid taking apart this printer so I sprayed it from the outside). But surprisingly this printer was easier to put together than to take it apart. A lot of thanks to my photos. But even without photos, once I have done it, I can easily backtrack my steps. I have a great attention for details and I learn quickly.

The way I accessed the disc for the sensor so I could clean it fully and completely was by unscrewing a couple of the screws and then pushing out and bending the plastic part where it sits so I can turn the gear (it's not possible to pop it out, it's spring loaded axially and radially). Because if I had not done that, the bottom half of the disc would have remained covered in grease, and once I turn the printer back on, and it starts rotating, it would grease up the sensor again and my effort would have been wasted. So I think it works now only because I did a good job cleaning it.
 
Last edited:

x64

Getting Fingers Dirty
Joined
Feb 21, 2025
Messages
60
Reaction score
32
Points
45
Printer Model
Epson Stylus R2400 2100 & more
You probably do not want to disassemble those tensioned gear assembly's because they are not easy to reassemble. Additionally some of those also require precise adjustment either physical or with a service program, so I recommend against it.

However, with the printer operational and easy access to all the moving parts, you can try lubricating it carefully and properly. I'm assuming you are certain that there are no jams anywhere, and the printer wasn't dropped or had any physical damage that caused this sound.

The other option would be to disassemble it further and/or replace damaged parts like a bearing that PeterBJ mentioned.
 

Pixman

Printing Apprentice
Joined
Jul 28, 2025
Messages
21
Reaction score
0
Points
11
Printer Model
Pixma TS8350
You probably do not want to disassemble those tensioned gear assembly's because they are not easy to reassemble. Additionally some of those also require precise adjustment either physical or with a service program, so I recommend against it.

However, with the printer operational and easy access to all the moving parts, you can try lubricating it carefully and properly. I'm assuming you are certain that there are no jams anywhere, and the printer wasn't dropped or had any physical damage that caused this sound.

The other option would be to disassemble it further and/or replace damaged parts like a bearing that PeterBJ mentioned.
Yeah, it's for my own safety that I decided against going any further. I don't have a service manual, and even if I did, seeing out examples of service manuals, I'm afraid they are not very detailed on the disassembly procedures. They show exploded view of parts in best case. I don't want to mess with spring loaded gears and hurt my arm, finger or eyes. It's probably not that dangerous, but it's best to be safe. If doing something like this blindly, you better be prepared for that. So I decided against it. I don't have the time or proper work space for this. I would rather buy a new printer at that point.

No, the printer was never dropped or as much as bumped into. I'm the first and only owner, and its only user. It's been sitting at the top of my office cabinet in a corner, next to my desk, for about five years. I may have occasionally only taken it down to remove the dust mostly on the top as I don't use the scanner unit very often, and all around the cabinet. I always handled it with care. But the noise came gradually, probably after about three years. I think it's reasonable to assume that it's the grease that has worn off and needs to be replaced, but they don't exactly make the task easy. There is nothing about maintenance servicing in the user's manual. It's assumed that they don't need any lubrication for the lifetime of the printer (which is short if you replace it by the time it starts making weird noises). I guess it's a similar story as with those "lifetime" transmission fluids in modern cars.

There are absolutely no paper jams, but it was making a crease in the paper previously after I sprayed it with grease. It would print a blank paper with a crease on one short end (as I mentioned previously). This was probably caused by rollers spinning too fast and not guiding the paper right, because of the blinded sensor. At one instance, it did get stuck mid way as I was messing around with it. But it has not jammed since. That sensor seems to be correlated with "paper jam" or "jam detection". I have no idea how.

By service program you mean the Canon service tool?

I have finally assembled the printer now. Except the side panels. The scanner unit was most difficult to put back in at the hinges, and the rear tray. I had to disassemble and reassemble to get the rear tray back in. But it's fairly easy to get access to the main gears as seen in my photos, once you remove the scanner unit. It's just underneath one or two covers.

My main problem now is that I don't have any of these specialty greases. I have to try and source some or buy a 1 kg can of it. Also, where to apply it for my printer, I have no idea, or just apply it wherever I see that yellow stuff on the gears. I will use the manual for Pixma IP4000 as a guide. But I need to get the grease first.
 
Last edited:

PeterBJ

Printer VIP
Platinum Printer Member
Joined
Nov 27, 2010
Messages
5,165
Reaction score
5,060
Points
373
Location
Copenhagen Denmark
Printer Model
Canon MP990
1 kg of Molykote EM-50L might be more expensive than a new printer, especially if bought retail. I would use the EM-30L that is available in small quantities at an affordable price.

A service manual for the MG8120 printer that is much newer than the iP4000 recommends the use of Floil KG-107A for which I think the EM-30L is an acceptable substitute. The service manual is found here. Click the grey button marked "Скачать" to download. Neither AVG Internet Security nor Malwarebytes Antimalware found anything wrong in the download. See pages 57/70 and 58/70 for lubrication. Notice item 5 APP code wheel gear shaft. This is the shaft that drives the purge pump. APP = Automatic Purge Pump, I think.

The purge pump is a peristaltic pump.

Epson and Canon printers are very different and Epson printers often need a special adjustment program to register and adjust the printhead in case it has been replaced. The adjustment program is also needed for other repairs.

The Canon service tools are mostly used to get some info and change a few settings. They are not needed for most repairs and of course a software tool cannot repair a mechanical defect. You won't need a Service Tool until you need to reset the waste ink absorber counter, and resetting the counter will allow the printer to continue printing, but won't make the waste ink magically go away.
 
Last edited:

Pixman

Printing Apprentice
Joined
Jul 28, 2025
Messages
21
Reaction score
0
Points
11
Printer Model
Pixma TS8350
A service manual for the MG8120 printer that is much newer than the iP4000 recommends the use of Floil KG-107A for which I think the EM-30L is an acceptable substitute.
I was unable to locate any publicly available data sheet for Floil KG-107A. But I think it's pretty thin. I think EM-30L is even better than what they use. But I would prefer an even thicker grease for dampening the noise more. Not too thick though, like Nyogel 767A, that would be counterproductive.
See pages 57/70 and 58/70 for lubrication. Notice item 5 APP code wheel gear shaft. This is the shaft that drives the purge pump. APP = Automatic Purge Pump, I think.
I think you're right, but I can't tell by the picture on page 58/70 where that is on the printer. Looks like a metal or plastic plate from the right side of the printer? If you have a look at page 32/70, there is a "purge drive system unit" depicted in the bottom right. Is this the APP? I can see some tubes in there. I suspect this is what's making all the noise. Because it sounds like badly adjusted wipers on a car. So I would assume it's the rolling part rubbing against rubber tubes (as in the Wikipedia animation). But I'm not sure if or how lubricating the shaft will help in that case.
Epson and Canon printers are very different and Epson printers often need a special adjustment program to register and adjust the printhead in case it has been replaced. The adjustment program is also needed for other repairs.
For Canon printers, this adjustment program is separate from the Canon "service tool" program that we find on forums?
The Canon service tools are mostly used to get some info and change a few settings. They are not needed for most repairs and of course a software tool cannot repair a mechanical defect.
Of course, software can't repair a hardware issue. Do Canon printers need a counter reset for waste pads? I was asking about this to get some clarity on what is meant by "tool" or "service tool", if it' software or hardware, like a special adjustment key.
You won't need a Service Tool until you need to reset the waste ink absorber counter, and resetting the counter will allow the printer to continue printing, but won't make the waste ink magically go away.
Of course, I have replaced the wast pads and reset the counter on my Epson XP-750. It was pretty easy once I had the pads from China, and the right software. This is like replacing engine oil on a modern car, and wanting to do it yourself. You have to visit a dealership or a service center and beg them to reset it free of charge, because only they have the software tools.
 
Top