Epson 1500W print head replacement

brian_mk

Getting Fingers Dirty
Joined
Feb 12, 2015
Messages
40
Reaction score
10
Points
39
Printer Model
Epson Stylus 1500W
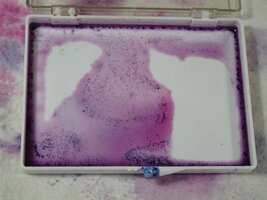
The print head in my 1500W has the common 'black ink leaking into the adjacent yellow channel' problem (delamination) and needs to be replaced.
Has anyone carried out a print head replacement? I have watched a couple of videos and it looks feasable.
Replacement heads are available from Aliexpress for just over £100. Are they any good?
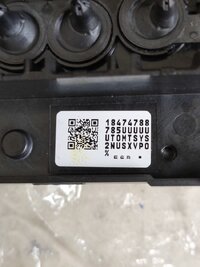
There seem to be two different part numbers available: F1730350 or R1390.
I get the impression that F1730350 is a non-original replacement.

1769528695233.png
 

brian_mk

Getting Fingers Dirty
Joined
Feb 12, 2015
Messages
40
Reaction score
10
Points
39
Printer Model
Epson Stylus 1500W
After watching a video on how to repair the actual print head, I think the chances of success are slim to say the least.
It would require buying some fairly expensive special tools and equipment: A low power stereo microscope, an ultrasonic cleaning bath plus some special 2 part sealant.
Even if repair were possible, it would not be cost effective just for a single print head.

I'd rather just buy a new Canon pixma pro-200s. (UK price around £450).
Unfortunately a set of replacement 8 ink carts for the Canon costs over £100.

I still have some ink for the 1500W which is why I was considering replacing the print head. I have read a couple of reviews that suggest some of the Chinese replacements are useless and leak ink straight away.

Some years ago I used to work for Fujifilm Electronic Engineering (FFEI). They manufactured industrial inkjet printers used for packaging. They used UV curable inks and print heads made by Xaar. Each colour channel used a separate head. I seem to remember the heads required individual calibration I.e. the voltage required to generate equal size ink drops differs from head to head. I wonder if the heads used on Epson printers also require calibration during installation.
 

The Hat

Printer VIP
Platinum Printer Member
Joined
Jan 18, 2010
Messages
16,144
Reaction score
9,094
Points
453
Location
Residing in Wicklow Ireland
Printer Model
Canon/3D, CR-10, CR-10S, KP-3
I'd rather just buy a new Canon pixma pro-200s. (UK price around £450).
Did you ever consider trying to get a second hand Canon 100, that would be a far better choice, it would easier to run and cheaper than the pro 200..
 

Ink stained Fingers

Printer VIP
Platinum Printer Member
Joined
Dec 27, 2014
Messages
6,351
Reaction score
7,569
Points
373
Location
Germany
Printer Model
L805, WF2010, ET8550, T3100X
I seem to remember the heads required individual calibration I.e. the voltage required to generate equal size ink drops differs from head to head. I wonder if the heads used on Epson printers also require calibration during installation.
Epson is doing something very similar - printheads of lots of printers are coded - with a kind of serial number which carries individual technical parameters which are coded with a barcode, and such barcode label is attached to the printhead. When replacing such printhead you need to enter this code of the new printhead into the printer firmware, WicReset offers you to read and replace this code in the firmware. I checked on my L805 printer which is a kind of 6 ink A4 printer similar to the 1500, and WicReset is supporting this code entry.
 

bplaman

Getting Fingers Dirty
Joined
Jan 7, 2021
Messages
43
Reaction score
22
Points
38
Printer Model
Epson Stylus Photo 1500W
Hi.
I asked Grok. This is what he said.

Can I replace the print head myself on an Epson 1500W printer?

Yes, it is possible to replace the print head on the Epson Stylus Photo 1500W yourself
, but it is a quite complex and risky procedure. Many people have successfully done it (there are even videos titled “head replacement in 3 minutes”), but there are also a huge number of cases where the mainboard gets burned during the process due to mishandling the flat cables or static electricity.

Key things to know before starting​


  • Print head model — most commonly F173050 / F173060 / F173070 / F173090 (depends on the production year and region). In most cases they are interchangeable.
  • After replacement, you will almost always need to enter the Head ID (the 24-digit code from the sticker on the new head) using the service program (usually Adjustment Program for 1500W / 1400 / 1430). Without this, the printer may print very poorly — with strong blurring or severe color misalignment.
  • Main risks:
    • Burning the mainboard when connecting/disconnecting flat cables (the most common issue)
    • Damaging or incorrectly seating the cables
    • Misaligning the head position → banding, offset prints
    • Static electricity killing the electronics
Rough step-by-step (general; watch videos specifically for 1500W)
  1. Turn off the printer and unplug it from the power outlet, remove all cartridges.
  2. Remove side covers, panels, and get access to the carriage.
  3. Move the carriage to the service position (often manually or via the cartridge replacement menu + unplug the power cord at the right moment).
  4. Disconnect the flat cables (very carefully! don’t bend or pull hard).
  5. Unscrew 2–4 screws holding the head to the carriage.
  6. Carefully remove the old head.
  7. Install the new one (make sure to align the guides properly and don’t tilt it).
  8. Reconnect the flat cables (correct order and proper pressure are important).
  9. Reassemble everything in reverse order.
  10. Run the Adjustment Program → enter the new Head ID.
  11. Perform several powerful cleanings + nozzle check.
Helpful videos (search these exact titles on YouTube)
  • “Change Epson 1500w head in 3 minutes replacement”
  • “Epson 1500w head replacement and how the motherboard got burned” (very useful — shows how easy it is to burn the board and how to avoid it)

Realistic advice​


  • If you already have experience disassembling similar Epson models (R270, T50, L1800, 1390/1400 etc.) — you can try it yourself.
  • If you have little or no experience — it’s better to take it to a service center (cost of head + labor is usually around $100–200 USD in 2024–2026, depending on the region).

Good luck! If you decide to do it — please come back and tell us how it went and whether the board survived 😄
 

brian_mk

Getting Fingers Dirty
Joined
Feb 12, 2015
Messages
40
Reaction score
10
Points
39
Printer Model
Epson Stylus 1500W
Where is the best place to download the Adjustment Program?
As far as I can tell it requires an activation key before you can use it (or does that only apply to the waste ink resetter function?). The activation key is not free.

Most of the download sites I have looked at also indicate the need to disable anti-virus software before running.
That seems a bit dubious.

I find it annoying that Epson do not make this adjustment software available for free. They (or someone else) are making money from a component that frequently fails.

Another reason to switch from Epson to Canon.
 
Top