Tandberg
Getting Fingers Dirty
- Joined
- Jan 13, 2013
- Messages
- 23
- Reaction score
- 11
- Points
- 39
- Location
- Sweden
- Printer Model
- Pixma Pro 9500 Mk II
Using commonly available materials its easy to make soft silicone gaskets for use as seals
when filling ink cartridges. The silicone can also be used to make reusable caps to seal the
cartridges after refilling.
Some nice properties would be:
- Softer than the usual rubber sheets used for gaskets. This means low forces are needed,
the cartridges are not made to take large mechanical loads.
- Resistant to water and chemicals used for cleaning.
- Non toxic
- Commonly avaliable
Silicone used for sealing glass (aquariums, windows etc.) is available in soft variants. The type
I have tested has a hardness of 16 Shore A degrees and meets all the requirements in the
"wishlist". Look for a similar hardness or types that clearly state they are highly flexible
(like allowing 25 % movement of the seal).
A sheet of clear polypropylene or polyethylene is used as a base to form the gasket. Lids for food
containers are often made of these materials ( marked PP or PE ). Avoid the coloured ones,
something strange in the surface chemistry sometimes makes the silicone stick and hard to remove.
First lay a string of the silicone on the plastic sheet and quickly spread the string to form a wider
layer no thicker than approximately half of what you want the gasket to be finally.
Wait until this layer has set, it takes a day or so for 2 mm. High humidity makes the process quicker.
Peel the silicone layer away from the plastic sheet.
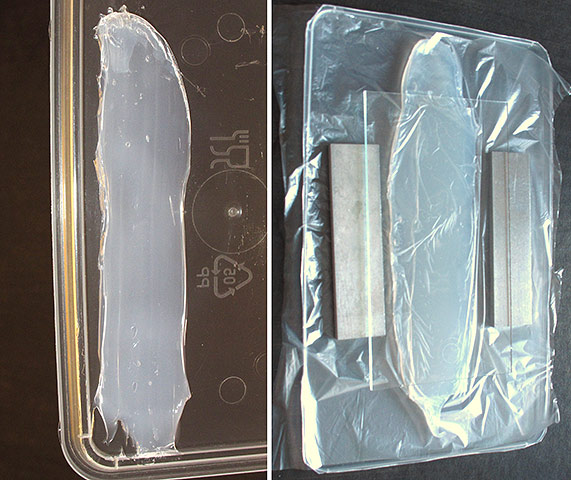
Make another string of silicone on the plastic sheet. Turn the silicone layer from the first step upside
down (flat side up) and press it down on top of the new silicone string. Start in one end and press it
down a little all the way to the other end. Air pockets can be pushed out to the side.
Cover all of the old and new silicone with a piece of a polyethylene bag. Wrinkles are ok, the important
surface on top has already set.
Place two pieces of something flat on either side of the silicone, this will decide the thickness of the
gasket.
Place something flat that covers the entire gasket on top of the two distance pieces. Press downwards
until the gasket is flattened to the height of the distance pieces. (a weight on top is a good thing)
The plastic bag is there to keep the silicone from sticking to these parts.
Wait half a day or so until the outer edges of the new silicone has set. Remove the plastic foil even if
some of the new silicone is sticking to it, this part is wasted anyway.
Wait until the bottom layer has set all the way to the middle.
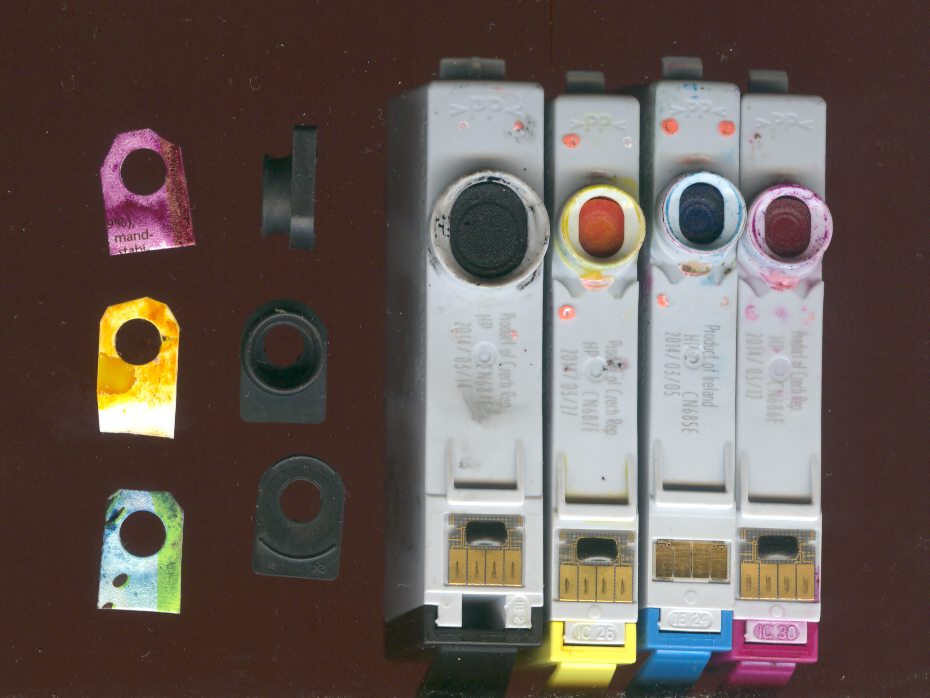
The useful part is the one that is flat on both sides. Cutting is easy using a sharp knife, water and some
soap. Holes can be cut with a sharpened metal tube (also lubricated).
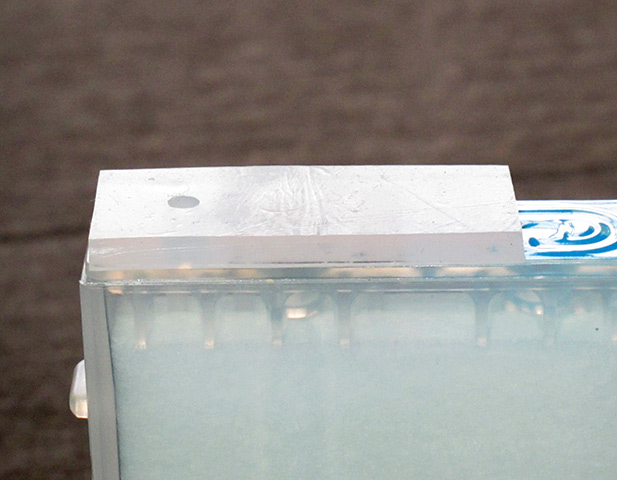
My own use in a "filling station" for BCI-3 cartridges. The fixture has a flat surface pressing down on
the gasket. It also contains a small valve to manually open and close the vent hole. The seal does
the job really well, it is airtight (if the label on the cartridge is undamaged). Only a few N(ewtons) are
needed to compress the seal. The length of the gasket is needed to center the force over the bottom
seal, otherwise that part will tilt slightly and possibly leak.
Why this complicated procedure, why not just put silicone between two plastic sheets?
Well, it will take forever and a day to set, especially if the gasket is thin and wide.
2 mm per day to set is a figure I have seen but I have not had the patience to test this myself.
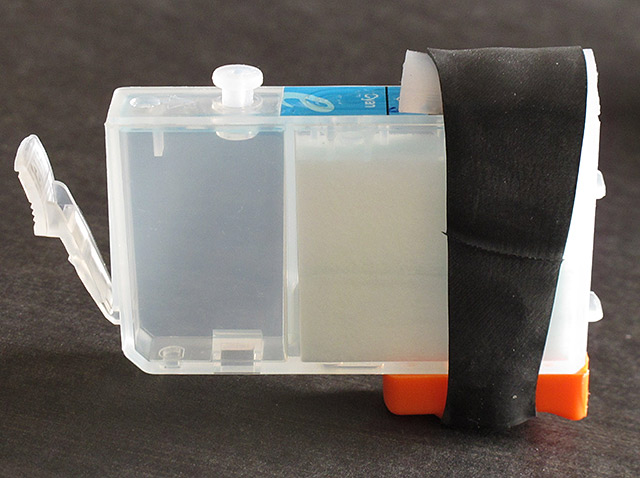
A semicircular crossection can be used to seal the vent holes on BCI-3 (and similar) cartridges.
Cut the nozzle of the sealant tube like this:
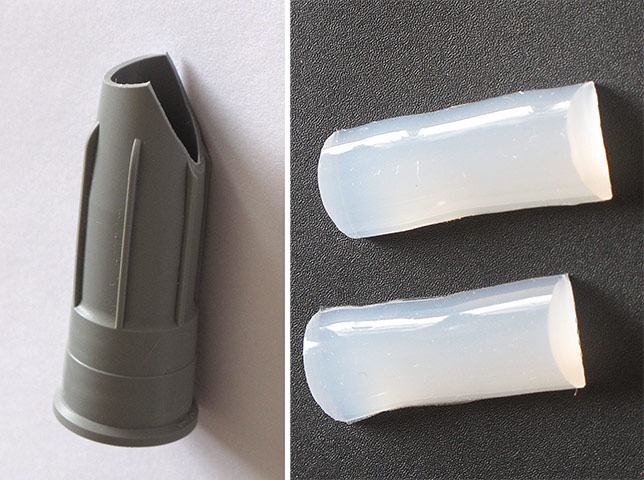
The seal can be combined with a rubber band made from a bicycle tube like this:
when filling ink cartridges. The silicone can also be used to make reusable caps to seal the
cartridges after refilling.
Some nice properties would be:
- Softer than the usual rubber sheets used for gaskets. This means low forces are needed,
the cartridges are not made to take large mechanical loads.
- Resistant to water and chemicals used for cleaning.
- Non toxic
- Commonly avaliable
Silicone used for sealing glass (aquariums, windows etc.) is available in soft variants. The type
I have tested has a hardness of 16 Shore A degrees and meets all the requirements in the
"wishlist". Look for a similar hardness or types that clearly state they are highly flexible
(like allowing 25 % movement of the seal).
A sheet of clear polypropylene or polyethylene is used as a base to form the gasket. Lids for food
containers are often made of these materials ( marked PP or PE ). Avoid the coloured ones,
something strange in the surface chemistry sometimes makes the silicone stick and hard to remove.
First lay a string of the silicone on the plastic sheet and quickly spread the string to form a wider
layer no thicker than approximately half of what you want the gasket to be finally.
Wait until this layer has set, it takes a day or so for 2 mm. High humidity makes the process quicker.
Peel the silicone layer away from the plastic sheet.
Make another string of silicone on the plastic sheet. Turn the silicone layer from the first step upside
down (flat side up) and press it down on top of the new silicone string. Start in one end and press it
down a little all the way to the other end. Air pockets can be pushed out to the side.
Cover all of the old and new silicone with a piece of a polyethylene bag. Wrinkles are ok, the important
surface on top has already set.
Place two pieces of something flat on either side of the silicone, this will decide the thickness of the
gasket.
Place something flat that covers the entire gasket on top of the two distance pieces. Press downwards
until the gasket is flattened to the height of the distance pieces. (a weight on top is a good thing)
The plastic bag is there to keep the silicone from sticking to these parts.
Wait half a day or so until the outer edges of the new silicone has set. Remove the plastic foil even if
some of the new silicone is sticking to it, this part is wasted anyway.
Wait until the bottom layer has set all the way to the middle.
The useful part is the one that is flat on both sides. Cutting is easy using a sharp knife, water and some
soap. Holes can be cut with a sharpened metal tube (also lubricated).
My own use in a "filling station" for BCI-3 cartridges. The fixture has a flat surface pressing down on
the gasket. It also contains a small valve to manually open and close the vent hole. The seal does
the job really well, it is airtight (if the label on the cartridge is undamaged). Only a few N(ewtons) are
needed to compress the seal. The length of the gasket is needed to center the force over the bottom
seal, otherwise that part will tilt slightly and possibly leak.
Why this complicated procedure, why not just put silicone between two plastic sheets?
Well, it will take forever and a day to set, especially if the gasket is thin and wide.
2 mm per day to set is a figure I have seen but I have not had the patience to test this myself.
A semicircular crossection can be used to seal the vent holes on BCI-3 (and similar) cartridges.
Cut the nozzle of the sealant tube like this:
The seal can be combined with a rubber band made from a bicycle tube like this: