- Joined
- Feb 24, 2005
- Messages
- 1,669
- Reaction score
- 183
- Points
- 223
- Location
- North of Boston, USA
- Printer Model
- Canon i9900 (plus 5 spares)
This is a long story - I'm warning you in advance. In defense, I think that I may have found something that explains some of the strange "terminal clogged head" reports and may have even found a way for the adventurous to attempt a fix on a terminal head that is out of warranty.
I recently got a new head under warranty for my i9900 because the "heat sink" came loose and was making a noise when the head reversed direction. The new head performed perfectly until 3 days ago, at which time, the PM stopped printing anything. This head has never seen anything but commercial head cleaning solution, alcohol and my bulk ink, so there is no possibility of clogging due to incompatible inks. I checked the ink from the cart as well as the bulk ink for any traces of bacterial growth (long stringers) and found nothing.
I tried most of the standard cleaning techniques (alcohol, cleaning solution, Windex/alcohol mix , overnight soak - but no compressed air) with no success. I didn't feel that I could legitimately request another warranty head, as I had been warned that 3rd party inks can clog the print head. I was ready to throw out my bulk ink and buy replacement ink from another supplier, as well as a replacement head, so I decided that it was either fix the head or destroy it in the process to locate the cause of the blockage.
I then tried compressed air in both directions, and found that the channel wasn't just a little blocked - it was completely blocked. I would occasionally get some air to flow, but there were times when the channel wouldn't allow any flow in either direction. I used my hand vacuum pump to pull a vacuum on all 8 ink pickups, and only the PM channel was blocked. The only thing left to do was to disassemble the head, as shown in the 5 images combined below.
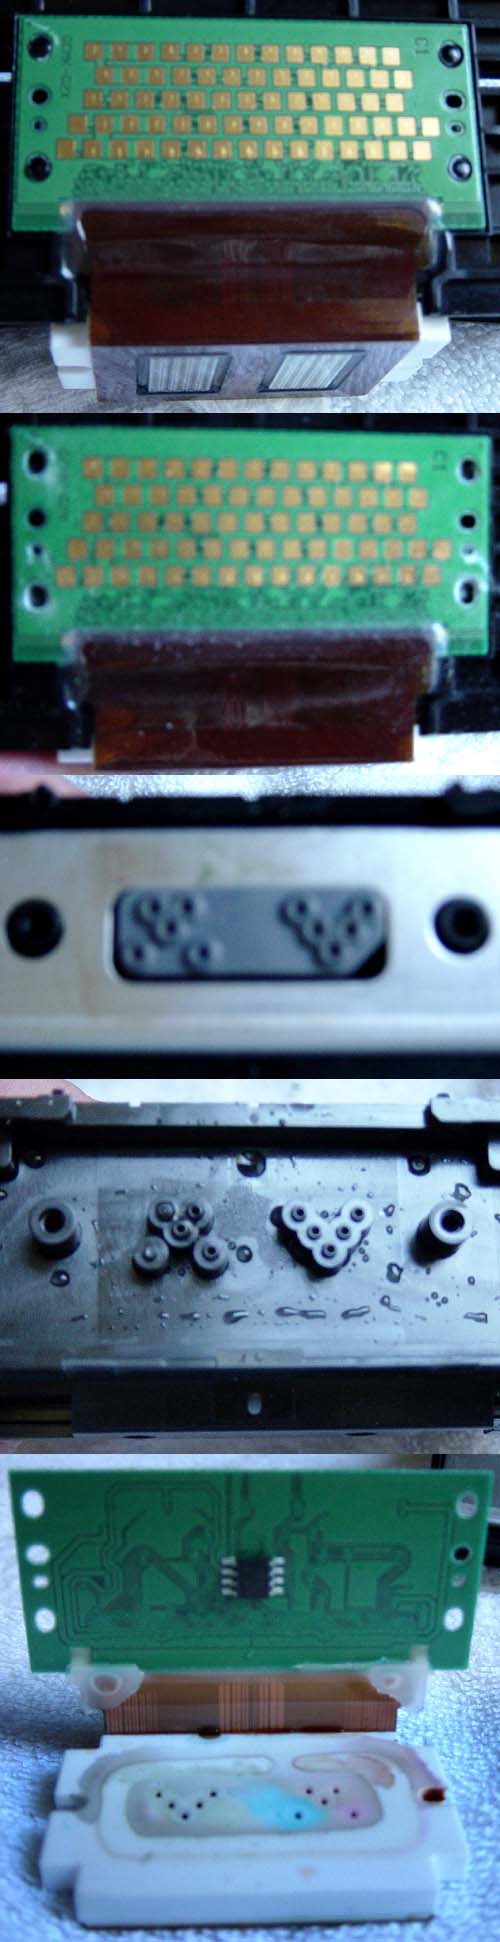
The top image shows the back of the head after the two screws that hold the actual print head in place were removed. The connection between the electrical contacts and the head is flexible, but not flexible enough to remove the head, so I ground off the 4 plastic "nubs" that held the circuit board in place, using a Dremel hand grinder with a small ball-end tool. The complete head assembly was then easily removed.
The third image shows an (out-of-focus) gasket that seals the 8 individual ink channels to the nozzles (2 of the holes are unused). The aluminum piece is actually "U" shaped, and it now appears to be used as a "heat shield" to block heat from the ceramic head from reaching the plastic housing more than a "heat sink". The 4th image shows the bottom of the plastic housing after the head was removed (the ink holes are about 0.7 mm diameter, so there isn't a lot of ink in the channels). It is not evident in this photo, but the plastic housing consists of two pieces that are apparently glued together at assembly to form the individual ink flow channels between the two pieces (I couldn't get them apart without breaking something) The 5th image shows the circuit board and head. I believe that the IC on the back of the circuit board is an EEPROM that is probably used to hold a serial number for each head, and it could also be used to hold information on the head's usage. Everything except the EEPROM was "potted" and could be covered with water without causing a short.
Now that it was apart, it was quickly found that the blockage wasn't in the head at all, but in the plastic body! Since the head wasn't connected at this time, it was now OK to use a full 100 psi of compressed air for cleaning. After about 15 minutes working with compressed air and vacuum, the channel was re-opened (I have no idea where the blockage went). A little test rig was connected to each ink pickup with a 6" head of water, and water flowed through the right 6 channels at about 4 drops/second. The PM (the far left, "problem" channel) only flowed at 1 drop/2 seconds, and the 2nd channel only flowed at 1 drop/second, but this was still far more ink than would be required when printing, so it was decided to put it back together and see if it would print.
Reassembly was easy. All liquids were blown out of the head before it was reassembled. A hot melt glue gun was used to replace the "nubs" that hold the circuit board in place. The cleaning cycle that is run when the print head is removed got the ink flowing to all 8 channels. The nozzle check was good, and the head alignment values were almost the same as they were when the head was initially installed. The printer is now back to normal - I'll let you know if it clogs again.
What happened???? This analysis is pure conjecture, as it would be necessary to destroy the head to see what is inside - now that it is working, that will have to wait for a terminal illness. If someone has a scrap head, perhaps they would like to perform an autopsy and post the photos. It appears that the ink channels from the ink pickups to the print head are formed between two pieces of plastic that have the channels molded into them before they are glued together. I strongly suspect that some of the sealant/glue got into the ink channel during assembly and recently broke free and balled up to block the channel.
1. Would this have happened with Canon ink? Perhaps their ink doesn't loosen the sealant, but 3rd party inks do?
2. In a previous post, I asked if anyone had seen the situation where the head wouldn't allow back flow on a channel. I suspect that there was a similar problem on that head, but the blockage still allowed enough forward flow to the nozzle for it to print.
If you have a similar problem on a terminal out-of-warranty head, you have nothing to lose, so give this "coronary bypass" cleaning method a try. Please post your results. I have seen a number of posts where similar problems were reported, and it is usually blamed on the ink. Perhaps the ink isn't the culprit. Perhaps Canon has an assembly/quality problem.
Before trying this method, be sure to read at least these posts (preferably the entire thread):
http://www.nifty-stuff.com/forum/viewtopic.php?pid=60410#p60410
http://www.nifty-stuff.com/forum/viewtopic.php?pid=56808#p56808
http://www.nifty-stuff.com/forum/viewtopic.php?pid=56845#p56845
http://www.nifty-stuff.com/forum/viewtopic.php?pid=56864#p56864
http://www.nifty-stuff.com/forum/viewtopic.php?pid=56873#p56873
http://www.nifty-stuff.com/forum/viewtopic.php?pid=56974#p56974
http://www.nifty-stuff.com/forum/viewtopic.php?pid=57020#p57020
http://www.printerknowledge.com/threads/clogged-canon-print-head.227/page-24#post-2394
I recently got a new head under warranty for my i9900 because the "heat sink" came loose and was making a noise when the head reversed direction. The new head performed perfectly until 3 days ago, at which time, the PM stopped printing anything. This head has never seen anything but commercial head cleaning solution, alcohol and my bulk ink, so there is no possibility of clogging due to incompatible inks. I checked the ink from the cart as well as the bulk ink for any traces of bacterial growth (long stringers) and found nothing.
I tried most of the standard cleaning techniques (alcohol, cleaning solution, Windex/alcohol mix , overnight soak - but no compressed air) with no success. I didn't feel that I could legitimately request another warranty head, as I had been warned that 3rd party inks can clog the print head. I was ready to throw out my bulk ink and buy replacement ink from another supplier, as well as a replacement head, so I decided that it was either fix the head or destroy it in the process to locate the cause of the blockage.
I then tried compressed air in both directions, and found that the channel wasn't just a little blocked - it was completely blocked. I would occasionally get some air to flow, but there were times when the channel wouldn't allow any flow in either direction. I used my hand vacuum pump to pull a vacuum on all 8 ink pickups, and only the PM channel was blocked. The only thing left to do was to disassemble the head, as shown in the 5 images combined below.
The top image shows the back of the head after the two screws that hold the actual print head in place were removed. The connection between the electrical contacts and the head is flexible, but not flexible enough to remove the head, so I ground off the 4 plastic "nubs" that held the circuit board in place, using a Dremel hand grinder with a small ball-end tool. The complete head assembly was then easily removed.
The third image shows an (out-of-focus) gasket that seals the 8 individual ink channels to the nozzles (2 of the holes are unused). The aluminum piece is actually "U" shaped, and it now appears to be used as a "heat shield" to block heat from the ceramic head from reaching the plastic housing more than a "heat sink". The 4th image shows the bottom of the plastic housing after the head was removed (the ink holes are about 0.7 mm diameter, so there isn't a lot of ink in the channels). It is not evident in this photo, but the plastic housing consists of two pieces that are apparently glued together at assembly to form the individual ink flow channels between the two pieces (I couldn't get them apart without breaking something) The 5th image shows the circuit board and head. I believe that the IC on the back of the circuit board is an EEPROM that is probably used to hold a serial number for each head, and it could also be used to hold information on the head's usage. Everything except the EEPROM was "potted" and could be covered with water without causing a short.
Now that it was apart, it was quickly found that the blockage wasn't in the head at all, but in the plastic body! Since the head wasn't connected at this time, it was now OK to use a full 100 psi of compressed air for cleaning. After about 15 minutes working with compressed air and vacuum, the channel was re-opened (I have no idea where the blockage went). A little test rig was connected to each ink pickup with a 6" head of water, and water flowed through the right 6 channels at about 4 drops/second. The PM (the far left, "problem" channel) only flowed at 1 drop/2 seconds, and the 2nd channel only flowed at 1 drop/second, but this was still far more ink than would be required when printing, so it was decided to put it back together and see if it would print.
Reassembly was easy. All liquids were blown out of the head before it was reassembled. A hot melt glue gun was used to replace the "nubs" that hold the circuit board in place. The cleaning cycle that is run when the print head is removed got the ink flowing to all 8 channels. The nozzle check was good, and the head alignment values were almost the same as they were when the head was initially installed. The printer is now back to normal - I'll let you know if it clogs again.
What happened???? This analysis is pure conjecture, as it would be necessary to destroy the head to see what is inside - now that it is working, that will have to wait for a terminal illness. If someone has a scrap head, perhaps they would like to perform an autopsy and post the photos. It appears that the ink channels from the ink pickups to the print head are formed between two pieces of plastic that have the channels molded into them before they are glued together. I strongly suspect that some of the sealant/glue got into the ink channel during assembly and recently broke free and balled up to block the channel.
1. Would this have happened with Canon ink? Perhaps their ink doesn't loosen the sealant, but 3rd party inks do?
2. In a previous post, I asked if anyone had seen the situation where the head wouldn't allow back flow on a channel. I suspect that there was a similar problem on that head, but the blockage still allowed enough forward flow to the nozzle for it to print.
If you have a similar problem on a terminal out-of-warranty head, you have nothing to lose, so give this "coronary bypass" cleaning method a try. Please post your results. I have seen a number of posts where similar problems were reported, and it is usually blamed on the ink. Perhaps the ink isn't the culprit. Perhaps Canon has an assembly/quality problem.
Before trying this method, be sure to read at least these posts (preferably the entire thread):
http://www.nifty-stuff.com/forum/viewtopic.php?pid=60410#p60410
http://www.nifty-stuff.com/forum/viewtopic.php?pid=56808#p56808
http://www.nifty-stuff.com/forum/viewtopic.php?pid=56845#p56845
http://www.nifty-stuff.com/forum/viewtopic.php?pid=56864#p56864
http://www.nifty-stuff.com/forum/viewtopic.php?pid=56873#p56873
http://www.nifty-stuff.com/forum/viewtopic.php?pid=56974#p56974
http://www.nifty-stuff.com/forum/viewtopic.php?pid=57020#p57020
http://www.printerknowledge.com/threads/clogged-canon-print-head.227/page-24#post-2394
Last edited: