Converting Spyderprint 225 patch target to i1Profiler

pharmacist

Printer VIP
Platinum Printer Member
Joined
May 29, 2007
Messages
2,734
Reaction score
1,536
Points
313
Location
Ghent, Belgium
Printer Model
SC-900 ET-8550 WF-7840 TS705
With help of @crenedecotret:

Here is a new target set based on the famous i1Profiler TC9.18 target combined with the SpyderPrint grays target (to neutralise black and white printing) to be printed on 2 sheets of A4 for ArgyllCMS and to be scanned with the i1Pro2 spectro:
 

Attachments

  • ArgyllCMS TC918+Spyderprint grays target for i1Pro2.zip
    10.8 MB · Views: 40

pharmacist

Printer VIP
Platinum Printer Member
Joined
May 29, 2007
Messages
2,734
Reaction score
1,536
Points
313
Location
Ghent, Belgium
Printer Model
SC-900 ET-8550 WF-7840 TS705
@crenedecotret : I have made an i1Profiler target that is based on the high quality target + grays of Spyderprint, that originally was based on RGB: 5x5x5, but I have changed it to a better RGB: 7x7x7 and including an bunch of near neutral patches (automatically generated by the i1Profiler target) and combining it with the extra patches from the Spyderprint 225 high quality target (minus the RGB 5x5x5 patches) + the neutralising gray patches + 2 extra patches (orange and violet) to fill up the target to 702 patches witch is divided into 26 rows, each including 27 patches (26x27=702). You might to try to convert it to the ArgyllCMS format with this: much appreciated.

Users of i1Profiler can also download the set. The target is optimized (A4) for use on the X-Rite i1pro2 scanning table/board.

For i1Profiler users:

install the txf + tif file into:

\ProgramData\X-Rite\i1Profiler\ColorSpaceRGB\TestCharts

install the pxwf file into:

\ProgramData\X-Rite\i1Profiler\ColorSpaceRGB\PrinterProfileWorkflows

Use the advanced profiling option in i1Profiler to access the printer profile workflow.

Due to the large amount of grays, near grays and near neutral patches this target will optimise black and white printing with a relatively low patch count. The standard i1Profiler patch generating engine does not allow to introduce these extra near gray and near neutral patches automatically, so I introduced similar gray/near gray patches from the original grays target from the SpyderPrint package to optimise black and white printing.
 

Attachments

  • Chart 702 Patches Enhanced Spyderprint with grays.zip
    771.5 KB · Views: 26
Last edited:

Ink stained Fingers

Printer VIP
Platinum Printer Member
Joined
Dec 27, 2014
Messages
6,193
Reaction score
7,383
Points
373
Location
Germany
Printer Model
L805, WF2010, ET8550, T3100X
thanks a lot for your work on i1Profiler patch files; I downloaded tlhis last version with the 702 patches incl. extended grays.

I had to make a small change to get it working with the i1iO robot arm which needs patch sizes at min 7.5x8 mm sized patches. It most likely should work as well with manual scanning; here are the parameter files zipped, I print with the borderless option on with min extension
 

Attachments

  • Chart 702 Patches Enhanced Spyderprint with grays-1.zip
    52.1 KB · Views: 24
Last edited:

Ink stained Fingers

Printer VIP
Platinum Printer Member
Joined
Dec 27, 2014
Messages
6,193
Reaction score
7,383
Points
373
Location
Germany
Printer Model
L805, WF2010, ET8550, T3100X
A dual scan with the i1i0-2 robot table takes 11 min with a dual scan for the different M0, M1, M2 modes and just 2 min for a single scan in one of the modes, the driver apparently uses a lower speed for the robot arm for whatever reason for the dual mode, there is no control over the actual scan speed for the user. It is probably something with the UV LED . There is just another mode to read the patches step by step in singular mode, but that takes a very long time.
 

pharmacist

Printer VIP
Platinum Printer Member
Joined
May 29, 2007
Messages
2,734
Reaction score
1,536
Points
313
Location
Ghent, Belgium
Printer Model
SC-900 ET-8550 WF-7840 TS705
The proof of the pudding is in the eating: what is your experience in the black and white printing using this profile compared to a standard similar patch count profile without these neutralizing gray patches?
 

Ink stained Fingers

Printer VIP
Platinum Printer Member
Joined
Dec 27, 2014
Messages
6,193
Reaction score
7,383
Points
373
Location
Germany
Printer Model
L805, WF2010, ET8550, T3100X
I'll create a few profiles with this new patch sheet and compare some prints with my current and these new profiles in the next time.
 

pharmacist

Printer VIP
Platinum Printer Member
Joined
May 29, 2007
Messages
2,734
Reaction score
1,536
Points
313
Location
Ghent, Belgium
Printer Model
SC-900 ET-8550 WF-7840 TS705
Here are two extra sets with extended grays à la Spyderprint for the i1Profiler:

The first one is designed for a miniature target on 2 small 10x15 cm (4x6") photo cards and includes the patches of the Spyderprint 225 High Quality target + Spyderprint Extended grays target squeezed down onto 2 small sheets of 10x15 cm photo cards. Because it is very small, some care must be taken to scan those miniature patches, but it can be done. I generated this target with profiling paper types that are only available in small photo card sizes and only uses 2 small sheets of 10x15 cm. Alternatively the shrink method for the Colormunki/i1Studio also allows to make a printer profile using only 2 small sheets of 10x15 cm photo cards. However this i1profiler target has extended grays to neutralise black and white printing for which the Colormunki/i1Studio device will need 3 sheets to accomplish the same job (black and white target method using 50 + 2x50 patches).

The second patch set is a high quality target using 1404 patches divided over 2 sheets of A4 based on RGB: 10x10x10 + near neutral patches automatically generated by the smart patch generator of 1IProfiler + Spyderprint extended grays patch set + extra near gray ramps (about 50 %) on top of the near gray ramps already included in the Spyderprint extended grays patch set for even better sampling of the neutral/gray axis. It is known that the neutral/gray axis is very important for the human eye to get the most pleasing prints. Unfortunately the smart target generator of i1Profiler does not generate these extra (stained) gray ramps. However the Optimization option in the workflow selection in i1Profiler does generate these stained gray ramps:

1745307055835.png


Beneath a print screen of the second patch page of the 1404 target with neutralising black and white patches:

1745307176640.png
 

Attachments

  • Chart 1404 Patches ABW-enhanced 2xA4.zip
    1.7 MB · Views: 19
  • Spyderprint 450 patch target 2x 10x15cm.zip
    353 KB · Views: 21

Ink stained Fingers

Printer VIP
Platinum Printer Member
Joined
Dec 27, 2014
Messages
6,193
Reaction score
7,383
Points
373
Location
Germany
Printer Model
L805, WF2010, ET8550, T3100X
I did this over the last days - I used the i1Profiler parameters for a 702 patch sheet as provided above by @pharmacist with the extnded range of gray spots, I'm interested to see what additional gray spots do to a profile, so I created a profile on two papers - a Netbit/Aldi paper 300 gr and a glossy 300 gr sold by Europrint/Ebay. I'm always waiting a day to let the dye inks drift a small amount before I do the actual scanning - with an i1Profiler robot arm . The patch sheets are printed with an ET-8550 printer with the ultraglossy paper selection.
And I got a surprise - the gamuts of the Netbit and the Europrint papers are identical - across the complete luminance range - the papers are just identical. That's good to know that there is a budget friendly substitute available for the Aldi/Netbit paper which was not offered anymore since years by Aldi.

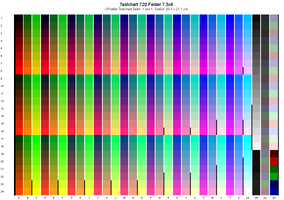
I created another profile with i1Profiler - a target sheet which just fits onto an A4 paper sheet - this goes with 720 patches which is the maximum if I want to use the robot arm, the min patch size is 7,5 x 8 mm. The i1Profiler software just creates the necessary patches which includes a range of about 50+ gray patches at the right size of the sheet.

Testchart 0720 Felder 7,5x8.png

I now have 2 different profiles generated with patch sheets with 702 and 720 patch fields - one with the extended gray range and a standard i1Profiler profile, and both with a similar patch field count.

I now can do test prints with both of these profiles - onto the same paper, this could be an image or even a patchsheet which gets profiled, I'm printing with Qimage with the relative colorimetric - RC _ mode - with BPC on - this with both profiles.

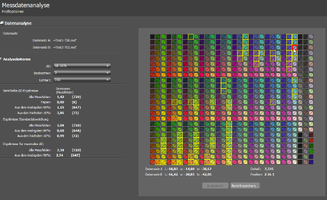
I scanned these prints, and i1Profiler let me compare the prints and calculates several different statistical parameters for the deltas between each of the 702 color spots.

Profile Deltas.png


The program is showing the individual deltas when I move the cursor over one of the spots, the average DeltaE (76) of all 720 spots is 1.42 which is pretty good I think. The program as well highlights those 10% of spots which have the highest values - the max is 7.34 - the cursor at the top right is located there . The spots are highlighted wtih a yellow box round it. None of the gray patches exceed a DeltaE of 2, they are typically between 0.8 and 1.2. The gray spots are locaed mainly in the vertical columns 2B and 2C at the right sie of the patch sheet - mainly columns 2B and 2C.

1745580462953.png


This shows to me that both profiles - a standard 720 patch profile and a 702 patch sheet with additional gray patches deliver pretty much the same print output.
And I printed 2 B/W test images - by Keith Cooper - with both profiles, I can't see a difference, I specifically looked for the darker range - detail resolution , and I don't see a change in the color hue of the gray with different luminance values.

The data table shows a max DeltaE of 7.34 , this spot is located at the top right at the cursor location - detailed data is shown at the bottom of the patch sheet layout. The deltas at the adjacent spots are much lower. There are problably some errors in the data - from scanning or printing. It would be necessary for a lower error rate to use at least 2 actual prints , to scan them several times and average tthe data before the comparison is made. But since the gray spots don't exhibit such wide variations I don't see a reason to go such additional steps.
 

pharmacist

Printer VIP
Platinum Printer Member
Joined
May 29, 2007
Messages
2,734
Reaction score
1,536
Points
313
Location
Ghent, Belgium
Printer Model
SC-900 ET-8550 WF-7840 TS705
Many thanks for the update. Good to know that there is hardly any difference. However: the ET-8550 has gray ink: this might influence the game of grey printing....One could ask if it would be a greater difference when using the BW enhanced target with a printer that has NO gray ink and is depending solely by mixing CMY to obtain all the grey steps. Not sure this will give a greater difference compared to a printer which has gray ink(s).
 
Top