Canon MP730 vertical head alignment problem

lin

Print Addict
Joined
Dec 15, 2007
Messages
363
Reaction score
18
Points
151
Trigger 37 said:
lin,... Grandad35 could be correct. However, the bad news is that to get at the timing strip, you have to take the printer apart. There is just no way you can get your hands or any tools inside the small opening of the cover. You could open the cover and pull the power cord and then move the PH out of the way and look to your far right with a flashlight at the timing strip and see if there is any ink on it. It does not seem logical that this could happen at the same time you forgot to close the ph locking level. It seems you are doomed to take the printer apart.
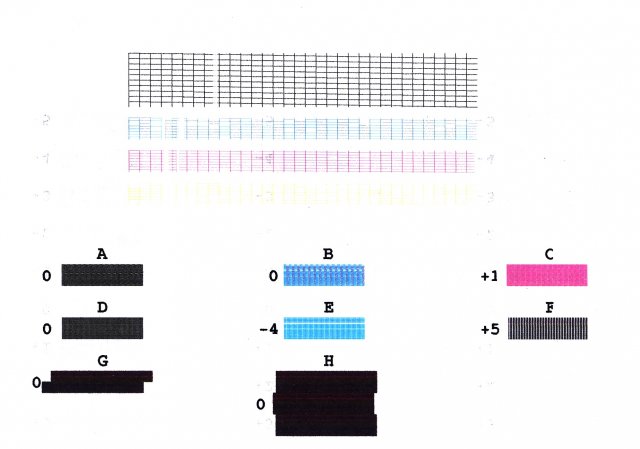
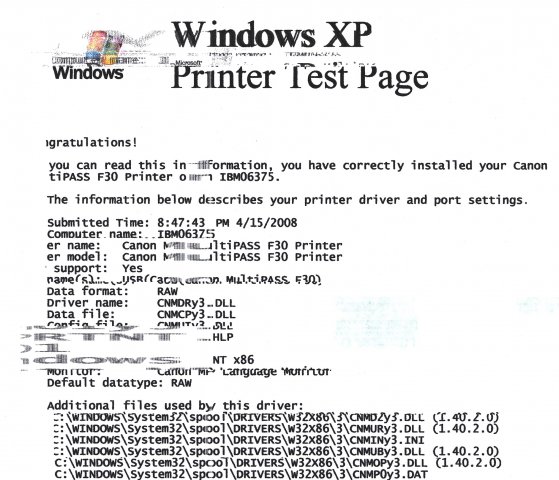
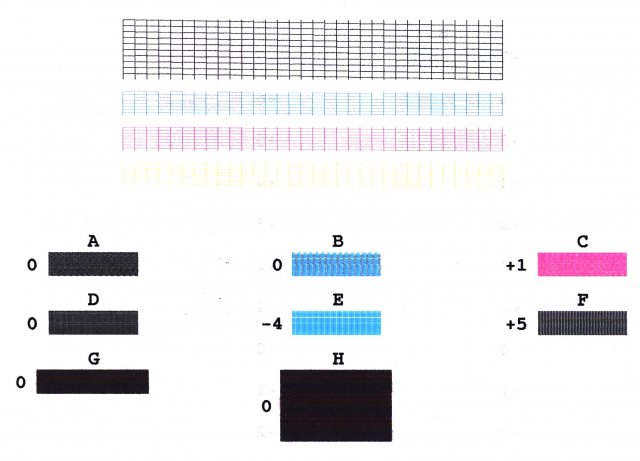
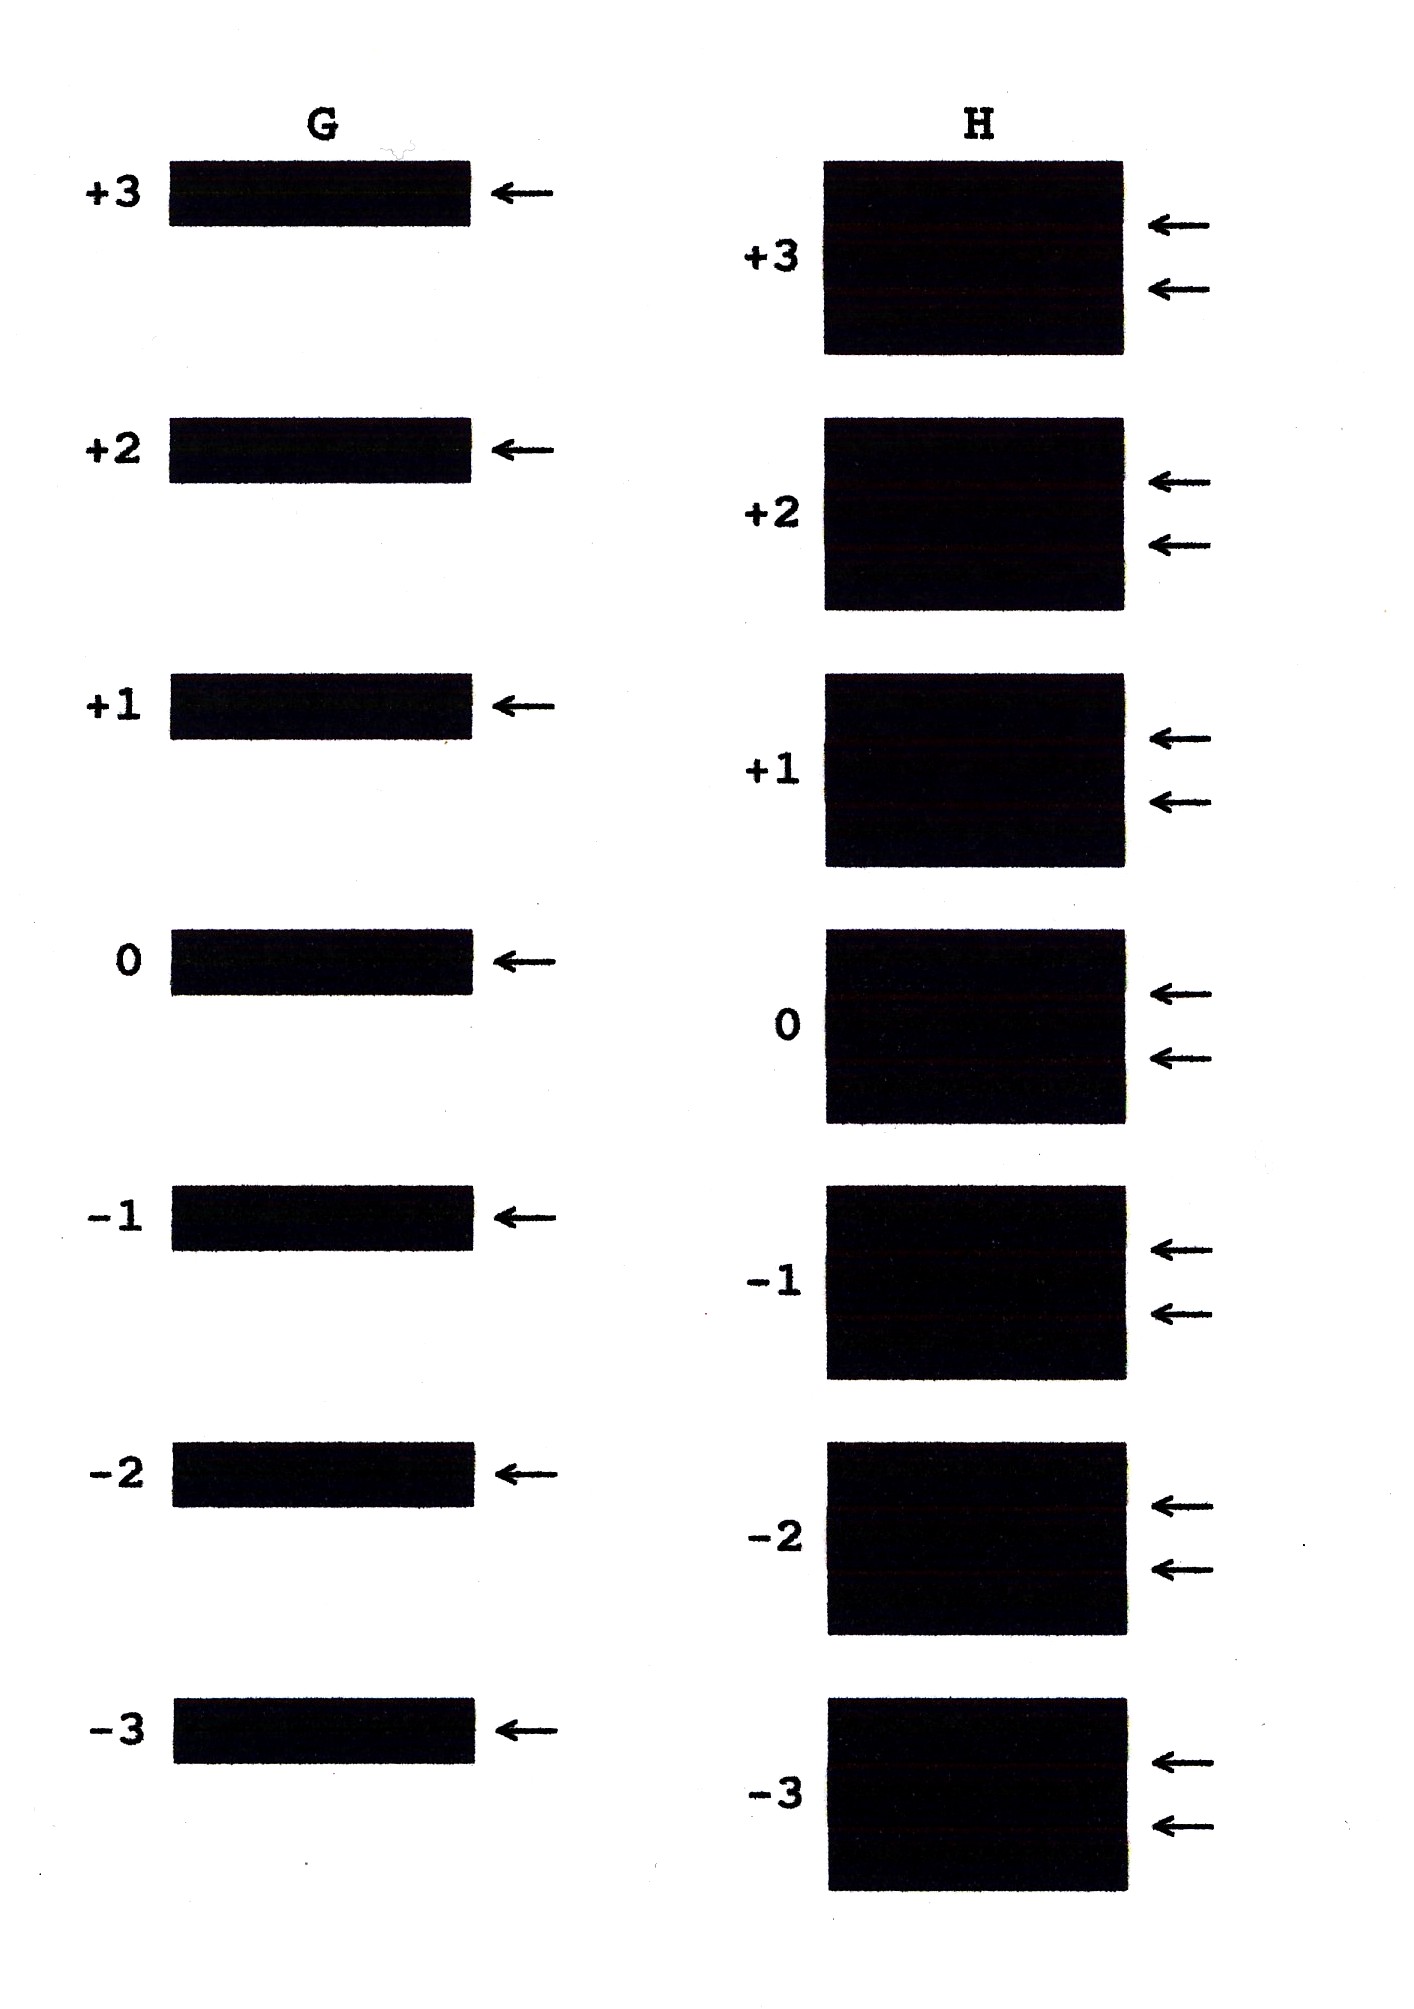
Hi I supposed the translucent belt is the timing strip which comes with 2 black dots at both ends. Assuming below is an illustration of the timing strip. May I asked if there is any other tiny black dot on the strip at the righthand side other than the one big dot at the right of the timing strip (see the blue arrow that point towards that tiny black dot)?

2740_timing_strip.png
 

Trigger 37

Printer Guru
Joined
Dec 23, 2006
Messages
607
Reaction score
4
Points
136
Lin,... The answer is no. There is no other dots on the timing strip. However, I don't think the dot you showed in you picture would cause a lot of problems. What happens to a page when you print. Those marks are only used for horizontal position sensing, so some characters may be spaced wrong.


The dot is probably an ink spot. If it is causing you a problem, you could try and clean it off with a very long cotton swab with just a touch of alcohol on it. If you press too hard in the wrong direction you could cause the timing strip to fall off the hook. Then you are back to taking the covers off.

I just re-listed my Repair Manuals on eBay if your still interested. It will be up for 10 days.
 

lin

Print Addict
Joined
Dec 15, 2007
Messages
363
Reaction score
18
Points
151
Trigger 37 said:
Lin,... The answer is no. There is no other dots on the timing strip. However, I don't think the dot you showed in you picture would cause a lot of problems. What happens to a page when you print. Those marks are only used for horizontal position sensing, so some characters may be spaced wrong.


The dot is probably an ink spot. If it is causing you a problem, you could try and clean it off with a very long cotton swab with just a touch of alcohol on it. If you press too hard in the wrong direction you could cause the timing strip to fall off the hook. Then you are back to taking the covers off.

I just re-listed my Repair Manuals on eBay if your still interested. It will be up for 10 days.
Hi Trigger37, I actually had my service manual which shows how to disassemble the printer (not the canon user guide) but i guess it was not as comprehensive as the one you were offering. I also think that was an ink dot on the timing strip too but I don't want to jump into conclusion and feel it's better that I asked. I did attempted to clean that black ink spot away but I guess it was the black pigment ink because no matter how I tried to remove it even with alcohol, I couldn't.

Since that dot wouldn't cause the problem, I guess I will try to think of something else in the meanwhile.
 

Trigger 37

Printer Guru
Joined
Dec 23, 2006
Messages
607
Reaction score
4
Points
136
Lin,.. I have thought a lot about your problem, and I almost had it happen to my MP730 about 6 months ago. fortunatley it did not do any damage as I caught it and shut the printer off. My only thought is that when the head jammed against the cover, some part of the carriage is now tilted, such that when it prints in one direction it sees the timing marks in position "X", and when it prints in the other direction is sees them in position "Y". This produces the ofset.

Do this test. Open the cover and when the head comes to center, pull the power cord out of the back. Now you can move the carriage left and right. Move it with your hand and see if there is any tilt or vertical movement in the printhead holder. Don't use any force, just see if it is loose or if it will rock. Let us know.
 

Trigger 37

Printer Guru
Joined
Dec 23, 2006
Messages
607
Reaction score
4
Points
136
Lin, SXD,.... It seems that both of you have the exact same problem. I've been gone so long, I have not thought about this problem and I have been envolved with many other things including doing everything for my wife who has just finished surgery and needs help with everything.

Anyway, after thinking long and hard about the problem,... it is not a "Vertical Alignment" problem. It is a "Horizontal Timing Problem". While the nozzle check pattern seem good enough, the black sections show left to right misalignment. The cause of this is that the nozzle patterns are printed in one direction only,...right to left. The black bars are printed in both directions as is the heal alignment test.

To print at a specific location from the edge of the paper, the logic counts the number of lines on the timing strip as it moves from home. It knows what the count should be going from right to left. Once it gets there it starts the print. Next the printhead has to move all the way to the left and start backwards. Again the logic card counts the Timing marks and clearly there are an exact number. When it gets to the correct spot, it starts the print again. The Bars are printed in 3 passes, first right to left, then left to right, and finally right to left again. So if the count gets off for any reason, the pattern will be skewed. When you look at a line of text that is printed in black only, the text appears to be split in two pieces and shifted.

The answer is there is clearly a timing problem difference from left to right, which was produced by the jamming of the printhead carriage ASM.

So what is the problem?... The answer is the logic card is missing "One" timing pulse in the count from right to left. It is totally possible that the Dot on "Lin's" timing strip could cause this. So as the carriage moves from right to left, one pulse is missing, one count is missed, and the printed image is delayed. It is probably more than one count as the dot is large enough to wipe out the signal from several timing marks.

A second possibility is that the sensor in the carriage ASM has been shifted, but this seems very unlikely. The logic counts the timing marks from the large dot on the right which is the home pulse. If you look close at the timing marks, they are about 200-300 lines per ink.

Another possibility, which again seems unlikely, is that when the carriage jammed, the tiny teeth in the belt drive got stripped, such that a couple are missing, or that one of the teeth in the drive gear for the belt was sheared off. So each time the printhead is moved from right t left, it skips a step,... but when it comes back the other way, there is no skip.

So here is my recommendations. Take the printer apart. If you want you can purchase my Repair Manual on Ebay as I just relisted it last night. If you already have it, great, then you will know the exact steps to take it all the way down to the main chassis and at that point there are pictures to show you how to take the timing strip off. Take it off and examine it. I would also ask you to take the drive belt off and examine all of it to see if some teeth are missing. Also check out the gear on the drive motor, one or more gear teeth could be missing. Each of these parts can be ordered over the phone from Canon, and they are not expensive.

You can buy a new timing strip from Canon for about $3.00 plus shipping. The drive belt is not much more. The motor and drive gear are one part and I guess that would be about $10. Once you examine the parts you should know what to buy.

The parts are very easy to remove and replace, and again, this is shown in my Repair Manual. The Canon Service Manual will not show you any of this. At the most they provide an "Explosion" view of all of the parts. The Canon Service Manuals sell on eBay for about $10. My Repair Manual sells for $24.99 and includes the Canon Service Manual, all the latest "Canon Product Service Bulletins", which show things like the alignment of the paper feed timing gears, etc.
If you purchase my manual I will be glad to work with you to resolve your problem. I am just as interested in the solution as you are, as I still have 5 more MP730 to repair.
 

hank_freid

Newbie to Printing
Joined
Apr 8, 2008
Messages
1
Reaction score
0
Points
6
Location
USA
the user Trigger 37 has much knowledge about the topic i studied the topic and joined the group.. i hope i will get very useful information.

Canon MP730 vertical head alignment problem topic has been covered very smoothly. i am also searching over it after getting something i will share with you all.
 

Trigger 37

Printer Guru
Joined
Dec 23, 2006
Messages
607
Reaction score
4
Points
136
lin,...I think you will be please to hear that I have found the solution to your problem. My last post was correct and I think that Grandad35 mentioned it first but it is still the same problem.

I have had another printer waiting for repair for almost 6 months,..I've had so much to do I just couldn't get around to working on it. Anyway I finally took it apart and cleaned it and put it all back together. This is not the easist as this is one of the Canon F30 multifunction printers and to take one of these apart is a lot of work. Anyway, after putting it back together and cleaning the printhead and adding new ink, I powered it on and ran a cleaning cycle and then printed a nozzle check pattern. Here is a copy of that picture.


If you look close you will see several things. First there is a Horizontal shift in the black bars, which is the same problem you posted as Vertical Alignment. It looks just like your pictures. The second thing you will notice is that there is a complete dropout or void of black print about 1' in from the left on the Black matrix pattern.
I also printed a standard Windows Test print and here is the result of that print.


Look close at this print and you will see "Smear" in the very top line and in the 1st sentence as well as have way down. You should also note that every other line does not end in the correct place. So it seems like there is more than one problem.

I openned up the cover of the printer and inspected the timing strip and the belt. The belt looked fine and at first look the timing strip looked OK also. But then I used a light and tilted the timing strip and I found the problem. There were several sections of very transparent grease of finger prints along the timing strip. When I initially clean the printer, I did not see these at all. This is another lession learned. From now on I will know how to do a much better job in examining the timing strip.

As I have mentioned before, and problem with the correct detection of any timing mark will cause some kind of print problem. There were seveal spots of very bad grease "Film" on the strip. If you held it flat they were no visible at all. If you can tilt them back and shine a bright light through the strip you can see the grease or smears. Now it is very difficult to do a good job of cleaning the strip for a F30 because when the cover is open there is only about 6-7" access. Anyway, I used a "Q" tip wet with Windex and gently wiped the timing strip, front and back, for as long as I could reach. Each time I moved the Carriage out of the way. I finished by drying the strip with a soft tissue. In doing all of this you have to be very carefull or the timing strip will come loose from the attachement at either end. Once I got it done, I printed several more test prints and here is the nozzle check.


As you can see the black bars are not back in the correct position, and the gap in the Black matrix print is gone. The printhead still has many clogged jets in the Cyan and magenta but that wil get fixed later. Next I printed the "Alignment test" which is shown next.


As you can see, the alignment is pretty good. However, if you look really close you will see there is still some very small shift in the printing. It is probably another very small smear somewhere on the timing strip that I could not reach. I'm going to have to take the printer apart again and do it right this time. Anyway here is another Windows test print to show how the initial problems were fixed. Like I said there is still some very small timing but it is hard to see. I was able to blow the image up by 500% and it is easy to see at that magnification.

Lin,... I hope you're still watching these posts as I am confident that you can fix your printer. The F30 I did is so close to the MP730 but still the F30 is easier because most all of the electronics card is in the back and does not have to be removed. Plus the cables are back there and again that makes it much easier. One peice of good news for you is that now you know what to look for. You also don't have to remove the printer asm out of the base which is another job you don't have to do. Once you get the middle cover off of the printer you will have all the access you need to remove the timing strip and clean it carefully.

I guess I was lucky in a way to have a printer that had the same problem, and lucky to fix it so fast. It took 3 minutes.
 

lin

Print Addict
Joined
Dec 15, 2007
Messages
363
Reaction score
18
Points
151
Hi Trigger 37, I had received your email. This thread get buried over the course of time. Thanks so much for feedback & updating on the solution to this problem and dropping me an email. I was intending to update this thread when I couldn't get a perfect alignment.

Both you & Grandad35 hit the right node on this problem. It was the timing strip ( I am not too sure what is the word to call this piece because I was told it's not call timing strip but well, let's just stick to calling it as timing strip). When Grandad35 first suggested the timing strip, I did cleaned up the timing strip which had some grease on it. It dramatically reduced the the gap (the split of the horizontal top & bottom rectangular block) except a 1mm (0.01cm) shifting that no matter now I tried to wipe the timing strip I couldn't make it look like it was before. Which is a perfect rectangular alignment block. In my opinion (though I may be wrong), this 1mm (0.01cm) shift which I suspect was caused by the tiny dot (likely to be the pigment ink will splash onto the timing strip). I couldn't remove this dot even though I tried isopropyl alcohol & other glass cleaner. I don't have access to windex but I recently chanced upon a product which contains ammonia which I might be of help. Like the 4th picture in your above post there is a tiny shift. For my case, if one don't look for the 1mm shifting, one won't even notice the slightest shift at all. As the text no longer horizontally split & most print cannot vividly show the tiny shift.

But I could still see it, if I inspect it more closely because I know what to look for or where my circle pie chart is somewhat look like a resolution problem because it was 'edgy'. I find colored rectangular block show up the 1mm slight than black block.

You were right about the many 'logic counts the number of lines on the timing strip' which I couldn't see them because they were kind of obscured by the scanner housing above which make the printhead housing area a bit dark (despite I had held a flash light) and cramp. I had a chanced to see the timing strip on a photo printer displayed at the local store. As it as smaller and more simplified model unlike other canon multifunctional printers, I can finally see the many 'logic counts the number of lines on the timing strip' you spoke of.

Though I will not be removing this dot myself anymore (check your email), may I asked if using an ammonia based solution to clean the dot (pigment ink) on the timing strip, will the logic counts of lines on the timing strip be accidentally remove as well?
 

lin

Print Addict
Joined
Dec 15, 2007
Messages
363
Reaction score
18
Points
151
I must say a big thanks to Trigger37 & Grandad35 with the help to this problem. And thanks to Trigger37 for sharing more details pictures and detailing the fix. I believe many gonna find your fix, a valuable piece of information.

I hope sxd sees this post and wonder if he/she had resolves the aligment problem. If he/she hadn't created this thread back then, I guess I will still be searching on the net finding if anyone had the same problem.
 

lin

Print Addict
Joined
Dec 15, 2007
Messages
363
Reaction score
18
Points
151
Hi Trigger37, just an update. Sorry it took so long. Here is a good news that the dot has been removed and I had been testing for the past 5 days. But unfortunately, that didn't help to remove the 1mm differential despite after performing alignment. But at least, it was better than before which look like the 1st picture in your post #17 (i.e 3-5 mm differential).
 
Top