Bed Adhesion: PLA on heated glass bed

Hector Vilches

Printing Ninja
Joined
Jan 9, 2016
Messages
42
Reaction score
69
Points
80
Location
New Jersey
Printer Model
R2000, 3880, PRO-100, PRO-10
I was about to resurrect an old thread on bed adhesion and thought it might be even more beneficial to have a thread for different materials and surfaces. Here's my experience with PLA on an Ender 3 /w heated glass bed. Maybe I'll start a trend?

Isopropyl Alcohol pads: not good
I started with a glass bed and wiped it down with isopropyl alcohol... I thought this would get it the most clean it could be! I was wrong... didn't work too well. This must leave behind something that gets in the way of PLA adhesion, even though it is not visible to the eye.

Glue stick: good
Then I tried the glue stick liberally applied by rubbing the stick right on the bed, and while it worked, it didn't feel right to have all that glue messing up my nice smooth glass surface. After cleaning it all off again, I decided to apply the glue to a wet paper towel and deposit a super thin layer with the wet paper towel, leaving behind a 'matte' looking glass without any heavy streaks and this worked just as well and kept my OCD in check.

Soap and water cleaned glass bad: BEST
The glue stick works, but it wasn't super consistent and I wasn't happy with all the prep work. Along the way I found an Ivan Miranda video on the topic (https://www.youtube.com/watch?v=Kj4Xz3DwGSQ) and have not looked back... Wash the glass with soap and water, dry it, and never ever, ever, ever... touch it. It is super consistent and I have never had to pry a part off the bed. I just let it cool down and it lifts right off.

As always with this stuff, YMMV.
 

The Hat

Printer VIP
Platinum Printer Member
Joined
Jan 18, 2010
Messages
15,618
Reaction score
8,691
Points
453
Location
Residing in Wicklow Ireland
Printer Model
Canon/3D, CR-10, CR-10S, KP-3
Bed Adhesion has to be faced by all new participants in the 3D world, it’s not as simple as all the experts make out, and pulling your hair out doesn’t solve the problem either.

You may try several methods until you get the one that’s almost perfect, then out of the blue it lets you down, it’s almost the same as refilling your cartridges, you make the simple mistake of being too complacent and over confident.

Every method mentioned works, but for how long is the big question, and 98% of the problem is bed height, get the first layer right and your project will stick to just about any surface, and you won’t end up with a lovely ball of wool. AGAIN...

We’ve heard it all before, I use this method, he uses that method and someone else uses something completely different, and the one thing we have in common is, if it works for you then STICK with your method.

The more complicated the method used, the greater chance it has of failure, try to keep things simple, and even then you can still Feck it up...:oops:
 

Hector Vilches

Printing Ninja
Joined
Jan 9, 2016
Messages
42
Reaction score
69
Points
80
Location
New Jersey
Printer Model
R2000, 3880, PRO-100, PRO-10
Yes, all you say is quite true, plus I will add that the first layer settings play a huge role as well. Even the object being printed, and the orientation of the object, can affect the total surface area of the first layer and in turn the success of the subsequent layers.
 

Redbrickman

Printer Master
Joined
Dec 27, 2010
Messages
1,102
Reaction score
1,184
Points
293
Location
UK
Printer Model
MB5150
I've tried most of the methods out there now and what works for me is either a PEI Sheet (genuine not the clear stuff being sold by the Asian suppliers) or Lokbuild. Of the two Lokbuild was the easiest to apply and so far it is proving a really good build surface, with PLA a bed a room temp works perfectly. I have it on my flex plate and once cooled the parts either just lift off or a flex of he plate and they are free.
 

Nifty

Printer VIP
Administrator
Joined
Nov 3, 2004
Messages
3,046
Reaction score
1,405
Points
337
Location
Bay Area CA
Printer Model
CR-10, i560 ,MFC-7440N
Great post!

So, when I read about bed adhesion... this is the first thing I look for:
Ender 3 /w heated glass bed

I'm not sure why, but I avoid heating the bed at all costs (well, that's extreme... I just never worry about it).

I found an Ivan Miranda video on the topic (https://www.youtube.com/watch?v=Kj4Xz3DwGSQ) and have not looked back
I'm a big fan of his and love that video... but yeah, I don't think he mentions bed temp (maybe everyone just assumes people head the bed?), but I'm pretty sure he heats his. I just can't ever get hot plastic to stick to "cold" glass.

That all said... getting some large-area flat parts off the glue bed is sometimes VERY scary... so, maybe in some cases I'll do a heated bed and clean glass so big area parts will pop off easier.

Yes, all you say is quite true, plus I will add that the first layer settings play a huge role as well. Even the object being printed, and the orientation of the object, can affect the total surface area of the first layer and in turn the success of the subsequent layers.
VERY true! I remember I had a horrible day of printing... nothing stuck to the bed. Then I realized somehow my first layer setting was off (nozzle diameter and/or first layer height) and once I fixed that, stuff stuck again.

Of the two Lokbuild was the easiest to apply and so far it is proving a really good build surface, with PLA a bed a room temp works perfectly. I have it on my flex plate and once cooled the parts either just lift off or a flex of he plate and they are free.
This is probably the only other thing I really want to try! One of the flex-bed surfaces on a magnetic sheet that comes off easy, flexes, and goes back on easy.

Of course, I'm mostly just happy I finally got glue/glass working so I could move off of painter's tape (which I used to be almost religious about).
 

Redbrickman

Printer Master
Joined
Dec 27, 2010
Messages
1,102
Reaction score
1,184
Points
293
Location
UK
Printer Model
MB5150
Stock Market News... "Shares in Blue Painter tape fall sharply due to investors embracing new technology" :hide
 

The Hat

Printer VIP
Platinum Printer Member
Joined
Jan 18, 2010
Messages
15,618
Reaction score
8,691
Points
453
Location
Residing in Wicklow Ireland
Printer Model
Canon/3D, CR-10, CR-10S, KP-3
Since switching to this glass board and using 3D Adhesive, my success rate is almost 100 % baring a few stupid mistakes on my part, and not to mention that it looks great too, I’m very happy with it and reluctant to change any time soon.
Capture3.PNG Capture4.PNG Capture2.PNG click to enlarge.
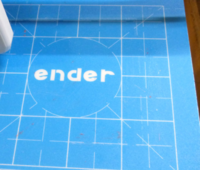
My little Ender 2 came with this blue self-adhesive soft board and its holding up so far, it’s also very strong and hasn’t had any holes gorged in while attempting to remove my prints, it also grips like a Scotchman’s hand on a £5 note... :hide
 

Nifty

Printer VIP
Administrator
Joined
Nov 3, 2004
Messages
3,046
Reaction score
1,405
Points
337
Location
Bay Area CA
Printer Model
CR-10, i560 ,MFC-7440N
hasn’t had any holes gorged in while attempting to remove my prints
That's exactly what I've worried about with some of these print surfaces!
 

The Hat

Printer VIP
Platinum Printer Member
Joined
Jan 18, 2010
Messages
15,618
Reaction score
8,691
Points
453
Location
Residing in Wicklow Ireland
Printer Model
Canon/3D, CR-10, CR-10S, KP-3
That's exactly what I've worried about with some of these print surfaces!
I too was very reluctant to stick the blue adhesive board to my hot bed and was worried as to how long it would last, but to my surprise it has stood the test of time, I’d give it 10 out of 10 for durability and sticking power.. :)
 
Top