Canon Pro-100 cabinet removal procedure.

FWP

Printing Apprentice
Joined
Jun 5, 2021
Messages
8
Reaction score
14
Points
18
Location
Maryland, USA
Printer Model
i860, i960, MX340, (2) Pro 100


Please review this complete document before doing anything.

Canon Pro-100 cabinet removal procedure​

Warning take apart your printer at your own risk. I have no idea on how to explain the difficulty level at succeeding at this work. As I do this kind of work a lot, and my chances of succeeding may be higher than most, I don't know. If this is your daily driver, think twice about doing this. I bought this printer off Ebay at a very reasonable price as a “parts only” purchase. I purchased this printer for the purpose of learning how to work on it. If a bricked it I didn't care as I have another Pro 100 that is pristine and works perfectly. The areas of concern are the following:
  1. The printer is big and heavy.​
  2. If any of the tabs get broken off the panels (they fall inside) you must retrieve them (they could end up someday in a moving part and brick your printer).​
  3. The WIFI antenna module and ribbon cable are fragile and must be removed before removing the top cover.​
  4. If you choose not to remove the control panel as I did. You must protect the wires and connectors. Make sure to support it and protect it from any type of movement damage.​
  5. I believe Canon must have a special tool to aid in the releasing of the first two top panels, without this tool the work is still possible, but some cosmetic damage to the panels is almost guaranteed.​
Now there was two other reasons I took apart this printer, one was the paper feed tray did not work and I wanted see how or if a printer potty could be installed. In the end I was able to repair the feed tray, install my homemade printer potty and successfully reassemble the printer. The printer works fine now. Now that I have done this I believe it is possible to install a printer potty without disassembling the printer. I will post a how-to on this later.

Tools need to do this work:
  1. #2 Philips screwdriver.
  2. A plastic and metal putty knife. (about 2” (50mm) wide)
  3. Needle nose pliers
  4. 5/16” (8 mm) standard straight edge screwdriver.
Proceed as follows:

  1. Remove right and left top panels, they basically unlock by moving them toward the back of the printer about 1/8” (2 to 3 mm) and pealing them off from the top.
  2. Remove the three cosmetic corners (leave control panel in place) depress (or lift) tab locks to release and peal away from top.
  3. Remove WIFI antenna module and release ribbon cable.
  4. Depress tab locks to release cover and remove as needed.
  5. DONE
    IMG_3023E.JPG
    IMG_3017E.JPG
    IMG_3016E.JPG
    IMG_3014E.JPG
    IMG_3013E.JPG
    IMG_3012E.JPG
    IMG_3011E.JPG
    IMG_3010E.JPG
    IMG_3006E.JPG
    IMG_3003E.JPG
    IMG_3002E.JPG
    IMG_2991E.JPG
    IMG_3009E.JPG
    IMG_3025.JPG
 

stratman

Printer VIP
Platinum Printer Member
Joined
Apr 19, 2007
Messages
8,712
Reaction score
7,163
Points
393
Location
USA
Printer Model
Canon MB5120, Pencil
Helluva post, FWP. Thank you. :clap:thumbsup
 

The Hat

Printer VIP
Platinum Printer Member
Joined
Jan 18, 2010
Messages
15,618
Reaction score
8,691
Points
453
Location
Residing in Wicklow Ireland
Printer Model
Canon/3D, CR-10, CR-10S, KP-3
Canon Pro-100 cabinet removal procedure
Congratulations on a job well done, however, your printer potty is shite and won’t work at that height and will also probably fall over and cause a mess, otherwise 100%... :thumbsup
 

stratman

Printer VIP
Platinum Printer Member
Joined
Apr 19, 2007
Messages
8,712
Reaction score
7,163
Points
393
Location
USA
Printer Model
Canon MB5120, Pencil
I believe it is possible to install a printer potty without disassembling the printer. I will post a how-to on this later.
Look forward to this. :)
 

FWP

Printing Apprentice
Joined
Jun 5, 2021
Messages
8
Reaction score
14
Points
18
Location
Maryland, USA
Printer Model
i860, i960, MX340, (2) Pro 100
Look forward to this. :)
As soon as a actually do it on my other Pro-100 I will post a detailed action plan. I have measured the location of the exact spot the hole will need to be cut when I had this apart. I plan to cut the hole with a dremel circular saw blade.
 

FWP

Printing Apprentice
Joined
Jun 5, 2021
Messages
8
Reaction score
14
Points
18
Location
Maryland, USA
Printer Model
i860, i960, MX340, (2) Pro 100
Congratulations on a job well done, however, your printer potty is shite and won’t work at that height and will also probably fall over and cause a mess, otherwise 100%...
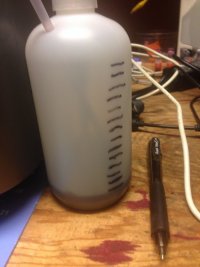
The pump in the purge unit is a Peristaltic pump and should have no problem pumping uphill several inches, ( I work with this type of pump on other types of equipment, and in their applications they have no problem pumping uphill up to 12") in addition I plan to mount the bottle to the side of the printer with Velcro or some other mounting scheme I haven't decided yet. See attached picture in the last few weeks it has pumped 10ML of ink into the bottle
 

Attachments

  • IMG_3053.JPG
    IMG_3053.JPG
    80.2 KB · Views: 352
Last edited:

stratman

Printer VIP
Platinum Printer Member
Joined
Apr 19, 2007
Messages
8,712
Reaction score
7,163
Points
393
Location
USA
Printer Model
Canon MB5120, Pencil
FYI - make sure you can enter Service Mode before modifying the printer. If you cannot enter Service Mode and then reset the waste ink counter then there is no need to install a printer potty or other similar device. If not reset then the printer will be inoperable regardless of a potty or not.
 

FWP

Printing Apprentice
Joined
Jun 5, 2021
Messages
8
Reaction score
14
Points
18
Location
Maryland, USA
Printer Model
i860, i960, MX340, (2) Pro 100
FYI - make sure you can enter Service Mode before modifying the printer. If you cannot enter Service Mode and then reset the waste ink counter then there is no need to install a printer potty or other similar device. If not reset then the printer will be inoperable regardless of a potty or not.
Yes I have read about this and am seeking help on how to reset the waste ink counter, that is a bridge I have not crossed yet. I would be grateful for any guidance anyone would have for me on that. So yes that is an issue. But I like the idea of clean ink pads even if I cant reset the waste ink counter. But I am hopeful someone can help me figure that out, so I can make the printer last even longer. Thanks for the comment.
 

stratman

Printer VIP
Platinum Printer Member
Joined
Apr 19, 2007
Messages
8,712
Reaction score
7,163
Points
393
Location
USA
Printer Model
Canon MB5120, Pencil
seeking help on how to reset the waste ink counter
Using the wrong Service Tool version may make Service Mode inaccessible even subsequent tries with the correct version. Additionally, what used to work may not work now for your model. Also, the sequence of button pushes to enter Service Mode (to be able to use the Service Tool) is specific to the printer model. So don't start trying things until you get solid info first.

The Service Tool King of the forum is @PeterBJ. He has an entire thread on this topic. The '@' followed by the forum member's name will send a notification that someone mentioned the member specifically in their post. In other words, Peter will now be notified of my post and therefore your questions on resetting the Pro 100 waste ink counter to factory fresh.
 

Latest posts

Top