Spongeless HP 123 cartridge?

imbaine13

Print Lurker
Joined
Jun 7, 2019
Messages
3
Reaction score
0
Points
2
Printer Model
HP 2130
Hello everyone,

I want to remove the sponge from a black HP 123 cart, and make it spongeless.
Something similar to this https://www.bchtechnologies.com/mod...1-62-63-64-65-66-67-68-69-70-as-rfc-hpsq.html except without their kit.

I have tried to find a way to prevent ink leaking from the print head, but all in vain. When i make the cart air tight, it doesn't leak, but it also wont print. Can I get some kind of valve i could use that will prevent air flowing in and ink leaking out when the cart is not printing, but allow the air in when it's printing?

Appreciate any input, thanks!

Cheers,
Isaac.
 

imbaine13

Print Lurker
Joined
Jun 7, 2019
Messages
3
Reaction score
0
Points
2
Printer Model
HP 2130
The simple answer is no, you must use a sponge in the

Thanks for the reply. However, the guys in the link used some kind of tiny damper attached to the lid of the cart on the inside and therefore didn't need the sponge. I'm mostly curious what it is that they used.
 

The Hat

Printer VIP
Platinum Printer Member
Joined
Jan 18, 2010
Messages
15,618
Reaction score
8,691
Points
453
Location
Residing in Wicklow Ireland
Printer Model
Canon/3D, CR-10, CR-10S, KP-3
'm mostly curious what it is that they used.
The method in this guys video does work if you purchase the items in his link, but he also describes his method as very difficult to install, so if you’re not very proficient at refilling then this method is not for you, even after watching his detailed video..
 

PeterBJ

Printer VIP
Platinum Printer Member
Joined
Nov 27, 2010
Messages
5,055
Reaction score
4,896
Points
373
Location
Copenhagen Denmark
Printer Model
Canon MP990
The sponge prevents ink leakage, as long as it is not oversaturated. Capillary forces hold ink in the sponge and the printhead must actively suck the ink from the sponge. The "filters" at the ink inlets are not primarily filters but surface tension breakers necessary for the sponge-ink inlet ink transfer. Remove the "filters" and the cartridge cannot print.

The print head can only generate a small suction/negative pressure, this makes the setup of CISS systems critical. Too much feed pressure fron ink bottles placed too high causes ink leakage, and too low feed pressure from ink bottles placed too low causes ink starvation. This pressure balance is delicate which explains why CISS systems are difficult to get working properly.

If the sponges in a sponged cartridge are oversaturated the cartridge will leak. The cartridges will of course also leak if the sponges are removed. If the sponges are removed, the negative pressure to prevent leaking must be created in another way. Sealing the cartridge will stop ink flow and drilling a small hole in the lid will cause leaking. A small hole only causes resistance to air flow, it does not create a negative pressure.

I think the small round "dampers" are in fact small membrane and spring type pressure regulators, that should provide the proper negative pressure for the cartridge to function properly. In theory the principle is simple, in practise the function of the small regulators that also need to be inexpensive is critical, I think.

IIRC some spongeless refillable cartridges for Epson also used a membrane type air pressure regulator.

Here are the dampers or regulators from the video, they are the round things attached to the cartridge lid:

HP Spongeless.jpg


If you buy the kit and install it or you find an alternative solution, please report your results.
 

PeterBJ

Printer VIP
Platinum Printer Member
Joined
Nov 27, 2010
Messages
5,055
Reaction score
4,896
Points
373
Location
Copenhagen Denmark
Printer Model
Canon MP990
Out of curiosity I checked if these kits were also available for Canon. If this kit were available from an EU country I might have ordered one out of curiosity. I found an explanation that showed my guess was spot on:
Question:
What’s the difference between the kits for a refillable spongeless mod and refillable sponge mod? It looks like the only difference is one comes with sponges, and one doesn’t.

Answers:
  • Posted by System Administrator on Tuesday, April 3, 2018
    The two kits are entirely different:

    Physically:

    The spongeless mod has a pressure regulator and needs the cover to be airtight. Therefore, it requires more skills, especially the color cartridge because its middle ridges have to be sealed too.

    The sponge mod regulates pressure with a sponge and doesn't require the covers to be airtight.

    Performance:
    1) The spongeless cartridges print a lot more than sponge cartridges. We have a video here to show: https://www.youtube.com/watch?v=aVcLmaHQtgg&t=2s
    2) The spongeless cartridges are a lot easier to unclog. Just blowing air into the air hole will do it.
 

soysauce

Fan of Printing
Joined
Jan 8, 2018
Messages
58
Reaction score
51
Points
68
Printer Model
Epson XP&WF, HP DJ, Canon MG
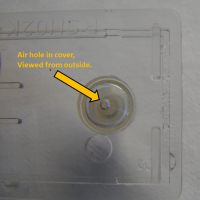
I have now had a chance to examine and test the valves that are part of the replacement covers or lids to make the HP cartridges sponge-less. They allow make-up air in but also maintain a negative pressure on the ink in the cartridge so the ink will not leak out, even without the capillary forces of a sponge. Looking at the top of the cover you can see a hole to allow air into the cartridge. As the ink is consumed by printing, a vacuum develops. If there were no air hole the vacuum would eventually become so strong that no more ink would flow out of the cartridge tank into the printhead.
Slide1.PNG


Underneath the hole on the bottom of the cover, extending into the ink tank of the cartridge is a check valve and then a silicone tube with two longitudinal slits and a sealed end.
Slide2.PNG


The check valve allows one-way flow of air into the cartridge to make up for the ink that has been consumed, but prevents flow in the other direction of ink out of the air hole in the cover. In the check valve, a spring holds a disk in place sealing a hole. In one direction pressure also holds the disk in place, preventing flow. In the other direction, once the pressure is sufficient to compress the spring, the disk uncovers the hole and flow begins. I used a manometer to measure the "cracking pressure", the pressure needed to overcome the spring, to be about 2 inches of water.
Slide3.PNG


After air flows through the check valve it must also flow through a short silicone tube with two longitudinal slits and a sealed end. The only way for the air to exit the tube is through the slits, but they are normally closed because of the elasticity of the silicone material. However, when the pressure exceeds about 5.5 inches of water, the slits are forced open by the pressure and air can enter the cartridge.
Slide4.PNG


I think the purpose of the tube with the slits is to increase the cracking pressure so that a vacuum or negative pressure of about 5.5 inches of water is maintained in the cartridge. My guess is that the cracking pressure of the check valve by itself (2 inches H2O) was too low to maintain the necessary negative pressure to prevent the ink from dribbling out of the printhead so the tube with slits was added to maintain more negative pressure (5.5 inches H2O).

The tube with slits acts as a check valve by itself to some extent, but I think it was probably not judged strong enough to be used alone without a "real" check valve to prevent ink from leaking out of the air hole. However, it would be interesting to see if the silicone tube with the slits could be used alone, without a check valve. It seemed to function as a check valve up to the limits of my manometer, 47 inches of water. The slits seem to remain closed until the vacuum or negative pressure inside got high enough to cause the tube walls to collapse. This collapsing pressure could be increased with thicker walls and/or a smaller tube diameter, although this would tend to raise the cracking pressure too. I did see a gradual dropoff of the vacuum over time so it is also possible that the slits do not act as a true check valve?

That's all for now.
 

Attachments

  • Slide1.PNG
    Slide1.PNG
    552.5 KB · Views: 857

Latest posts

Top