Worst print ever!!

Tony4597

Printer Guru
Joined
Jan 20, 2021
Messages
143
Reaction score
85
Points
115
Location
Cheshire, UK
Printer Model
Epson Surecolor SC P800
This is the worst looking print I have ever had. Of course over the last years I have produced my fair share of poor quality prints, all traceable to lamentable mistakes by the user ;):eek:

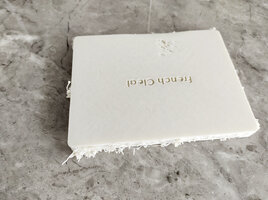
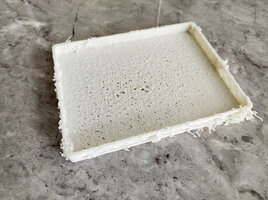
Attached images first one with text, this side on the printer bed, second viewed in print orientation

Not sure what has caused this but while I have some thoughts anyone care to throw in some ideas

Printer Bambu P1S
0.4 nozzle
Filament Bone colour mnfctr unknown via Amazon
Uncalibrated filament using Bambu labs settings for their PLA
Speed ludicrous mode

I bought this filament to use to print a dinosaur head and stand and worked perfectly well on that project and on others including a grid infinity base (this is/was for the top).

Not worried about best quality and being an impatient so and so I did set the printer to Ludicrous mode. A mode that I have only flirted with in the past; I normally print standard mode.

After seeing the failure I printed again on Sunlu red PLA without issue, although I am not sure if I altered speeds

What do you think?
 

Attachments

  • Lid_1.jpg
    Lid_1.jpg
    513.2 KB · Views: 71
  • Lid_2.jpg
    Lid_2.jpg
    674.3 KB · Views: 67

Redbrickman

Printer Master
Joined
Dec 27, 2010
Messages
1,237
Reaction score
1,387
Points
293
Location
UK
Printer Model
Brother MFC-L8690-CDW
Looks like damp or bad filament, which seems likely if the same part printed successfully with the the Sunlu.
 

Tony4597

Printer Guru
Joined
Jan 20, 2021
Messages
143
Reaction score
85
Points
115
Location
Cheshire, UK
Printer Model
Epson Surecolor SC P800
Thanks, damp poor filament my first thoughts as well. Perhaps a combination of factors including the silly speed (Bambu's Ludicrous mode 66% increase over normal).

Maybe the filament settings need looking at to optimise although printing at normal speed so far has produced acceptable prints i.e. using Bambu filament settings for their own brand.

Will probably give the faster modes mostly a miss and learn to have a little more patience :)
 

The Hat

Printer VIP
Platinum Printer Member
Joined
Jan 18, 2010
Messages
16,181
Reaction score
9,133
Points
453
Location
Residing in Wicklow Ireland
Printer Model
Now have 3 Ender-3 V3 Plus SE/
Will probably give the faster modes mostly a miss and learn to have a little more patience :)
My Ender3-SE printers were printing at ridiculous speeds when I first got them, and with plenty of help from here got them down to a manageable speed, they did however print great at high speed but I still preferred the more normal slower speeds..:old
 

The Hat

Printer VIP
Platinum Printer Member
Joined
Jan 18, 2010
Messages
16,181
Reaction score
9,133
Points
453
Location
Residing in Wicklow Ireland
Printer Model
Now have 3 Ender-3 V3 Plus SE/
This is the worst looking print I have ever had. Of course over the last years I have produced my fair share of poor quality prints, all traceable to lamentable mistakes by the user
Keeping your filament reasonably dry is the best way of getting perfect prints every time, I have printed with my filament at about 50% but there were times it slipped to 75% and the results were acceptable but not great..
It’s not hard to do now with all these new filament driers on the market today, but storage of used filament when not is use is also critical, this is where my rule of 50% comes in.. The lower the better..
You can start a print after you’ve put your filament into a drier at 50% or lower and have the drier lower the moisture as you go along, that how I print all my projects now, and this practice seems to work pretty well..
Dryier.JPG
 

Tony4597

Printer Guru
Joined
Jan 20, 2021
Messages
143
Reaction score
85
Points
115
Location
Cheshire, UK
Printer Model
Epson Surecolor SC P800
Keeping your filament reasonably dry is the best way of getting perfect prints every time, I have printed with my filament at about 50% but there were times it slipped to 75% and the results were acceptable but not great..
It’s not hard to do now with all these new filament driers on the market today, but storage of used filament when not is use is also critical, this is where my rule of 50% comes in.. The lower the better..
You can start a print after you’ve put your filament into a drier at 50% or lower and have the drier lower the moisture as you go along, that how I print all my projects now, and this practice seems to work pretty well..
View attachment 18442
Thank you and yes I have a couple of filament dryers. I also purchased some vacuum bags and a pump specifically for filament. So along with the orange silica gel beads I should be good to go, i.e. as long as I remember to keep to good housekeeping and actually use the tools

The thing is for this particular filament I am pretty sure that it was 'dry enough' being under 40% (assuming the cheap humidity meters somewhere close to correct!).
 

PeterBJ

Printer VIP
Platinum Printer Member
Joined
Nov 27, 2010
Messages
5,251
Reaction score
5,157
Points
373
Location
Copenhagen Denmark
Printer Model
Canon MP990
You could calibrate your hygrometers using the salt method. See this video.

I've noticed that some cheap electronic hygrometers I bought are not very accurate. An old analog hygrometer I have is much better.

Here is a table of some salts and the resulting humidity, click to enlarge:

Kalibrering af hygrometer.jpg

You don't need to buy exotic chemicals. Ordinary table salt will do. If you want one more calibration point Potassium Carbonate (Potash in English?) used instead of baking powder in some cookie recipes is also suitable.
 
Last edited:

Tony4597

Printer Guru
Joined
Jan 20, 2021
Messages
143
Reaction score
85
Points
115
Location
Cheshire, UK
Printer Model
Epson Surecolor SC P800
Thanks for the info. TBH I had never considered calibration. Will check out the video later 👍

Like you the 3 cheap ones (Aliexpress) I purchased none matched for either temp or humidity. Temperature was worst offender being about +2 degree. Attached shows the three in use - where did all that dust come from? ;):D. The single hygrometer being downstairs in the office sitting on top of monitor hood (temp incorrect due to position). The two on the printer were closest to match out of the packet (humidity and temp).

FWIW Hygrometer specs:
Temperature measurement accuracy: ±1.0℃
Measurable Humidity range: 20%~90%RH
Humidity Resolution: 1%RH
Humidity measurement accuracy: ±5%RH (at room temperature 25℃)


After printing and loading the desiccant holders with silica gel beads for the AMS (total 5) I realised that I should take the beads out of the centre holder as it would likely be a very false reading due to being surrounded by the beads and not truly representative of the area surrounding the filament.
 

Attachments

  • Humidity.jpg
    Humidity.jpg
    326.7 KB · Views: 5
Last edited:

The Hat

Printer VIP
Platinum Printer Member
Joined
Jan 18, 2010
Messages
16,181
Reaction score
9,133
Points
453
Location
Residing in Wicklow Ireland
Printer Model
Now have 3 Ender-3 V3 Plus SE/
the cheap humidity meters
Those little metres are pretty darn close, after all the amount of discrepancy between them is nothing, besides when measuring filament humidity, 1 or 2 percentage points isn’t going to make any difference at all..:)
 
Top