Thinking of upgrading your printer to get better photos?

mikling

Printer VIP
Platinum Printer Member
Joined
Jul 2, 2006
Messages
3,239
Reaction score
1,471
Points
313
Location
Toronto, Canada
Again take note as many mistakes are made right in this part.

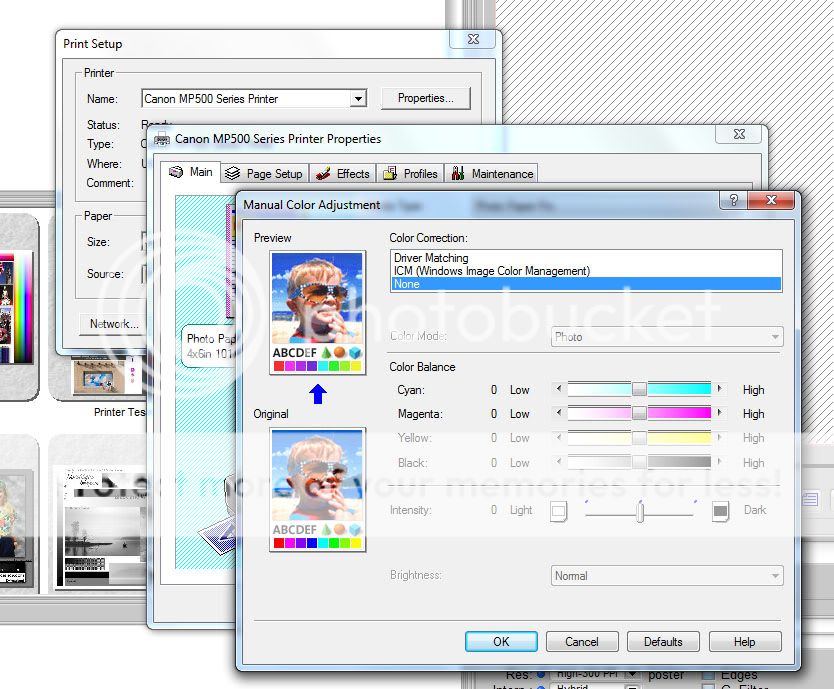
under COLOR CORRECTION Select None

make sure all the sliders are in the middle.

PrinterSelected3.jpg
 

mikling

Printer VIP
Platinum Printer Member
Joined
Jul 2, 2006
Messages
3,239
Reaction score
1,471
Points
313
Location
Toronto, Canada
make sure you select OK for the settings to stick.

Qimage will remember these settings for this profile. These settings will not change the setting for the printer outside Qimage, Qimage has the ability to retain these settings every time you use this profile. You might want to double check to make sure.

You can then select the paper size you are feeding into the printer. Take note that this is NOT the print size. Qimage has the ability to print multiple images on one sheet in one go. You can take the Qimage tutorial to delve into this.
 

mikling

Printer VIP
Platinum Printer Member
Joined
Jul 2, 2006
Messages
3,239
Reaction score
1,471
Points
313
Location
Toronto, Canada
The next step is select the picture you want to print via the explorer type window
Also select the printed size for the image as well.

When you select the image you want to print, the pirnt file name will change color indicating it has been selected.
It will then appear on the right hand side.

SelectedImage.jpg


SelectedImage2.jpg
 

mikling

Printer VIP
Platinum Printer Member
Joined
Jul 2, 2006
Messages
3,239
Reaction score
1,471
Points
313
Location
Toronto, Canada
The print should appear very close to what you see on the screen and if your monitor is calibrated, it will look pretty identical within printer capability limits.

Print away. Color managed printing can be this easy.

Stand back you've just gotten yourself a major upgrade to your printed images if you have not been using profiles.

Please note that after the picture is completed, you might notice a green cast in the gray gradient ramp that will largely slowly disappear after about ten minutes. The picture will further change slightly in the next 30 minutes thereafter. During this time, the picture can be handled safely but should not be placed inside an album or sleeve until hours after. If you do store it away or stack them immediately, the picture will slowly bleed over a period of months. In other words, allow adequate drying time before mounting or storing. I've committed that error so I'm just giving you a heads up on this paper or any paper for that matter. The "dries instantly" printed on boxes is not really true.
 

mikling

Printer VIP
Platinum Printer Member
Joined
Jul 2, 2006
Messages
3,239
Reaction score
1,471
Points
313
Location
Toronto, Canada
PHOTOSHOP ELEMENTS


Now continuing on but this time we will show how Photoshop Elements printing with color management is implemented. Elements is a simplified version of Photoshop geared for the Photographer. it is much simpler to use than Photoshop which while fully featured has the potential to allow users to make more mistakes in setting it up properly. Photoshop Elements costs a fraction of what Photoshop costs.

My screen shots are for Version 8 but version 6 and 7 which also supports color management will be similar.

First we install Photoshop Elements and install one of the test files.
 

mikling

Printer VIP
Platinum Printer Member
Joined
Jul 2, 2006
Messages
3,239
Reaction score
1,471
Points
313
Location
Toronto, Canada
In this shot, we see the Canon Pro 9000 has been selected. Choose the model printer you have as listed at the start. The supplied profile will not be applicable to the Pro9000 I have other ones for that.

Untitled-2.jpg
 

mikling

Printer VIP
Platinum Printer Member
Joined
Jul 2, 2006
Messages
3,239
Reaction score
1,471
Points
313
Location
Toronto, Canada
Now choose printer settings and choose the paper setting. Again the paper setting used was Canon Photo Paper Pro in creating the printer profile so that is what we select.

Now pay attenttion here. The Print Quality here has nothing to do with the Quality setting that was used in creating the profile. This setting tells Photoshop how much to decrease image resolution or increase.

After selecting the other two items of Paper Tray and Paper Size, we select Advanced Settings.

Untitled-3.jpg
 

mikling

Printer VIP
Platinum Printer Member
Joined
Jul 2, 2006
Messages
3,239
Reaction score
1,471
Points
313
Location
Toronto, Canada
Note now that the Print Quality here is what needs to be set to correspond to the profile. Select High.

Like was shown in Qimage we now set Color Intensity to Manual and click on Set

Untitled-4.jpg
 
Top