canonfodder
Printer Guru
PREPARATION OF INKJET INK SAMPLES FOR METHOD TO MEASURE INK COLORS BY SPECTROSCOPIC ANALYSIS.
See also: "Method to measure ink colors" by Grandad35 at:
http://www.nifty-stuff.com/forum/viewtopic.php?id=2681
The Object:
To consistently deposit a precise thickness of inkjet ink onto a strip of photo glossy inkjet paper, enabling the spectroscopic analysis and comparison of multiple inks.
The Method:
The Object is accomplished in this method by depositing a precise quantity of ink, spread evenly over a precise area, on a strip of photo glossy inkjet paper.
Materials:
1. Inkjet ink to be tested.
2. Glycerin, USP.
3. Glossy Photo Paper strips (Kirkland/Ilford Glossy Photo Paper-no longer sold by Costco).
4. LDPE plastic sheet, 0.032" or thicker, to use as ink spreading plate.
5. Turntable, ball bearing, 10 to 12 inch diameter, flat top.
6. Precision Brayer, having a high quality rubber roller of known width and circumference.
7. Brayer Guide Assembly which spans over the turntable.
8. Brayer Guide which holds strip of glossy photo paper.
9. Precision Micro-Pipette for measuring and dispensing up to 50 microliters (0.05ml) liquid.
Simplified Procedure:
Step 1. Measure out a precise amount of inkjet ink. Deposit at center of LDPE plate.
Step 2. Measure out an equal amount of glycerin and add to the inkjet ink on the plate. (Glycerin is to retard drying and has only a minor effect on the color.) If glycerin is not used, some colors (especially cyan and black) will suffer from bronzing.
Step 3. Spread the ink/glycerin mixture very evenly on the LDPE plate. Spreading is done by repeatedly running the rubber roller back and forth, covering a specific area of the plate - a 6.5 diameter circle in this case.
Step 4. Transfer the ink/glycerin mixture from the plate to the paper strip by coating the brayer's rubber roller and rolling it onto the paper strip. Repetition is required as the roller only takes a percentage of the ink with each pickup.
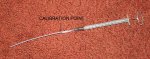
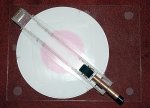
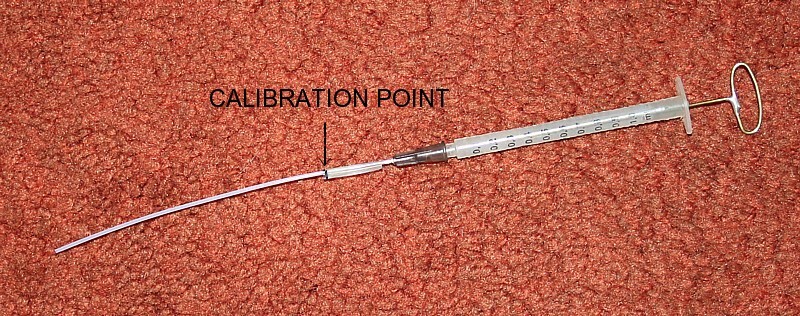
MICRO-PIPETTE AND MODIFIED SYRINGE
A 1.0ml syringe was modified to reduce its volume to about 50 microliters (0.05ml) total. A micro-pipette made of a length of small bore high density TFE tubing was calibrated at the 34.76 microliter fill point.
In doing the calibration, a 1.00mL quantity of ink was fed into a long length of the TFE tubing to be calibrated. The ink filled 104.71 inches of the tubing. The pipette made of this tubing was calibrated at the 3.640 inch point, resulting in a pipette volume of 34.76 microliters.
The pipette tube is connected to the modified syringe by using a Luer-lock needle which fit snugly inside the tubing. Liquid is drawn in up to the calibrated point on the pipette. The syringe only moves air to draw liquid in and force it out of the pipette.
Immediately after the ink and glycerin are deposited on the plate, the micro-pipette must be cleaned thoroughly. The outside of the TFE tube is rinsed in running hot water and a 10mL syringe is connected to the Luer fitting of the pipette and about 3mL of hot water followed by 10mL of air are forced through the pipette tube.
The precise amount of ink jet ink used in our test is 34.76 microliters. The amount was determined by the effective ink thickness desired on the glossy photo paper sample strip, taking into account the area of the paper strip to be covered by the ink and the ultimate percentage of the original quantity of ink that will be transferred.

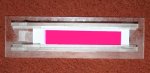
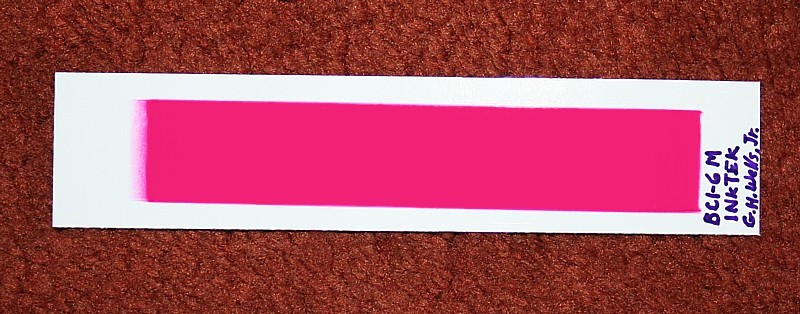
PHOTO PAPER STRIP WITH INK SAMPLE
The area covered on the paper strip is the area of the outer surface of the brayer's rubber roller. As the brayer is to be run in a straight line down the paper strip, the width of the rubber roller sets the width of the ink stripe on the paper. One full revolution of the rubber roller sets the length of the ink stripe on the paper equal to the circumference of the rubber roller. The brayer chosen has a roller of 1.00 inch width and 5.40 inch circumference.
The values used for the initial volume of ink can be modified if your brayer has a different circumference and/or width.
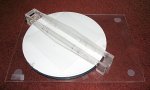
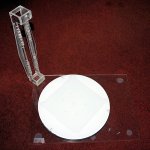
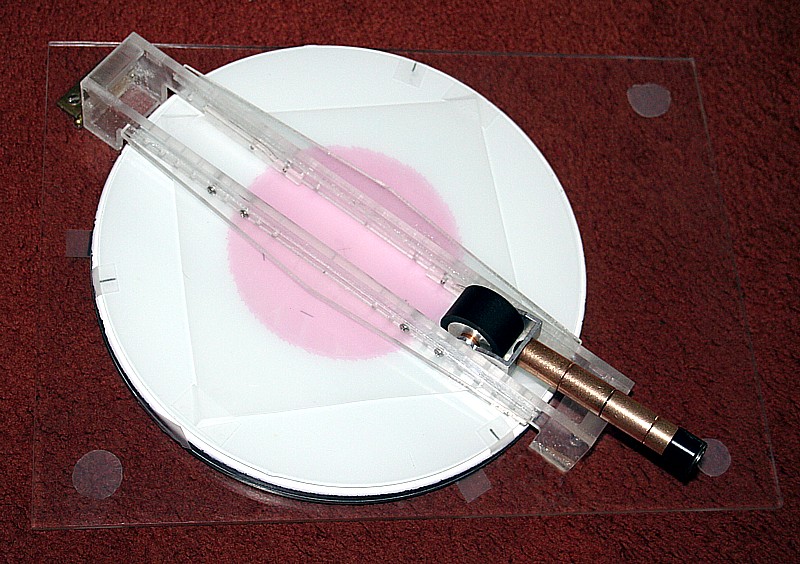
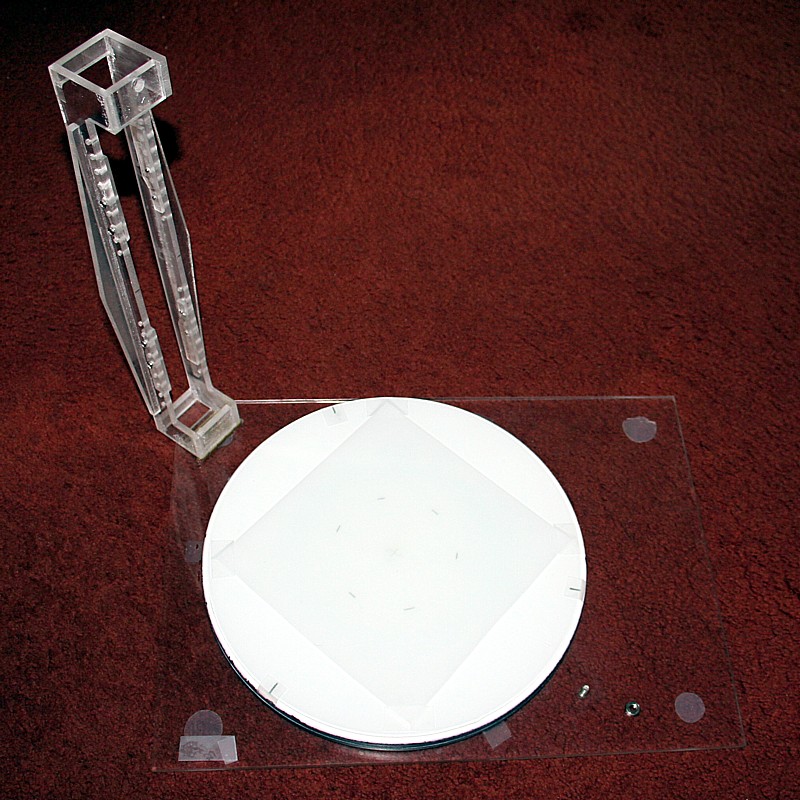
TURNTABLE WITH LDPE PLATE IN PLACE
The LDPE plate, on which the 34.76 microliter quantity of ink is spread out, rests on a 12" diameter ball-bearing turntable. Because the turntable used was made with a molded plastic top which has a textured surface, a glass plate was used to cover the top and provide a flat backup surface for the LDPE plate.
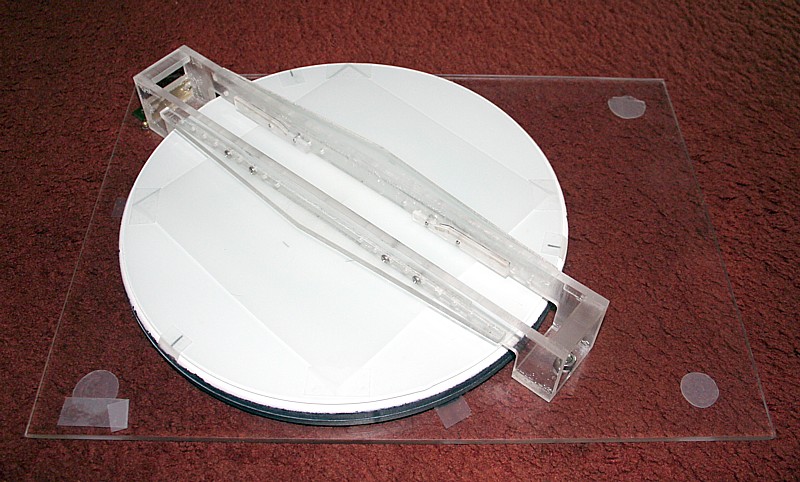
Mounted over the turntable is a guide bar assembly fabricated to guide the brayer in a straight line across center of the plate. The assembly includes side ramps which lift the brayer clear of the plate at either end of a 6.5" long travel. The brayer roller thus can only contact the plate over this controlled distance across the plate.

ORIGINAL BRAYER
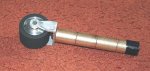
MODIFIED BRAYER
The brayer was modified in two ways. First, the originally squared ends of the yoke were rounded to make the lifting action of the guide bar side ramps act equally with varying handle angles. Second, the original handle was replaced by a shaft surrounded by bronze bearings to limit any torsion force that might be applied by a twisting force of the operator's hand.
TURNTABLE WITH INK SPREAD
As the turntable is rotated in small steps and the brayer is repeatedly passed back and forth, a 6.5" diameter circular area of ink is spread on the plate. At least three full rotations of the turntable are done during the ink spreading. The distance of the stroke for the brayer is intentionally greater than the 5.4" circumference of its rubber roller. At the ends of the strokes, when the roller is lifted clear of the plate, the roller spins a bit, lending a random rotary position of it for the following stroke. When sufficient strokes across the plate combined with sufficient rotations of the plate are done, an even coating of the ink is present on the plate. The turntable is then locked into a position and the brayer is stroked back and forth several more times to assure an even coating of ink on its rubber roller.
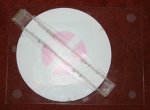
SAMPLE STRIP IN GUIDE FRAME
The strip of photo glossy inkjet paper is mounted in a guide frame made for the job of holding the paper strip and guiding the brayer while it is transferring its charge of ink onto the paper strip. Side ramps at the starting end of the frame hold the brayer up, letting it down at a repeatable starting point on the paper strip. The ink coated roller is brought into contact with the paper near one end of the strip and rolled for one full rotation down the paper strip. Without losing contact, the roller is passed back and forth three times at about 3 seconds per stroke to be sure of a full transfer of all the ink that the roller held.
TURNTABLE WITH FIRST STRIPE COMPLETED
Since not all of the ink in that stripe on the plate will be picked up on one transfer to the roller, repeated pickups and transfers are done until all the ink in that first stripe is picked up and transferred to the paper strip. Over 60% of the ink stripe remaining on the plate is picked up by the roller each time it is loaded, so 7 pickups and transfers are used to clear that stripe of all ink.
TURNTABLE WITH SECOND PICKUP COMPLETED
Next, the turntable is rotated 90 degrees, locked, and a new stripe is spread evenly by 15 or more back and forth strokes of the roller. This fills in the gap at the center and evens the ink. The process of 7 transfers is then repeated.
TURNTABLE WITH ALL TRANSFERS COMPLETED
Two more rotations of the turntable are done with repeated transfers. With a first rotation of 45 degrees, and later one of 90 more degrees, the process has transferred 72% of the original sample of ink.
All ink samples are treated to this exact process. With the dimensions given here, the quantity of ink transferred to the paper strip is 72% of the original 34.76 microliters, giving a total of 25 microliters.

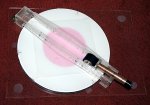
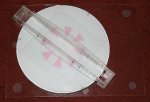
A FINISHED SAMPLE
Since the ink sample being made on the photo glossy paper is 1.00" wide by 5.40" long, the 25 microliters of ink has been spread on 5.40 square inches or 34.84 square centimeters. The resulting thickness of liquid ink laydown is 7.18 microns. This has been determined to be a reasonable thickness of ink for the test samples.
TURNTABLE WITH GUIDE BAR RAISED
The guide bar which spans the turntable is hinged such that it can be lifted to facilitate the cleaning of the plate on the turntable. The plate must be very clean when beginning an ink sample to preclude contamination of the ink. The plate is cleaned with dish soap and water with multiple water rinses.
The final test for the uniformity of the laydown is to scan the sample strip, import it into Photoshop, desaturate and use the brightness/contrast to find the range of luminosity. If there is a significant side-to-side or end-to-end non-uniformity, the ink laydown procedure should be rechecked.
It is realized that this procedure may seem like overkill, but extensive testing has revealed that this level of detail is required to give the uniformity of ink laydown required for our tests. Unless you are willing to invest a great deal of time and some money in building the required parts, you will not achieve acceptable results.
See also: "Method to measure ink colors" by Grandad35 at:
http://www.nifty-stuff.com/forum/viewtopic.php?id=2681
The Object:
To consistently deposit a precise thickness of inkjet ink onto a strip of photo glossy inkjet paper, enabling the spectroscopic analysis and comparison of multiple inks.
The Method:
The Object is accomplished in this method by depositing a precise quantity of ink, spread evenly over a precise area, on a strip of photo glossy inkjet paper.
Materials:
1. Inkjet ink to be tested.
2. Glycerin, USP.
3. Glossy Photo Paper strips (Kirkland/Ilford Glossy Photo Paper-no longer sold by Costco).
4. LDPE plastic sheet, 0.032" or thicker, to use as ink spreading plate.
5. Turntable, ball bearing, 10 to 12 inch diameter, flat top.
6. Precision Brayer, having a high quality rubber roller of known width and circumference.
7. Brayer Guide Assembly which spans over the turntable.
8. Brayer Guide which holds strip of glossy photo paper.
9. Precision Micro-Pipette for measuring and dispensing up to 50 microliters (0.05ml) liquid.
Simplified Procedure:
Step 1. Measure out a precise amount of inkjet ink. Deposit at center of LDPE plate.
Step 2. Measure out an equal amount of glycerin and add to the inkjet ink on the plate. (Glycerin is to retard drying and has only a minor effect on the color.) If glycerin is not used, some colors (especially cyan and black) will suffer from bronzing.
Step 3. Spread the ink/glycerin mixture very evenly on the LDPE plate. Spreading is done by repeatedly running the rubber roller back and forth, covering a specific area of the plate - a 6.5 diameter circle in this case.
Step 4. Transfer the ink/glycerin mixture from the plate to the paper strip by coating the brayer's rubber roller and rolling it onto the paper strip. Repetition is required as the roller only takes a percentage of the ink with each pickup.
MICRO-PIPETTE AND MODIFIED SYRINGE
A 1.0ml syringe was modified to reduce its volume to about 50 microliters (0.05ml) total. A micro-pipette made of a length of small bore high density TFE tubing was calibrated at the 34.76 microliter fill point.
In doing the calibration, a 1.00mL quantity of ink was fed into a long length of the TFE tubing to be calibrated. The ink filled 104.71 inches of the tubing. The pipette made of this tubing was calibrated at the 3.640 inch point, resulting in a pipette volume of 34.76 microliters.
The pipette tube is connected to the modified syringe by using a Luer-lock needle which fit snugly inside the tubing. Liquid is drawn in up to the calibrated point on the pipette. The syringe only moves air to draw liquid in and force it out of the pipette.
Immediately after the ink and glycerin are deposited on the plate, the micro-pipette must be cleaned thoroughly. The outside of the TFE tube is rinsed in running hot water and a 10mL syringe is connected to the Luer fitting of the pipette and about 3mL of hot water followed by 10mL of air are forced through the pipette tube.
The precise amount of ink jet ink used in our test is 34.76 microliters. The amount was determined by the effective ink thickness desired on the glossy photo paper sample strip, taking into account the area of the paper strip to be covered by the ink and the ultimate percentage of the original quantity of ink that will be transferred.
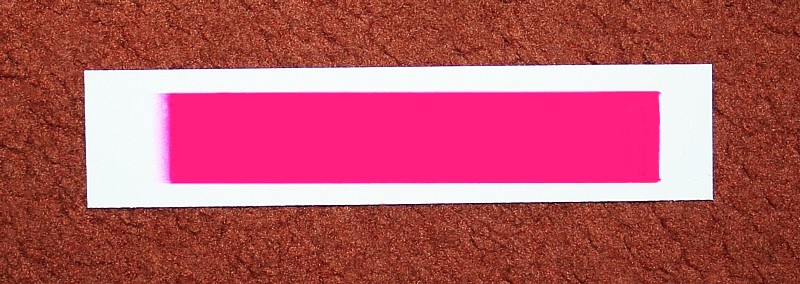
PHOTO PAPER STRIP WITH INK SAMPLE
The area covered on the paper strip is the area of the outer surface of the brayer's rubber roller. As the brayer is to be run in a straight line down the paper strip, the width of the rubber roller sets the width of the ink stripe on the paper. One full revolution of the rubber roller sets the length of the ink stripe on the paper equal to the circumference of the rubber roller. The brayer chosen has a roller of 1.00 inch width and 5.40 inch circumference.
The values used for the initial volume of ink can be modified if your brayer has a different circumference and/or width.
TURNTABLE WITH LDPE PLATE IN PLACE
The LDPE plate, on which the 34.76 microliter quantity of ink is spread out, rests on a 12" diameter ball-bearing turntable. Because the turntable used was made with a molded plastic top which has a textured surface, a glass plate was used to cover the top and provide a flat backup surface for the LDPE plate.
Mounted over the turntable is a guide bar assembly fabricated to guide the brayer in a straight line across center of the plate. The assembly includes side ramps which lift the brayer clear of the plate at either end of a 6.5" long travel. The brayer roller thus can only contact the plate over this controlled distance across the plate.
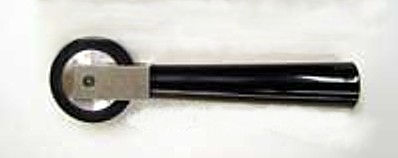
ORIGINAL BRAYER
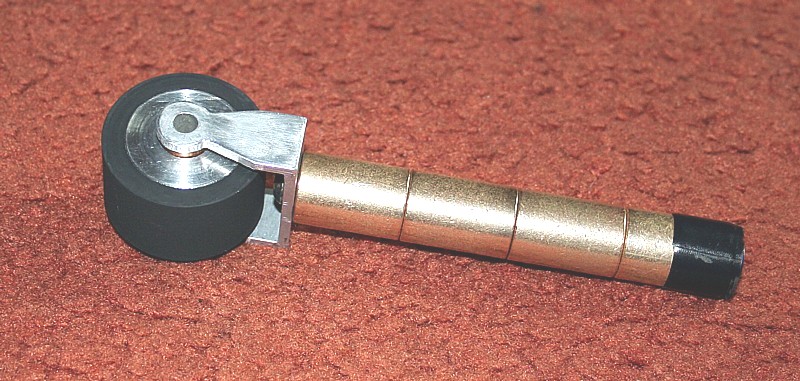
MODIFIED BRAYER
The brayer was modified in two ways. First, the originally squared ends of the yoke were rounded to make the lifting action of the guide bar side ramps act equally with varying handle angles. Second, the original handle was replaced by a shaft surrounded by bronze bearings to limit any torsion force that might be applied by a twisting force of the operator's hand.
TURNTABLE WITH INK SPREAD
As the turntable is rotated in small steps and the brayer is repeatedly passed back and forth, a 6.5" diameter circular area of ink is spread on the plate. At least three full rotations of the turntable are done during the ink spreading. The distance of the stroke for the brayer is intentionally greater than the 5.4" circumference of its rubber roller. At the ends of the strokes, when the roller is lifted clear of the plate, the roller spins a bit, lending a random rotary position of it for the following stroke. When sufficient strokes across the plate combined with sufficient rotations of the plate are done, an even coating of the ink is present on the plate. The turntable is then locked into a position and the brayer is stroked back and forth several more times to assure an even coating of ink on its rubber roller.
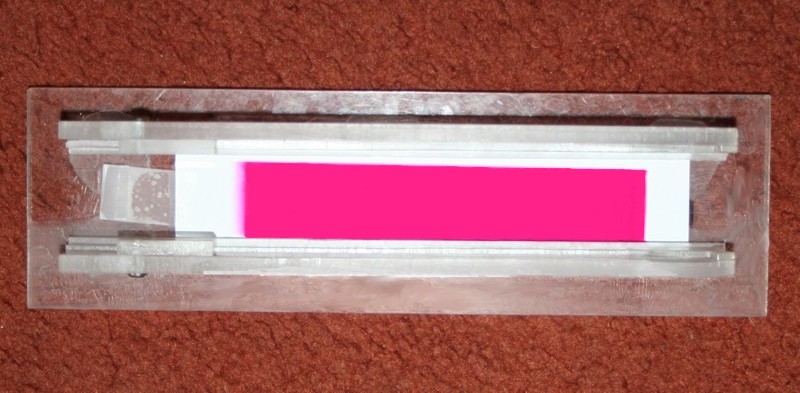
SAMPLE STRIP IN GUIDE FRAME
The strip of photo glossy inkjet paper is mounted in a guide frame made for the job of holding the paper strip and guiding the brayer while it is transferring its charge of ink onto the paper strip. Side ramps at the starting end of the frame hold the brayer up, letting it down at a repeatable starting point on the paper strip. The ink coated roller is brought into contact with the paper near one end of the strip and rolled for one full rotation down the paper strip. Without losing contact, the roller is passed back and forth three times at about 3 seconds per stroke to be sure of a full transfer of all the ink that the roller held.
TURNTABLE WITH FIRST STRIPE COMPLETED
Since not all of the ink in that stripe on the plate will be picked up on one transfer to the roller, repeated pickups and transfers are done until all the ink in that first stripe is picked up and transferred to the paper strip. Over 60% of the ink stripe remaining on the plate is picked up by the roller each time it is loaded, so 7 pickups and transfers are used to clear that stripe of all ink.
TURNTABLE WITH SECOND PICKUP COMPLETED
Next, the turntable is rotated 90 degrees, locked, and a new stripe is spread evenly by 15 or more back and forth strokes of the roller. This fills in the gap at the center and evens the ink. The process of 7 transfers is then repeated.
TURNTABLE WITH ALL TRANSFERS COMPLETED
Two more rotations of the turntable are done with repeated transfers. With a first rotation of 45 degrees, and later one of 90 more degrees, the process has transferred 72% of the original sample of ink.
All ink samples are treated to this exact process. With the dimensions given here, the quantity of ink transferred to the paper strip is 72% of the original 34.76 microliters, giving a total of 25 microliters.
A FINISHED SAMPLE
Since the ink sample being made on the photo glossy paper is 1.00" wide by 5.40" long, the 25 microliters of ink has been spread on 5.40 square inches or 34.84 square centimeters. The resulting thickness of liquid ink laydown is 7.18 microns. This has been determined to be a reasonable thickness of ink for the test samples.
TURNTABLE WITH GUIDE BAR RAISED
The guide bar which spans the turntable is hinged such that it can be lifted to facilitate the cleaning of the plate on the turntable. The plate must be very clean when beginning an ink sample to preclude contamination of the ink. The plate is cleaned with dish soap and water with multiple water rinses.
The final test for the uniformity of the laydown is to scan the sample strip, import it into Photoshop, desaturate and use the brightness/contrast to find the range of luminosity. If there is a significant side-to-side or end-to-end non-uniformity, the ink laydown procedure should be rechecked.
It is realized that this procedure may seem like overkill, but extensive testing has revealed that this level of detail is required to give the uniformity of ink laydown required for our tests. Unless you are willing to invest a great deal of time and some money in building the required parts, you will not achieve acceptable results.