Reliable CIS Operation With A Canon Sponged Cartridge Type Printer

canonfodder

Printer Guru
Joined
Sep 24, 2006
Messages
267
Reaction score
1
Points
109
Location
New Hampshire, USA
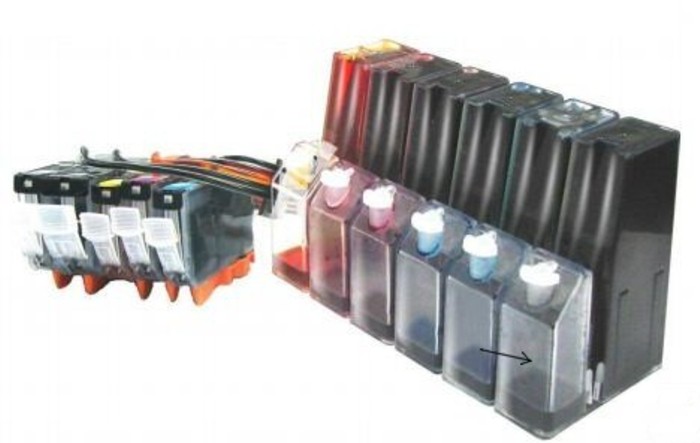
If you want to have a CIS operate with a Canon printer that normally uses sponged cartridges, like the iP4200, iP4300, and similar, then get a CIS that produces a constant effective ink elevation and set that elevation correctly for your particular printer. It is preferable that the replacement cartridges supplied with the CIS do not have sponges. An output filter is helpful, and most have that feature. Proper ink tank elevation will produce the slight negative pressure that the original sponges provide.

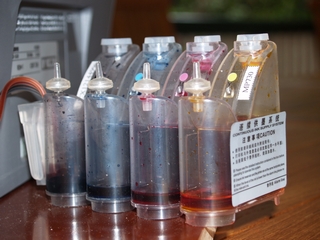
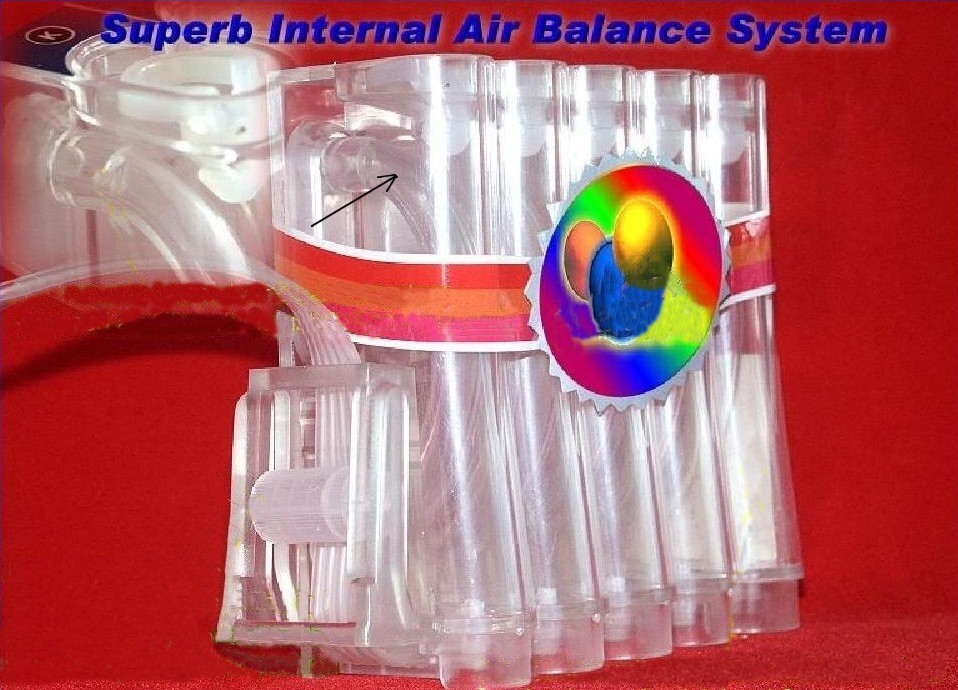
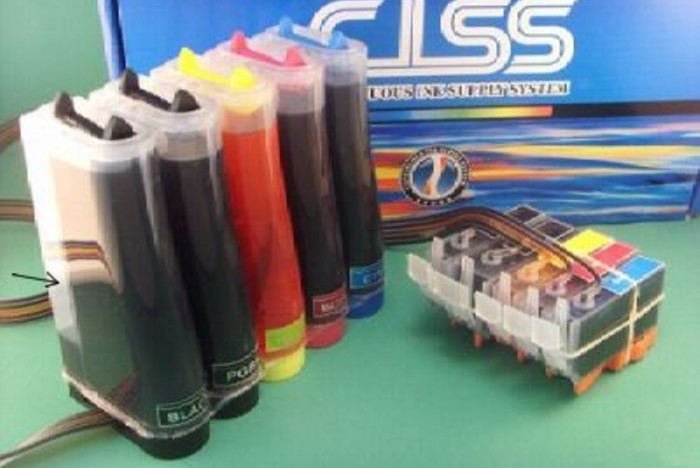
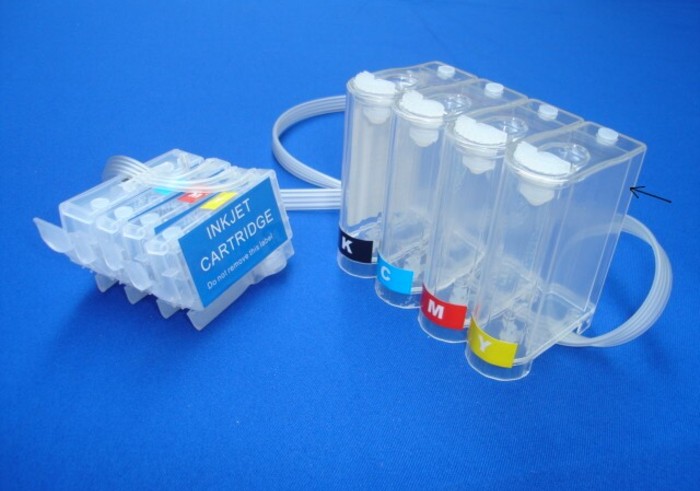
What CIS produces a constant effective ink elevation? See the photos below for some examples. There are probably others, and most sellers don't even know about this feature. In each one shown, there is a special way that the air is vented into the ink tank. It is a variation on Marriotte's Bottle. A black arrow points to the air tube or chamber. The air goes down the air tube or chamber to a point near the bottom of the main ink tank. There the air is allowed to enter the main ink tank as needed. The effect is to keep the effective ink elevation constant at the level of the ink surface in the air chamber or passage.

Click on photo to enlarge. Use back arrow to return to post.


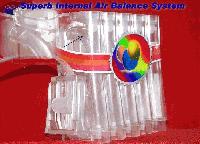
The effective ink level can be seen in photos 2 and 3, just down below the black arrow. For Canon sponged-cart printers, this ink level should be 1/2 to 1 inch below the printhead input elevation. For good operation, raise the ink tanks as necessary to achieve that relation.


The Canon iP4200 printhead elevation is about 2.4 inches above the table. Measure your printer's printhead elevation, subtract 3/4 inch, and set the tanks for the air chamber ink surface to be at that elevation above the table. You will provide the necessary negative pressure required while keeping it from being excessive. When using this approach, you may not need the special seals that sometimes come with a commercial CIS. You could try it first without them. They don't always work well.
 

ocular

Printer Guru
Joined
Feb 20, 2005
Messages
132
Reaction score
6
Points
131
Nice clear analysis of the bottle height issue that sellers pay little detail to. The level of the ink in the reservoir is held constant by the marriott breathing system. Howvever if receive your CISS already primed, that level may well have changed. The systen I have on my IP3000 X2 and MP730 x3 has a reservoir similar to the photo 2 above.

If one is to take advantage of this stabilised level of ink pressure as well as setting the reservoir up at the right height relative to the printer , understanding of how to refill is necessary. As mentioned above if the system comes primed the natural level in the ink reservoir may have changed. See the third photo in my CISS on my IP3000
http://nifty-stuff.com/forum/viewtopic.php?id=1745

Notice the ink level 3-4cm high. This was a recently delivered CISS and because it got shaken up and wasn't maintained upright the ink was distributed thru both chambers. ( By the look of the amount of ink in the reservoir it was also because the seller didn't use the right procedure to fill the reservoir and thus over filled it.) Also at this stage the air filter plugs had not been installed, whereas further down they are.


Whereas this is a photo of a system in use after some time and the ink level has reached its natural level.


This is about 5mm above the floor of the reservoir.

When it comes to filling, to maintain that "natural" level you really need to take the air filter off and seal the chamber and then refill thru the other chamber and then seal that chamber and then replace the air filter! I notice that www.rihac.com.au mention this filling method in some some detail in their technical advice. At first I thought this was overkill but now I see why. If you don't do this then the level of ink and its pressure will increase by a head of 3cm after refilling.

So not only do you have to have the correct height between the printer and the reservoir but you have to refill so you don't change the level of the ink from the stabilised marriott system. Otherwise after a refill you may have too much ink flowing thru the system as I have experienced!

There are other variables introduced when the cartridges are sponged as opposed to spongeless. Canonfodder states that the balance point is at the exit port of spongeless cartridges. With the sponged cartridges this may be significantly higher due to the negative pressure created by the sponge. Perhaps even as high as the top of the sponge in the cartridge?

If only there was a way to precisely measure this point then you could lower the reservoir by 1-2cm knowing that ink will not flow forward and yet put minimal strain on the exit port / rubber grommet join.
 

canonfodder

Printer Guru
Joined
Sep 24, 2006
Messages
267
Reaction score
1
Points
109
Location
New Hampshire, USA
ocular said:
So not only do you have to have the correct height between the printer and the reservoir but you have to refill so you don't change the level of the ink from the stabilised marriott system. Otherwise after a refill you may have too much ink flowing thru the system as I have experienced!
As Ocular said in his post, seal the air inputs while filling, then seal the ink inputs and open the air inputs to run. You may still have the ink level above the normal controlled level until some ink is consumed. It is preferred to get the ink level back to normal immediately to keep it in good control.

There is a quick way to reset the correct ink height in most of these systems, whether it was upset in shipping or by a refill. This method has been described in the instructions for systems sold by those few sellers who do know how this type of ink tank should work.

First, lets name the large tanks "ink tank" and the small tank where the air enters "air chamber".

After filling, or as received, with the ink tank fill holes sealed and the air inputs open , tip the tank assembly in a direction that allows the ink to flow from the air chambers back into the ink tanks.

CAUTION! DO NOT TIP THE TANK ASSEMBLY IN THE DIRECTION THAT BRINGS INK TO THE AIR INPUT HOLE ! The correct tipping direction will be bringing the air chambers higher than the ink tanks. In Ocular's photo above, the correct tipping direction might be described as "back" since the air chambers are in front. Some other designs are the opposite.

Only tip the tank assembly enough for the ink to flow out of the air chambers. This is probably about 90 degrees. When you bring the tank assembly back to the upright position, air will bubble into the ink tanks and ink will come out as needed to bring the ink in the air chambers to its proper level. At that point, the air path into the ink tank is blocked by the rising ink level. More air will enter the ink tank as ink is consumed by the printer. The condition established is the regulated or constant pressure condition.

This resetting approach will not work if you overfill the ink tanks. If you have an ink tank full and you have the air chamber also filled, the proper controlled ink level cannot be achieved. The maximum ink should only be enough to fill the main ink tank.
 
Top