garya
Newbie to Printing
- Joined
- Jan 21, 2026
- Messages
- 8
- Reaction score
- 2
- Points
- 8
- Location
- Ovando, MT, USA
- Printer Model
- Epson 3880
I have an Epson 3880, bought new over a decade ago. I never used the original ink carts, I don't think; I still have them and they are pristine. I immediately pulled the chips and used them with a set of Cone-Color refillable carts. I have been using cone inks since the beginning. My printing is almost entirely using PK; I have never replaced the MK.
As this printer is not heavily used, I try to run a manual nozzle check every few days. I have occasional problems with clogged nozzles, as revealed with a manual nozzle check. Usually printing solves the issue; if not, a cleaning cycle does, although I hate doing that because of the ink wasted. I wish there was a way to run a cleaning cycle on only one channel.
While printing holiday greeting cards with a lot of red/magenta, my VM nozzle clogged pretty badly. Cleaning cycles didn't seem to help. I eventually tried cleaning the printhead and wiper station using piezo-flush.
That did not work either, so I took a spare cart and filled it with piezo flush, moved the chips from the VM cart to the piezo flush cart, and ran a cleaning cycle. Then put the original VM cart back. That cleared it up and I was able to print about 20 cards. Unfortunately, I soon noticed that the VLM nozzle was missing, so went through the same process with the VLM cart. However, when replacing the VLM cart I saw only a few nozzles printing cyan(!) and the rest were blank. After more cleaning, all channels are blank and the channel seems clogged completely. Occasionally the machine claims there is no cartridge in that slot, but pushing it in (with and without removing and re-inserting the cartridge) seems to overcome that temporary complaint.
It appears to me there is a clog somewhere in the VLM, in one of the following:
1. ink line between cartridge and the "pre-damper" (or whatever it is called) in the top of the ink-supply
2. "pre-damper" in the top of the ink-supply or its output line to the ink-supply line connector
3. ink line between the ink-supply and the print-head
4. damper in the print-head
5. print-head nozzle
I am suspecting #2, but feel #1 and #2 should be cleaned out before proceeding with dismantling the printhead.
After more web searches I found information on dismantling the printer to clean the ink supply mechanism and its "pre-dampers" and on cleaning the printhead and its dampers. I have not (yet) dismantled the printhead and carriage, but at the moment I have the ink-supply out of the printer but still connected to the printhead with the ink-tube ribbon. When I removed the ink-supply box from the printer the absorbant pad below it was virtually pristine, with a small dot of ink under the VLM cartridge. But underneath the plastic box which holds the absorbant pad there was a fair amount of either piezo flush or VLM. I'm suspecting some of both.
I am about to unbolt the ink-tube ribbon from the ink-supply. Unfortunately, the service manual says nothing about this process, probably because it is meant to be replaced as a whole. (Steps 10-11, pp 156-157, section 4.3.9.3 of the service manual) In step 10 it shows the ink-supply cable attached to the ink-holder assembly, and in step 11 it is disconnected.
The videos I have watched describing cleaning the components of the ink-supply mechanism do not show disconnecting the cable; they all start with the system already disconnected.
Questions:
1. Suggestions on what will happen when unbolting the ink-supply cable and how to deal with it? I started to unbolt it and ink started leaking so I retightened it and cleaned up.
2. Do I need to worry about introducing air into the ink-supply line once it is unbolted?
3. I'm assuming I should:
a. use warm water to clean / flush the contact pad at the back of the ink-supply where the ink cart plugs in
a.1 I'm thinking I should clean them all since I have it apart and they haven't been cleaned in over 10 years
b. use warm water / piezo flush to clean out the pre-damper
b.1 I'm thinking I should clean them all since I have it apart and they haven't been cleaned in over 10 years
b.2 Should I flush both forward (attach syringe to tit at pre-damper) and reverse (attach syringe to ink-supply cable tit)?
4. I'm guessing the chip (what is this?) at the back of the ink-supply box where the ribbon cable for the VLM ink plugs in has probably gotten wet due to excess-pressure from a clogged line causing ink/piezo-flush to spray out. Suggestions on cleaning it?
5. Assuming I get things cleaned out, how to proceed when re-assembling to ensure no ink flow blockage from air bubbles?
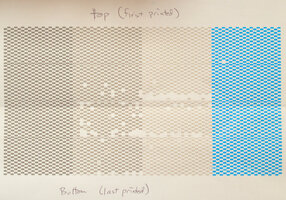
For the future, I found this reference that talks about a custom-designed image to print out of only one cart. Unfortunately, it requires a software product (Quad Tone RIP) I do not own and cannot run as I don't run windows or apple systems.
Does anyone have suitable images for each of the ink channels on a 3880?
As this printer is not heavily used, I try to run a manual nozzle check every few days. I have occasional problems with clogged nozzles, as revealed with a manual nozzle check. Usually printing solves the issue; if not, a cleaning cycle does, although I hate doing that because of the ink wasted. I wish there was a way to run a cleaning cycle on only one channel.
While printing holiday greeting cards with a lot of red/magenta, my VM nozzle clogged pretty badly. Cleaning cycles didn't seem to help. I eventually tried cleaning the printhead and wiper station using piezo-flush.
That did not work either, so I took a spare cart and filled it with piezo flush, moved the chips from the VM cart to the piezo flush cart, and ran a cleaning cycle. Then put the original VM cart back. That cleared it up and I was able to print about 20 cards. Unfortunately, I soon noticed that the VLM nozzle was missing, so went through the same process with the VLM cart. However, when replacing the VLM cart I saw only a few nozzles printing cyan(!) and the rest were blank. After more cleaning, all channels are blank and the channel seems clogged completely. Occasionally the machine claims there is no cartridge in that slot, but pushing it in (with and without removing and re-inserting the cartridge) seems to overcome that temporary complaint.
It appears to me there is a clog somewhere in the VLM, in one of the following:
1. ink line between cartridge and the "pre-damper" (or whatever it is called) in the top of the ink-supply
2. "pre-damper" in the top of the ink-supply or its output line to the ink-supply line connector
3. ink line between the ink-supply and the print-head
4. damper in the print-head
5. print-head nozzle
I am suspecting #2, but feel #1 and #2 should be cleaned out before proceeding with dismantling the printhead.
After more web searches I found information on dismantling the printer to clean the ink supply mechanism and its "pre-dampers" and on cleaning the printhead and its dampers. I have not (yet) dismantled the printhead and carriage, but at the moment I have the ink-supply out of the printer but still connected to the printhead with the ink-tube ribbon. When I removed the ink-supply box from the printer the absorbant pad below it was virtually pristine, with a small dot of ink under the VLM cartridge. But underneath the plastic box which holds the absorbant pad there was a fair amount of either piezo flush or VLM. I'm suspecting some of both.
I am about to unbolt the ink-tube ribbon from the ink-supply. Unfortunately, the service manual says nothing about this process, probably because it is meant to be replaced as a whole. (Steps 10-11, pp 156-157, section 4.3.9.3 of the service manual) In step 10 it shows the ink-supply cable attached to the ink-holder assembly, and in step 11 it is disconnected.
The videos I have watched describing cleaning the components of the ink-supply mechanism do not show disconnecting the cable; they all start with the system already disconnected.
Questions:
1. Suggestions on what will happen when unbolting the ink-supply cable and how to deal with it? I started to unbolt it and ink started leaking so I retightened it and cleaned up.
2. Do I need to worry about introducing air into the ink-supply line once it is unbolted?
3. I'm assuming I should:
a. use warm water to clean / flush the contact pad at the back of the ink-supply where the ink cart plugs in
a.1 I'm thinking I should clean them all since I have it apart and they haven't been cleaned in over 10 years
b. use warm water / piezo flush to clean out the pre-damper
b.1 I'm thinking I should clean them all since I have it apart and they haven't been cleaned in over 10 years
b.2 Should I flush both forward (attach syringe to tit at pre-damper) and reverse (attach syringe to ink-supply cable tit)?
4. I'm guessing the chip (what is this?) at the back of the ink-supply box where the ribbon cable for the VLM ink plugs in has probably gotten wet due to excess-pressure from a clogged line causing ink/piezo-flush to spray out. Suggestions on cleaning it?
5. Assuming I get things cleaned out, how to proceed when re-assembling to ensure no ink flow blockage from air bubbles?
For the future, I found this reference that talks about a custom-designed image to print out of only one cart. Unfortunately, it requires a software product (Quad Tone RIP) I do not own and cannot run as I don't run windows or apple systems.
Does anyone have suitable images for each of the ink channels on a 3880?