Need Advice on leaked cartridge

Fabphoto

Getting Fingers Dirty
Joined
Feb 3, 2013
Messages
27
Reaction score
6
Points
29
I put a leaky magenta cart in my pixma 6520 ( 5 cart system). I thought it had quit dripping. Now my print came out with magenta smeared over a third of the print.

I turned it off immediately and haven't tried any thing yet.

I hope someone can tell me what to do next before I really mess it up.

Before this accident I have had good beginners luck with re-filling.

Thanks for any help.
 

The Hat

Printer VIP
Platinum Printer Member
Joined
Jan 18, 2010
Messages
15,640
Reaction score
8,707
Points
453
Location
Residing in Wicklow Ireland
Printer Model
Canon/3D, CR-10, CR-10S, KP-3
Fabphoto said:
I put a leaky magenta cart in my pixma 6520 ( 5 cart system). I thought it had quit dripping. Now my print came out with magenta smeared over a third of the print.

I turned it off immediately and haven't tried any thing yet.

I hope someone can tell me what to do next before I really mess it up.

Before this accident I have had good beginners luck with re-filling.

Thanks for any help.
First off if your cartridge leaks rather than drips a few drops after the removal of the orange clip,
then that is a sure sign that you have not sealed up the refill hole properly,
it must be air tight and nothing else will do.

What you can do now is to bring the print head into the middle of the carriageway and pull the power plug,
and then remove all the cartridges plus the print head, then run the print head under some tap water to clean.

Give it a good shake and then leave it to dry in a nice warm place (On a Window sill)
next clean off any ink that may have gotten onto the rest of the cartridges, then tackle the leaking Magenta cartridge.

When youre sure you have sorted the leak problem with the magenta cartridge then use a paper towel soaked in some Windex (Window Cleaner)
and rub, pat and clean the inside platen area of the printer and anywhere else you can see magenta ink spots,
It will take more than one paper towel to clean up the mess.

When the print head is good and dry put everything back into the printer and start again with a nozzle check
and when its good and proper then do a head alignment once more, now you can print with confidence.

Happy Printing..
 

PeterBJ

Printer VIP
Platinum Printer Member
Joined
Nov 27, 2010
Messages
5,064
Reaction score
4,913
Points
373
Location
Copenhagen Denmark
Printer Model
Canon MP990
Hi Fabphoto

I guess you are are using topfilling, but please some more info about the refill method used, cartridges and materials used and if topfilling is used how are the cartridges sealed after refill.

Here is a thread showing what can happen if the plug is pulled from the cartridge. I think that the clearance problem in newer Canon printers was not yet known at the time of this thread: http://www.nifty-stuff.com/forum/viewtopic.php?id=6269&p=1 and this thread also has info about clearance problems and recommended type of plugs: http://www.nifty-stuff.com/forum/viewtopic.php?id=8770

I can confirm that the print head must be completely dry before reinstalling. I have burned out a print head plus logic board, making the printer a total loss, by reinstalling a printhead that was not completely dry.
 

turbguy

Printer Master
Platinum Printer Member
Joined
Sep 10, 2007
Messages
1,558
Reaction score
1,428
Points
293
Location
Laramie, Wyoming
Printer Model
Canon i960, Canon i9900
Never, Never NEVER rinse a printhead with tap water and then let it dry! Dissolved minerals in tap water water can EASILY form a solid calcium/magnesium deposit in nozzles, that then require acid cleaning to remove.

ALWAYS finish tap water cleaning with at least two good flushes of known, distilled water.

The variability of the quality of "tap water" throughout the world is quite significant.

Wayne
 

PeterBJ

Printer VIP
Platinum Printer Member
Joined
Nov 27, 2010
Messages
5,064
Reaction score
4,913
Points
373
Location
Copenhagen Denmark
Printer Model
Canon MP990
It might not be necessary to flush the print head under tap water. I suggest to first try a more gentle approach.

Turn the printer on and open the lid as to change a cartridge. When the print head has centered pull the power cord. Now remove the cartridges and the print head and clean the underside of the print head by gently blotting it against soft tissue paper moistened with water or Windex. Also inspect the printer for leaked magenta ink and try to wipe as much as possible away. Also clean the underside of the print head carriage.

After this cleaning reinstall the print head and replace the defective magenta cartridge and reinstall the the rest of the cartridges. Close the lid and reattach the power cord and turn on the printer. Do one or two normal nozzle cleanings and nozzle checks, and check that excess magenta is cleared from the print head by printing a test picture like this printer evaluation image: http://www.outbackphoto.com/printinginsights/pi048/essay.html . An explanation for how to interpret the results is here: http://www.outbackphoto.com/printinginsights/pi049/essay.html

You can clearly see from the greyscale if the printer is OK again. It might be necessary to repeat the printing of the test image, but I guess the printer will be OK again after one or two prints of the test Image.

Using a Pixma iP3600 I'm am doing some comparison tests between Canon OEM PGI-520/CLI-521 cartridges refilled with IS inks and a compatible cartridge set from Lidl. After having done a nozzle clean I printed the test image. The ink in the printhead had been replaced, and no further printing/cleaning was necessary, the IS ink in the printhead had been completely replaced by the ink in the Lidl cartridges.

BTW the cartridges from Lidl seem to be good quality and I think the price of 3.50 is fair, but my estimated costs of refilling the OEM cartridges is 1 for the dye cartridges and 2 for the larger pigment black cartridge.
 

mikling

Printer VIP
Platinum Printer Member
Joined
Jul 2, 2006
Messages
3,239
Reaction score
1,471
Points
313
Location
Toronto, Canada
turbguy said:
Never, Never NEVER rinse a printhead with tap water and then let it dry!

Wayne

I'd keep the key word as being DRY. no drying immediately reuse and let the ink flush out the water. In fact the initial priming of the printhead by the printer will evacuate the water. Thereafter the ink inside will be fine.
 

turbguy

Printer Master
Platinum Printer Member
Joined
Sep 10, 2007
Messages
1,558
Reaction score
1,428
Points
293
Location
Laramie, Wyoming
Printer Model
Canon i960, Canon i9900
mikling said:
turbguy said:
Never, Never NEVER rinse a printhead with tap water and then let it dry!

Wayne

I'd keep the key word as being DRY. no drying immediately reuse and let the ink flush out the water. In fact the initial priming of the printhead by the printer will evacuate the water. Thereafter the ink inside will be fine.

Agree. As long as the "contaminated" water is removed from the nozzles promptly, it should not cause an issue...

HOWEVER, there are many here that have the belief, and the experience, of a damp print head damaging the logic board or the print head.

Why take the risk? Install a dry print head!

Wayne
 

PeterBJ

Printer VIP
Platinum Printer Member
Joined
Nov 27, 2010
Messages
5,064
Reaction score
4,913
Points
373
Location
Copenhagen Denmark
Printer Model
Canon MP990
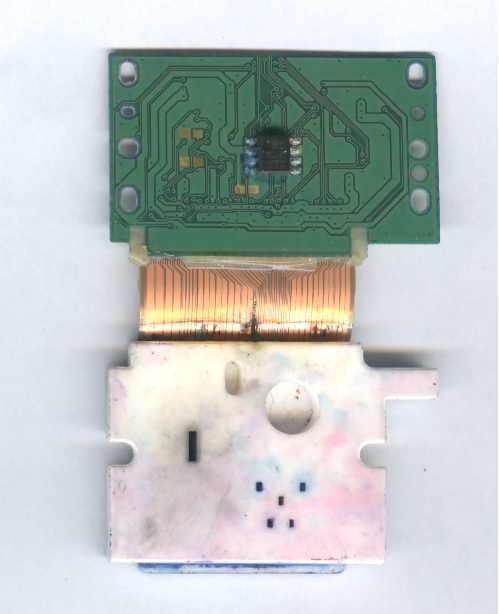
In my opinion it is not water left in the nozzles or ink reservoirs in the print head that is risky. It is water left where it does not belong, for instance behind the printed circuit board (PCB) or the ribbon cable at the back of the print head that is really risky.

This is my theory: The Canon print heads use two supply voltages 3.3 V for the control logic and around 24 V for the nozzle heaters. A small amount of water could cause a leakage current from the 24 V to the 3.3 V logic. This could immediately burn out the control logic. This might turn on all the switch transistors for the nozzle heaters creating an overload almost comparable to a short. This overload current might also burn out the print head driver circuit on the logic board. I don't think that leakage current alone, caused by water could amount to several amperes, burning holes in the ribbon cables, but maybe?

See this picture of the inner works of a pixma 3000 print head that I ruined by unskilled cleaning and installing before it was dry:

6881_ip3000.jpg


Note burnt holes in the ribbon cable and also note what appears to be ink residue or corrosion at the pins on the left side of the IC on the PCB.

Waiting for water that might be trapped behind the PCB or the ribbon cable to dry might also cause water in the nozzles to dry, so I think final flushing with distilled/demineralized water as recommended by turbguy is a good idea to get rid of dissolved minerals in hard water.
 

The Hat

Printer VIP
Platinum Printer Member
Joined
Jan 18, 2010
Messages
15,640
Reaction score
8,707
Points
453
Location
Residing in Wicklow Ireland
Printer Model
Canon/3D, CR-10, CR-10S, KP-3
I agree with you findings where any liquid is concerned, this unwanted guest will destroy the electrical system
in a print head rapidly if used while damp and a risk not worth taking,
never mind the quality of the water inside the print head, a short circuit is a far more efficient killer.

But it also has to be pointed out that not all drinking waters are created equal and if you dont know
the quality of the water in your own area then it might be best to avoid it as a flushing agent,
and just soak the head in a 1/2 bath of Windex instead..:)
 

Fabphoto

Getting Fingers Dirty
Joined
Feb 3, 2013
Messages
27
Reaction score
6
Points
29
The advice I received was right on. My printer is now working perfectly. This forum is a wonderful place.
 
Top