my ink has run out !! is the printhead dead? pls help!

shadowc

Newbie to Printing
Joined
Mar 10, 2008
Messages
6
Reaction score
0
Points
7
Hello.
I have a Canon MP600, and i've used refill for the cartridges with a third party ink. Which is very good by the way.
I knew i had to look after ink not to empty, cause i heard about the problems with the printhead. But, i left home, and when i came back, it had happened.
On nozzle check, i have everything ok, besides the 2 MAGENTA...

My question is : Can i do something about it? Or the printhead is dead on the magenta side?

Please help me.:(
 

chaosoffar

Newbie to Printing
Joined
Nov 29, 2007
Messages
7
Reaction score
0
Points
7
Both times I've run out of ink and printed dry for alittle, refilling and running a cleaning and nozzle check fixed the problem. The Canon heads seem to be pretty durable from what everyone has to say, you can always try one of the cleaning methods on here to hopefully bring it back to life.
 

headphonesman

Printer Guru
Joined
Mar 18, 2006
Messages
250
Reaction score
2
Points
109
chaosoffar said:
The Canon heads seem to be pretty durable from what everyone has to say, you can always try one of the cleaning methods on here to hopefully bring it back to life.
I would agree, dont give up yet. I recently took delivery of a MP600, I put the Printhead into storage without unwrapping it , using instead the used printhead from a 5200 (same head type). I printed and refilled without a problem until after one re-fill when testing via the print of a purge sheet the blue print failed halfway thru.
The nozzle check confirmed that the blue nozzle bars were both absent. Over the next 24 hours i soaked it (several) retried several times ran several deep and light cleaning cycles but to no success.
I retrieved the original new printhead out of storage , installed and everything was ok (as it should be).

I then continued testing the printhead installed back to the 5200.., same of course, it still was absent the Cyan bars.

I tried introducing cleaning solution from "both sides".......I noticed i could get the start of a Cyan bar in nozzle check , (only half a bar, then it expired).
Encouraged I decided the blockage was "inside" . I undid the two screws on the head folded it back and applied cleaning solution to both the rubber gasket and to the opposite 5 holes on the actual head. Eventually i could see daylight through all of them. I re-assmbled and repeated deep cleaning and nozzle checks also coupled with cleaning solution being dripped on both sides.. Still no Cyan bars.

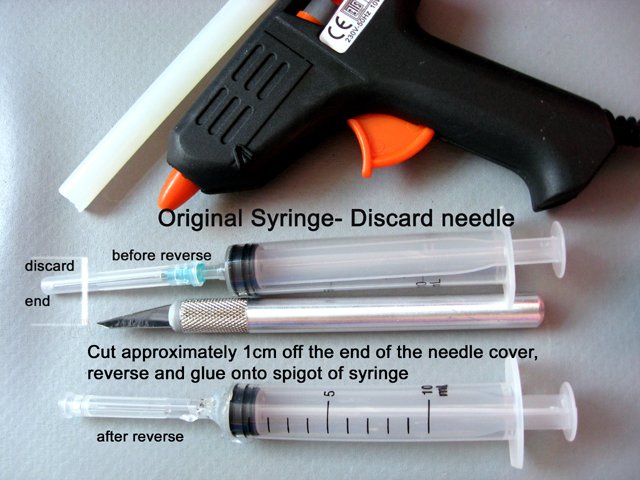
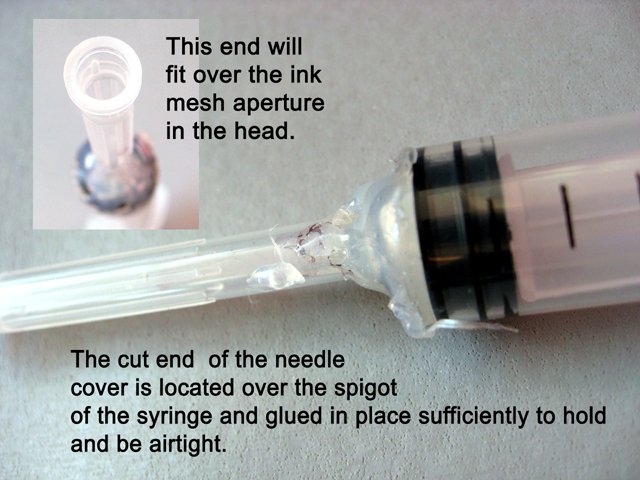
Then I made a pump (out of a refill syringe) which could suck or blow cleaning solution (gently) down thru the Cyan filter mesh. The nozzle of the pump fits over the mesh and sits on the rubber surround.
I first used a sucking action this got quite a lot of fluid back, disposed of this. Filled the pump (syringe) with tap water and gently forced it through the head which was sitting on a paper towel, this seemed to clear quite well as it came out bright Cyan. I then put the carts back in ran a deep clean then a nozzle check and it worked perfectly all the bars were back.
The Pump is made out of a spare syringe which has had a needle protect sheath with its small end cut off and this in turn stuck on to the end of the syringe (the glue used was from a heat glue gun stick type). The widest end then sits over the ink mesh grill.

These were extreme measures , only for the brave or desperate and to be used as a last resort , but they worked for me. I have now put the head into (hermetically ) sealed storage.
Some people advocate the use of compressed air , I have used it in the past (with little success) but i think the fluid method is preferable as you have easier control and can see what is happening.

Hope this helps.....If any Forum members think these last resort methods are unsuitable , please comment.
 

jru

Printer Guru
Joined
Dec 22, 2006
Messages
121
Reaction score
4
Points
131
Location
Central NY, USA
headphonesman,

Could you say what you used as the cleaning solution?

Also wondering if you had the ability to post some photos of your "pump" from the syringe.

Thanks so much for your post.
 

headphonesman

Printer Guru
Joined
Mar 18, 2006
Messages
250
Reaction score
2
Points
109
jru said:
headphonesman,

Could you say what you used as the cleaning solution?

Also wondering if you had the ability to post some photos of your "pump" from the syringe.

Thanks so much for your post.
The cleaning solution was the commercial type , pink , in a little 30ml bottle as part of the refill kit, plus 1 bottle of each Cyan, Magenta, syrringe, needle, plugs etc, bought at the local store.

this sort of kit.
http://www.jettec.com/canonrk.asp

I will do my best for the pictures........I am not sure how to post any here.......but I will do them first and worry about getting them to view later.
Instead if using a needle on the syringe you are using a tube which is big enough to have an airtight fit on the base of the syringe and the other end big enough to fit over and around the small mesh aperture which the ink cart feeds into.
In my opinion in this particular case I am not sure the cleaning solution played a major part, in fact I used water on the feed in cycle , perhaps the gentle pressure was enough to free the clog.
I had already decided that if the cool water did not work I would use warm and then hot.........(several people have recently proposed using hot water as an unclogging agent ), in the event the cool water did the trick for me. You might try standing the head in medium to hot (not deep enough to cover the electrical connections though !) for a period and then syringing hot water onto the mesh.


PS can some one briefly describe how to post pictures in this thread ?
 

Tin Ho

Print Addict
Joined
Apr 24, 2006
Messages
866
Reaction score
26
Points
163
shadowc said:
Hello.
On nozzle check, i have everything ok, besides the 2 MAGENTA...

My question is : Can i do something about it? Or the print head is dead on the magenta side?
(
The most important action you need to take is stop printing until your magenta is cleared. The biggest mistake most people make is trying to print and see if printing will eventually clear it. No, it won't and it makes the matter worse. The only printing you can still do is the nozzle check. Other than that you should try to clear the clog using some cleaning fluid.

I worked on an MP780 recently that had some tiny banding on its nozzle check print. It was barely noticeable but it was there. The printer was not frequently used as the cause of the clog I believe. After discovering the clog it had the printer was shut down and left alone for a few weeks. I made a cleaning cartridge using some glass (window) cleaning fluid from a janitor who came to do his weekly cleaning work. I believe it was Windex or something similar. I plugged it in the printer for half a day. The clog was completely gone when I checked it again. It was amazingly effective. I must ask the janitor what the cleaner is when he came next time. I did not have Windex on hand so I tried his cleaner. I believe if the MP780 was used continuously after discovering the banding it may be dead already by now.
 

Smile

Printer Master
Joined
Aug 23, 2006
Messages
1,914
Reaction score
417
Points
253
Location
Europe EU
Printer Model
Canon, Brother, HP, Ricoh etc.
You can use ammonia + distilled water solution, put only a few drops of ammonia into water solution. The cotton swabs and paper towels are also not recommended also because micro fibers can clog or scrape the print head nozzles.

You should always use coffee filters they are safe to use, no rubbing the nozzles should be always avoided if possible.

My recipe for print head cleaning:

1. Soak the print head in distilled water until it is very clear. Use a small plastic container that did not contain any chemicals in it before procedure. Single use containers should be used.
2. Leave the head in distilled water solution for 24hrs. Make sure water level covers ink inlet ports too.
3. Change distilled water in the container and heat it to degrees 40-50C. Too hot can damage the dead so make sure to not overheat the water. When the water is ready submerge the head into the container for 15mins or so. Make at least 4 cleaning cycles this way.
4. Put a coffee filter on the table, underneath the coffee filter put 3 - 4 sheets of paper towel to absorb the cleaning solution.
5. Put the print head on the coffee filter and get some soda straws (they are ideal for ink ports on pixma printers) remove rubber padding around ink ports on the print head by using some instrument as tweezers. Recommended way is to submerge the head into distilled water because rubber padding can be removed easily without friction in water. Now when you are ready connect each soda straw to every ink port.
6. Make a cleaning solution by using few drops of ammonia solution and distilled water. For example 2ml of ammonia and 19ml of water in a 20ml syringe. Mix the solution by shaking the syringe.
7. Fill the soda straws with cleaning solution. If you get air pockets in the straws use another 20ml syringe to connect and force air trough the straws until there are no more air pockets and solution level is decreasing in the straws. Take some patience the method is slow but well worth it. The solution should decrease faster as more nozzles are cleared. Don’t hesitate to use the empty syringe to force some air trough the nozzles if you get air stuck when filling the straws.
8. Finish the cleaning by injecting pure distilled water and by submerging the print head into distilled water for 15mins. Then blow the ports with air using a syringe with a soda straw.
9. Clean the gold contacts on the head with some isopropyl alcohol and then immediately install into printer and perform 2 to 5 cleaning cycles or some deep cleaning to prime the head, and then print some purge pages. Now you can print nozzle check to see how well the cleaning unclogged the nozzles.
 

shadowc

Newbie to Printing
Joined
Mar 10, 2008
Messages
6
Reaction score
0
Points
7
Thank you all for your replys
I wish i could see headphonesman's pictures :)
Thanks smile for your reply too, i'll give it a try.
 

headphonesman

Printer Guru
Joined
Mar 18, 2006
Messages
250
Reaction score
2
Points
109
shadowc said:
I wish i could see headphonesman's pictures :)
Thanks smile for your reply too, i'll give it a try.
I am working on producing the pictures.........meanwhile (as the pump is the last resort, and Smiles suggestions of soda straw usage are very similar) , I recommend employing as many of Smiles procedures as you can.
The only point of difference I have with Smiles procedures are the purge sheet test while the success of the de-clog actions are unknown. I now prefer to use only the light/deep cleaning and nozzle check until the status is good (these actions are less intensive), then a purge sheet print can be employed to make absolutely sure that the head can handle intensive use , but this is just my preference .

good luck meanwhile !
 

headphonesman

Printer Guru
Joined
Mar 18, 2006
Messages
250
Reaction score
2
Points
109
here we go
1058_pump1cres.jpg


1058_pump5bres.jpg


Hopefully the pictures are fairly self explanatory

Postcript 26/03/08 .
Original thanks should go to hpnetserver for his post of 8/18/2005 where he first drew our attention to this type of tool. I have just seen it (again?) and realise I am not the original inventer.
The thread is the repository of all known cleaning techniques to date

http://www.nifty-stuff.com/forum/viewtopic.php?id=241&p=2
 
Top