Is this an alignment problem ?

SpideRMaN

Fan of Printing
Joined
Oct 16, 2009
Messages
173
Reaction score
0
Points
74
This is my friend's printer but mine does the same

I manually aligned the head of a Canon MP980
I also let the printer do an automatic alignment but the results are the same

The printer is almost new running it's second set of OEM carts


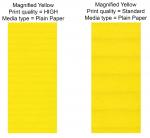
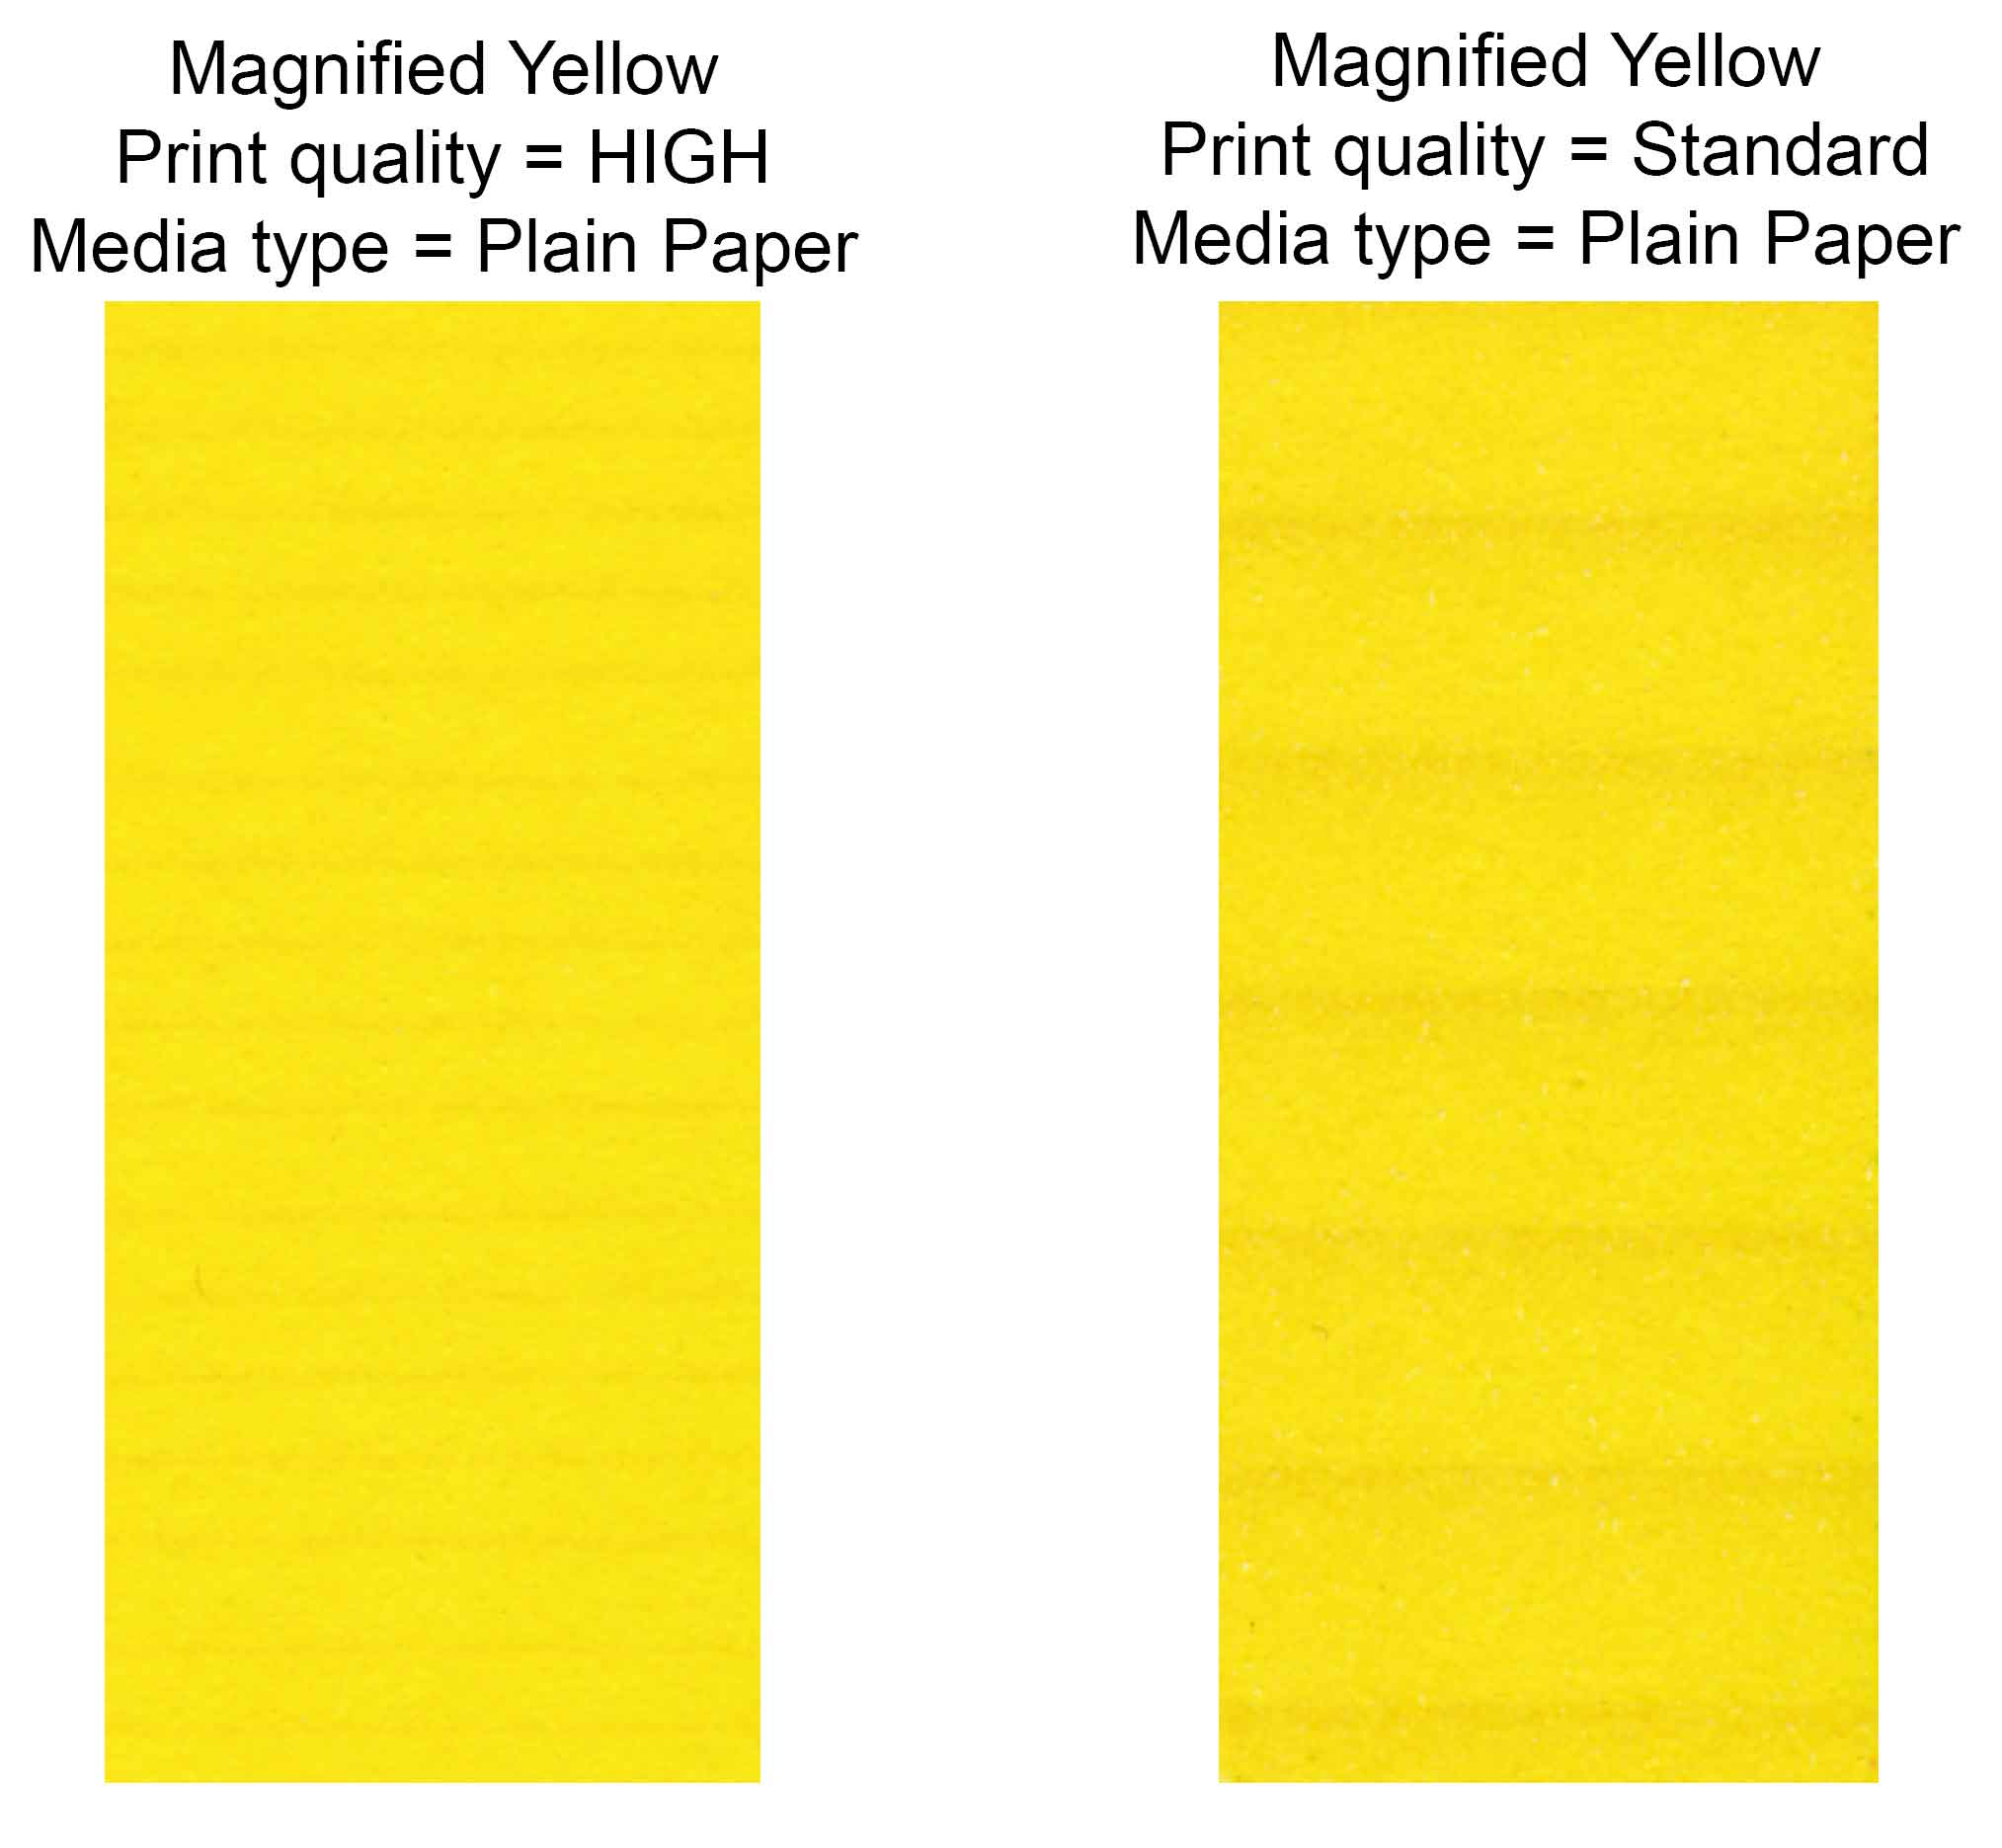
Is it actually a problem ? (lines are visible mainly on the yellow and visible to the naked eye)

EDIT: Nozzle test print is 100%

Thanks :)
 

ghwellsjr

Printer Master
Platinum Printer Member
Joined
Jun 16, 2006
Messages
3,645
Reaction score
85
Points
233
Location
La Verne, California
Printer Model
Epson WP-4530
First off, I'm not sure what you mean by calibrating the printer. If you mean alignment, then I doubt that it has any effect on the yellow ink. In most Canon printers, there are two columns of nozzles for the cyan and magenta colors for each nozzle size, one column for printing when the head scans left-to-right and the other column for when the head scans right-to-left. The purpose of alignment is to set the timing so that the two columns of nozzles will print exactly on top of each other. See this topic for an explanation of what's going on.

Secondly, the discoloration that you see in your printouts may be caused by your original document. Where did you get it from? I would think the best pure color would be one you generated from Paint by filling the entire page with a solid color. It may make a difference whether you specify the document to be saved as a bitmap (.bmp), or a compressed file such as the lossy .jpg or the lossless .png. Try all three and see if there is any difference.
 

Grandad35

Printer Master
Platinum Printer Member
Joined
Feb 24, 2005
Messages
1,669
Reaction score
182
Points
223
Location
North of Boston, USA
Printer Model
Canon i9900 (plus 5 spares)
SpideRMaN,

I once worked out that a print head costs well under a penny per nozzle; as such it can't be expected that each nozzle will deposit exactly the same amount of ink. This is why printing at high quality on photo paper is so slow - the paper only advances by 1/8 of the width of the nozzle bank for each pass of the print head so that any light/dark areas are randomized, masking print head defects by using 8 different groups of nozzles to complete the ink lay down.

When printing on plain paper at standard quality, the print head does its entire ink laydown in a single pass - making non-uniform ink flow apparent. Did you notice how fast this sample printed? High quality on plain paper will probably advance the paper 1/2 as far and make 2 passes - note that there are more defects and that they are less visible.

Repeat the test on photo paper. If the bands are still visible, send the printer to Canon if it is still under warranty.
 

SpideRMaN

Fan of Printing
Joined
Oct 16, 2009
Messages
173
Reaction score
0
Points
74
@ghwellsjr

sorry I meant Alighnment, don't know why I repeated the error 3 consecutive times MAH I'm too old to learn english !!

this is the original jpg I printed which I found on this forum


will try what you suggested and post back (thank You)

@Grandad35

Thanks for your explanation,

will make a decent bmp wit the exact 3 colors CMY and Black and test again

P.S I did the test on 2 MP980 printers and both printed the pics the same way so I doubt it's a malfunction of the printer
 

ghwellsjr

Printer Master
Platinum Printer Member
Joined
Jun 16, 2006
Messages
3,645
Reaction score
85
Points
233
Location
La Verne, California
Printer Model
Epson WP-4530
The yellow in the picture from post #4 looks like pure yellow while the yellow in post #1 looks a little muddy. Is that because you scanned it and your scanner introduced a color difference?

I know that your first post has a magnified image but I'm wondering how you did this. Did you simply print the image from post #4 so that it was as small as it appears in that post and then scan it and magnify the scan or did you magnify the image before you printed it?
 

SpideRMaN

Fan of Printing
Joined
Oct 16, 2009
Messages
173
Reaction score
0
Points
74
Ok,

No I did not magnify the image before I printed it

I dloaded the image

loaded as is in photoshop

printed using 2 printing modes (high and standard) on same paper type. It was here that I noted that the yellow was not looking good. I could see the lines in the 2 prints

scanned the images (2)

enlarged the yellow part

Please note that I can see the lines only on the yellow color in both printing modes (high and standard)

Thank you
 

ghwellsjr

Printer Master
Platinum Printer Member
Joined
Jun 16, 2006
Messages
3,645
Reaction score
85
Points
233
Location
La Verne, California
Printer Model
Epson WP-4530
Between the "smudges", does the printout look like pure yellow or does it appear muddy as in the scanned and uploaded scanned images?

Can you print an image from Paint with a Defined Custom Color of 100% yellow? (Yellow is 255 red, 255 green, 0 cyan.) Leave it as a bitmap (.bmp).
 

SpideRMaN

Fan of Printing
Joined
Oct 16, 2009
Messages
173
Reaction score
0
Points
74
I think the problem was with the image which is now solved by creating one using PS (attached image is reduced for forum upload)


I found another problem on the black though

If I use PS print option to print the above image then PS uses the Pigment black cart
If I use PS Easy Photo Print Plugin (Canon) then it uses Dye black cart

Is there any explanation for this ?
 

ghwellsjr

Printer Master
Platinum Printer Member
Joined
Jun 16, 2006
Messages
3,645
Reaction score
85
Points
233
Location
La Verne, California
Printer Model
Epson WP-4530
It appears that PhotoShop defaults to plain paper which uses the pigment black ink while the PS Easy Photo Print Plugin defaults to one of the photo papers which uses the dye black ink. With either of these, can't you click on Preferences (or some other such button) to specify your paper type as well as other parameters?

Also, what exactly was the problem with the image that you were using and how did you solve it with PhotoShop?
 

SpideRMaN

Fan of Printing
Joined
Oct 16, 2009
Messages
173
Reaction score
0
Points
74
ghwellsjr said:
Also, what exactly was the problem with the image that you were using and how did you solve it with PhotoShop?
sorry for the confusion

when I printed the image in the 4th post of this topic (3 circles) I was having a problem with the yellow as in picture of the first post.

I could be related to what you said in 2nd post (compression)

so I created another image in PS without any compression and the yellow printed fine

ghwellsjr said:
It appears that PhotoShop defaults to plain paper which uses the pigment black ink while the PS Easy Photo Print Plugin defaults to one of the photo papers which uses the dye black ink. With either of these, can't you click on Preferences (or some other such button) to specify your paper type as well as other parameters?
Yes i can, and I selected Plain paper for both prints

Thanks fot your time :)
 
Top