- Joined
- Nov 3, 2004
- Messages
- 3,141
- Reaction score
- 1,519
- Points
- 337
- Location
- Bay Area CA
- Printer Model
- CR-10, i560 ,MFC-7440N
On my other community forum www.BackYardChickens.com, we've got a member that recently hit 100,000 posts!

Well, to celebrate her AMAZING accomplishment, I was going to buy a custom engraved chicken trophy. There are a bunch out there, but none of them were really what I wanted, plus, I felt she deserved something really special and unique!
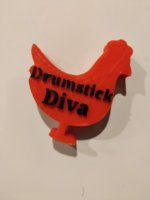
So, I got to designing and printing, and came up with this:


The whole project (design and printing) took me about an entire day, but it was a pretty interesting, complex, and fun project!
Here's how I did it:
I used the base of this trophy thing: https://www.thingiverse.com/thing:2882313
and a customized version of this gyro thing: https://www.thingiverse.com/thing:802145
I loaded the trophy into Tinkercad and cut off the top. Then I added a square hole.
I then loaded the gyro into Tinkercad, added a square peg (to match the hole above) and then added the chicken using Chuck's video instructions where he scanned a thing and imported it into tinkercad. Then added the text in to the chicken silhouette.
I also created a faceplate with the text.
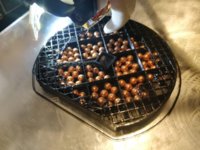
I printed the base first, all one color... but did something SUPER tricky! I wanted to weigh down the base. I thought about inserting pennies or large magnets. Instead, I used the "gradual infill steps" feature in CURA with the "Grid" infill pattern. This created some really large spaces in the bottom of the print. While it was printing, I slowed the print down to 10% and then filled the spaces with copper BB's:


This worked out GREAT!
Next I printed the faceplate and did a color-swap (change filament) to go from black to white.
I then printed the gyro which required 2 color swaps (white, red, black), which turned out REALLY well!
I ran into a problem where the outer ring didn't print as well as I wanted, so I reprinted that ring in black... and I think it actually turned out nicer!
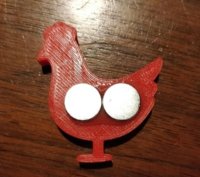
During my testing, I printed the chicken by itself. I didn't want it to go to waste, so I epoxied two super strong magnets to it and made this little thing:


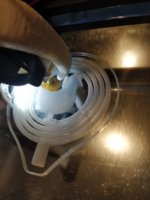
Here it is mid-print:


Well, to celebrate her AMAZING accomplishment, I was going to buy a custom engraved chicken trophy. There are a bunch out there, but none of them were really what I wanted, plus, I felt she deserved something really special and unique!
So, I got to designing and printing, and came up with this:
The whole project (design and printing) took me about an entire day, but it was a pretty interesting, complex, and fun project!
Here's how I did it:
I used the base of this trophy thing: https://www.thingiverse.com/thing:2882313
and a customized version of this gyro thing: https://www.thingiverse.com/thing:802145
I loaded the trophy into Tinkercad and cut off the top. Then I added a square hole.
I then loaded the gyro into Tinkercad, added a square peg (to match the hole above) and then added the chicken using Chuck's video instructions where he scanned a thing and imported it into tinkercad. Then added the text in to the chicken silhouette.
I also created a faceplate with the text.
I printed the base first, all one color... but did something SUPER tricky! I wanted to weigh down the base. I thought about inserting pennies or large magnets. Instead, I used the "gradual infill steps" feature in CURA with the "Grid" infill pattern. This created some really large spaces in the bottom of the print. While it was printing, I slowed the print down to 10% and then filled the spaces with copper BB's:


This worked out GREAT!
Next I printed the faceplate and did a color-swap (change filament) to go from black to white.
I then printed the gyro which required 2 color swaps (white, red, black), which turned out REALLY well!
I ran into a problem where the outer ring didn't print as well as I wanted, so I reprinted that ring in black... and I think it actually turned out nicer!
During my testing, I printed the chicken by itself. I didn't want it to go to waste, so I epoxied two super strong magnets to it and made this little thing:


Here it is mid-print:

Last edited:


 I especially liked the way you manipulated the use of other pieces to make your creation...


