Canon Pixma MP980 magenta stripes - clean printhead?

hobbeschild

Printing Apprentice
Joined
Jul 30, 2017
Messages
5
Reaction score
2
Points
11
Location
Reading, UK
Printer Model
Canon Pixma MP980
Hello,

I have read the FAQ and I have got as far as removing the printhead, but on the bottom it has a spongy bit and a metal/electrical contact bit, and I lost my nerve - should I really get it wet? Should I take some bits of it off before washing?

The printer is several years old, and I have been refilling the OEM cartridges myself for years, but it has been fine until quite recently, when anything red started coming out stripey. It is only used once or twice a week for a few sheets.

I tried several cleaning & deep cleaning cycles. It didn't make any difference.
I tried changing the magenta cartridge to a new third-party one (not Canon). It didn't make any difference.

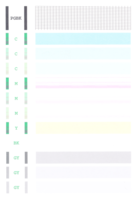
I'm assuming I do need to clean the printhead? but I will attach some maintenance prints for confirmation.

Many thanks in advance for any advice you can offer.
 

Attachments

  • alignment.jpg
    alignment.jpg
    28 KB · Views: 290
  • nozzle.jpg
    nozzle.jpg
    30.4 KB · Views: 340

stratman

Printer VIP
Platinum Printer Member
Joined
Apr 19, 2007
Messages
8,712
Reaction score
7,172
Points
393
Location
USA
Printer Model
Canon MB5120, Pencil
The image named "alignment' is a nozzle check and vive versa for the the image named "nozzle".

The nozzle check shows missing ink in both streaks and entire swaths. This could be due to any one or combination of
  • ink starvation - ink not leaving the cartridge properly
  • clog in the print head
  • permanently burned out nozzles
  • print head electronic failure
  • logic board assay malfunction.
Questions:

  1. What manner are you refilling - top, Durchstich or other?
  2. What ink are you using?
  3. How often do you print something that uses ALL the cartridge colors?
  4. How long have you been having these problems?
  5. Did you continue to print (other than nozzle checks) after the issues began?
  6. What have you done to remedy these issues?
  7. Have any of your efforts (or nothing at all done on your part) resulted in improvement in the issues?
  8. What is this "spongy-bit" on the bottom??? There is no spongy-bit on the print head AFAIK, but there is a sponge on the bottom of the cartridge in the circular ink exit port.
For now, print nothing but nozzle checks until directed otherwise. Your printer heats up the ink before it spits it out on the paper. The nozzles need the cooling effect of ink to prevent burning out. Without ink the nozzles may permanently burn out. Only a new print head will remedy this. New print heads for your printer may or may not be available. The ones from China seem to be used but sold as new in counterfeit packaging and have a high failure rate. They are a gamble.

More on the nozzle check. Cyan and Yellow appear to be OK. It would be best in the future to crop the image so that only the printed portion is pictured by cutting out the unprinted rest of the page. In this way you can get a magnified image of the important nozzle check. The Pigment Black has some nozzles missing - the cross hatches each represent a nozzle. These may represent clogs, burnouts or combination. The rest of the nozzle check shows variable loss of ink due to any one or more of the reasons I listed above.

First thing to do is to make sure all cartridges are functioning properly. I would replace with new OEM, or a known working cartridge, for the Magenta, Black (dye based not pigment one) and the Grey. These must be 100 % working cartridges otherwise you will never know if your efforts to fix the issues worked. Plus, you may permanently burnout more nozzles. That your new Magenta made no difference could be due to a serious clog, nozzle burnout, print head electronic failure or logic assay board failure.

After testing the new cartridges with a nozzle check, post it in cropped form. Do not print anything else. If you want to do a regular cleaning cycle before the nozzle check then OK. Otherwise just a nozzle check, crop, and post.

Chances are you will need to soak the print head (not the cartridges). I prefer water with liquid dish washing liquid like Fairy or Dawn. You did not tell us your general geographic location we can more specifically advise on what and where to purchase. I think Dawn is offered outside the US and Fairy is in Europe.

Before soaking you should flush the print head with water until no ink comes out or only a slight tinge in the bubble of water that may form around the ink inlet ports (circular holes inside the print head) or nozzles (the openings on the bottom)

Soaking a print head requires PATIENCE! At least 24 hours is what I recommend. Place print head in non-reactive (not metal) bowl filled with water to cover about 1-2 cm above the ink inlet ports of the print head. Add Dawn as you would to wash dishes. There is no scientiic amount. Place a wadded up kitchen towel in the bottom of the bowl. You will plunge he print head, nozzle bottom down, onto the towels every now and then to help push pull solution through the print head. You can also gentle warm the solution in the microwave - LUKEWARM, but do NOT warm it with the print head in the bowl! Change the solution if changes color from leeched ink. I changed at about 12 hours, warmed the solution then again, and plunged the print head onto the paper towels whenever I felt like it. Again, there is no scientific protocol here.

After PATIENTLY waiting for soaking to be done, fully rinse/flush the print head with water, pat dry with non-lint cloth, and let dry completely. Wet electronics may short out if powered on. If your water is hard then last rinse with demineralized or distilled water. Put back in printer, load up KNOWN WORKING cartridges and try a nozzle check. You can run a regular cleaning cycle first if you want. Post the nozzle check.

Hopefully all will be well. If there is some improvement then more soaking might be the next step. Post the nozzle check.
 

hobbeschild

Printing Apprentice
Joined
Jul 30, 2017
Messages
5
Reaction score
2
Points
11
Location
Reading, UK
Printer Model
Canon Pixma MP980
Oops, apologies for the image misnaming.
I am in the UK so we have Fairy.

1. Top-fill.
2. The ink is from OctoInkjet and labelled as such.
3. I use all colours once a week.
4. It's been stripey for a month.
5. I continued to print (eek).
6. I noticed whilst refilling magenta that its sponge was crusty - I picked it off with my awl. I tried replacing magenta with a new compatible cartridge. That is all.
7. No improvement from anything.
8. My bad, I thought it looked spongy but on touching it's thick white plastic.

I am attaching the original nozzle check cropped.

I have no way to prove that the new compatible cartridges are 100% working, so I will have to buy OEMs.
Should I do this first or try cleaning the print head first? Thank you for the detailed instructions. I promise to be patient.
 

Attachments

  • nozzle_crop.jpg
    nozzle_crop.jpg
    37.9 KB · Views: 288

stratman

Printer VIP
Platinum Printer Member
Joined
Apr 19, 2007
Messages
8,712
Reaction score
7,172
Points
393
Location
USA
Printer Model
Canon MB5120, Pencil
2. The ink is from OctoInkjet and labelled as such.
Good ink. Do not use any ink that appears thicker than remembered. has any particulate matter or growth in it, or has been opened for more than 2 years.

5. I continued to print (eek).
Yes, this could be the kiss of death for the full functioning of the print head from burned out nozzles.

6. I noticed whilst refilling magenta that its sponge was crusty - I picked it off with my awl.
Where was this crustiness? Please be specific. In the future, this should cause you to either throw away the cartridge or complete cartridge flush and then refill.

I am attaching the original nozzle check cropped.
Much better. Thank you. If asked when cropping or uploading to the forum, do not adjust the image size downward. Like denominations on currency, the bigger the better. :D

I have no way to prove that the new compatible cartridges are 100% working, so I will have to buy OEMs.
Entirely up to you. New 3rd party cartridges are cheaper and should work. New OEM cartridges are more expensive but are preferred for refilling.

Should I do this first or try cleaning the print head first?
Chicken versus the egg. At this point you could start soaking the print head. While patiently waiting - note I keep using the word or form of "patience" - you could flush and refill your current cartridges in order to possibly save money on new cartridges, especially on something that may not work in the end.

I promise to be patient.
:thumbsup
 

hobbeschild

Printing Apprentice
Joined
Jul 30, 2017
Messages
5
Reaction score
2
Points
11
Location
Reading, UK
Printer Model
Canon Pixma MP980
I have had that ink since 2012!
Crustiness was all across the surface of the sponge, where it is visible through the hole on the bottom of the cartridge.

I just recently bought a joblot of 3rd party cartridges because I suspected refilling the OEMs had run its course.
I have now replaced all the OEMs with brand new 3rd party cartridges.
I have run a regular clean and done a new nozzle check (attached).

I will soak the print head, and if I ever go back to refilling I will flush the old OEMs or buy new ones.

Thanks stratman.
 

Attachments

  • nozzle_3rdparty.png
    nozzle_3rdparty.png
    362.5 KB · Views: 282

stratman

Printer VIP
Platinum Printer Member
Joined
Apr 19, 2007
Messages
8,712
Reaction score
7,172
Points
393
Location
USA
Printer Model
Canon MB5120, Pencil
Grey looks good from my perspective. Magenta and dye-based Black are unchanged. Maybe flushing and soaking the print head will work as long as this is a clog and not something irreparable.

Start soaking! (Flush first)

PS - Octoink sells used empty OEM Canon cartridges. They may need a flush before refilling.
 

The Hat

Printer VIP
Platinum Printer Member
Joined
Jan 18, 2010
Messages
15,628
Reaction score
8,698
Points
453
Location
Residing in Wicklow Ireland
Printer Model
Canon/3D, CR-10, CR-10S, KP-3
Pigment Black ok and so is the Cyan, Yellow and Grey, the rest have had it,
I reckon it’s time to start digging the hole to put it to rest, its terminal, sorry... :(
 

stratman

Printer VIP
Platinum Printer Member
Joined
Apr 19, 2007
Messages
8,712
Reaction score
7,172
Points
393
Location
USA
Printer Model
Canon MB5120, Pencil
Pigment Black ok and so is the Cyan, Yellow and Grey, the rest have had it,
Thank you Mr. Repeato.

I reckon it’s time to start digging the hole to put it to rest, its terminal, sorry... :(
Maybe so but let him have a try at a good soaking. Hope is dashed but once. There's always time later to deliver the bad news.
 

hobbeschild

Printing Apprentice
Joined
Jul 30, 2017
Messages
5
Reaction score
2
Points
11
Location
Reading, UK
Printer Model
Canon Pixma MP980
Him is a her. :)

The black was well and truly stodged up - it was still leeching out almost 24 hours later. The magenta was the second-worst but not nearly in the same league. It eventually stopped and I have just dried it with kitchen towels. Should I let it air dry for a while? The electronics got soaked. I am going on holiday tomorrow and don't need to print today, so I could give it a good long rest. But I am itching to know whether it worked!!
 

stratman

Printer VIP
Platinum Printer Member
Joined
Apr 19, 2007
Messages
8,712
Reaction score
7,172
Points
393
Location
USA
Printer Model
Canon MB5120, Pencil
Him is a her. :)
Sorry. Not intentional. Now that we know, the forum's resident James Bond of printing, @The Hat , will flirt with you. ;)

I am going on holiday tomorrow and don't need to print today, so I could give it a good long rest.
How long? If a couple of days then let it soak or let it dry. Much longer and I might do something else. Or I might not.

The important thing at this stage is for the electronics to be dry before you put the print head back in the printer. A gentle blast of air from a can of compressed air you buy to blow dust off things may facilitate drying of the print head electronics. Unless you are living in the jungle where humidity is very high without raining, the print head should be dry enough after the night. Could be dried after several hours depending on your environmental conditions. Inspect before plugging back in. Use your best judgement.

If you do not put the print head and cartridges back in before leaving then make sure the cartridges have the round ink exit port capped or sealed tightly to prevent drying out the sponge or becoming contaminated by fungus or bacteria.

The print head is a different issue. I don't know what would happen if you left it soaking for days/weeks. If you left it dry over long holiday then any residual ink in the nozzle channels will dry up and you will need to return to soaking and will probable take even more time to reach the end point. No big deal, just test the print head and if the nozzle check is improved but not perfect then return to soaking.

Demineralized water, or Pharmicist's solution, or either propylene glycol (inhibits organic growth and moistens things) or glycerol alone may be fine for longer term soaking and keeping things from drying out. You could squirt Pharmacist's solution or the glycol/glycerin into the ink entrance ports on top and nozzles below and then seal the print head in a plastic baggie. This is a method of long term storage of a print head.

It is your choice.
 
Top