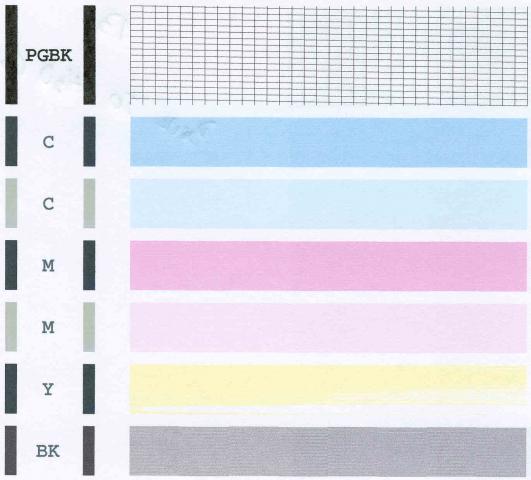
Canon Pixma MP830 - Light cyan not printing during nozzle check

Trigger 37

Printer Guru
Joined
Dec 23, 2006
Messages
607
Reaction score
4
Points
136
Stratman,....I for one do not use, nor do I recommend the use, of the German Refill process. Being an Engineer, I understand the significance of the design that the Canon Engineers have created. The entire ink flow system, and each and every part in it, has been designed to be balanced. A critical part of this design is the ability of the entire system to mantain a vacuum between the ink bubble that exits the nozzles all the way back up to the air intake port of the ink cartridge. If any link in this path is broken or ALTERED the small vacuum will be lost. It is this vacuum that SUCKS the next drop of ink out of the ink cart down into the printhead to replace the ink bubble that was ejected.

In the German process, an extra hole is drilled into the bottom rear of the ink cart and many people are amazed that ink does not leak out of this hole! It is all about the balance of pressure and the sponge material in the bottom of the ink cart. To fill the ink cart, a large needle must be pushed through the sponge material and over the top of the exit port, which also has a different viscosity material, and into the the reservior chamber. In my opinion there is no way this can be done without altering the balance of pressure inside the ink cart. I also suspect that because of this extra hole, that when the purge unit is doing anykind of suction on the color side that extra ink will flow out of the German style carts, and I suspect that more air gets into the path than required and this will result in short periods of missing ink in the print cycle.

I use the old tried and true process for 2 1/2 years of removing the filling ball that Canon installed and then replacing it with a screw that also has a rubber grommet. I have also verified that if that screw or seal is not air tight, the cart will leak ink all over the place, especially when the purge unit is operating.

I have seen reports from at least 5 people of similar problems and all of them had used the German Refill process. I have no other proof and I do not intend to waste my time on any further investigation. I suggest you try a new Canon ink cart once you clean your head and let us know about the results.
 

pharmacist

Printer VIP
Platinum Printer Member
Joined
May 29, 2007
Messages
2,567
Reaction score
1,269
Points
313
Location
Ghent, Belgium
Printer Model
Epson SC-P800,WF-7840,XP-15000
Trigger37,

I print alot with my Canon i9950 printer and I never experienced problems with sudden ink loss caused by the extra breathing hole by using the German Durchstich refill method. One thing: could you trace this problem down wether or not the problem is related to the refill hole being to big or using blunt needles to pierce through the sponge ? One can disclose this probability by simply putting a very tiny dot with the glue gun on the german refill hole to seal it effectively. If the problem is still occuring the problem is cause by something else...
 

ghwellsjr

Printer Master
Platinum Printer Member
Joined
Jun 16, 2006
Messages
3,645
Reaction score
85
Points
233
Location
La Verne, California
Printer Model
Epson WP-4530
Trigger 37, I just started using the German method with a 2" blunt needle. I poke a hole very close to the bottom of the cartridge. The needle does not puncture the sponge or the filter. It slides right in between the bottom of the sponge and the bottom of the cartridge case.

However, I think you may have a good point simply about the presence of an air path so close to the outlet port. I have also wondered about a similar problem that could happen with other methods of refilling that don't have a specific hole, especially with compatible cartridges. Consider this: suppose for some reason, an air path develops from the air vent at the top of the cartridge down through the sponge material directly to the outlet port. This is the reason I recommend Canon cartridges with the two different types of sponge material, the upper one designed to allow air flow from the air vent down to the groves along the wall between the two compartments and the lower one designed to allow ink and not air to flow from the bottom of the wall to the outlet port.

So maybe it is a combination of using a compatible cartridge and the German method of refilling that causes the ink flow problem.
 

stratman

Printer VIP
Platinum Printer Member
Joined
Apr 19, 2007
Messages
8,712
Reaction score
7,173
Points
393
Location
USA
Printer Model
Canon MB5120, Pencil
Here's what I have done so far.

1) Took out printhead and warm water flushed under tap as per Trigger37's instructions. Did see all the colors, including Yellow, bubble up on top of inner printhead screens (where the cartridge's ink outlet would sit on top of). After numerous rinsing and flipping back and forth, I thought I saw no more yellow (or any color) beading up on the screen. Flushed the whole printhead with distilled water. Dried and cleaned contacts per instructions and reinstalled printhead and cartridges. Ran a cleaning then a single nazzle check. No significant difference.

2) Started with warm water filled Yellow cartridge and alternating cleanings and nozzle checks. Tried the Yellow Test 4x6 print on plain paper once and still same pattern of cone-like missing Yellow. More warm water cleanings and nozzle checks. Improvement in Yellow print pattern so tried the full Yellow cartridge and obtained the best nozzle check (after a cleaning) to date - Number 11 total cleanings and nozzle checks at this pont:

2171_nozzle_check_11.jpg

Unfortunately a repeat cleaning and nozzle check with the full Yellow cartridge (no water) showed a worsening pattern so went back to warm water cleanings and nozzle checks. Never returned to as good as a nozzle check as seen in above picture.

3) After refilling cartridges, wasting ink, filling up the purge pads, and heading towards the dreaded Error for Service (to replace purge pads), I decided to install a brand new printhead I had that came with a refurbed MP830 I bought several months ago as a back up. After installing the SAME cartridges I have been using all along, I did a printhead alignment and then a nozzle check - PERFECT. I have a lot of printing to do and just can't afford to run behind anymore.

4) I took the old, problem child prinhead to the sink again and this time let the warm waterflush alternately over both sides for about 15 minutes cumulative for both sides. The flow of water was centered on the inner screen for the Yellow and the nozzles on the underside of the printhead. NO more ink of any color was seen in the beading on top of the screens. I've flushed the whole printhead with distilled water, patted it down, and letting it dry.

My thoughts:

A) The Yellow component of the old printhead is/was clogged. The new printhead printed Yellow perfectly.
B) The German Method seems to have no impact on the printhead or printing since the same cartridges with a new printhead printed flawlessly as far as I can tell. There was no ink leakage in the printhead or printer as hypothesized from the Durchstich refill hole as far as I can tell.
C) Maybe the super deluxe warm water flushing has "fixed" the old prinhead. Since the new prinhead is working I will continue with it. One day I will check out the old printheads function to see if it is fully unclogged.

QUESTON - What is the best way to store this flushed out old printhead?

Thanks again for all the help. Now I need to do some printing!
 

pharmacist

Printer VIP
Platinum Printer Member
Joined
May 29, 2007
Messages
2,567
Reaction score
1,269
Points
313
Location
Ghent, Belgium
Printer Model
Epson SC-P800,WF-7840,XP-15000
Stratman: I would recommend to use a solution of 20 % glycerin with 20 % alcohol and 60 % distilled water to prime the printhead. This solution will preven the nozzles from drying out: new Canon printheads contain a slighty blue solution to condition the printhead and to prevent it from drying out. Why 20 % glycerin ? Glycerin is very hygroscopic and does not dry out very quickly like water. However: it is quite thick (high viscosity) and using more than 20 % makes it very difficult the enter the nozzles effectively, therefore you have to mix it with alcohol and water.

If you have the time and the necessary extra clean carts with chips: you can refill these carts with this solution and run a few cleaning cycles to flush the ink out from the printhead and to prime the head with this solution. Take out the printhead and seal it.
 

stratman

Printer VIP
Platinum Printer Member
Joined
Apr 19, 2007
Messages
8,712
Reaction score
7,173
Points
393
Location
USA
Printer Model
Canon MB5120, Pencil
ADDENDUM


After typing up my last response I went to print out a test photo. Other than a couple streaks of Magenta/Red, I had NO MAGENTA!!! Now my problem was with the Magenta cartridge. (All the other cartridges are working as expected). So much for "flawless"!

A couple of cleanings showed nearly perfect nozzle check pattern. Repeat printing of test image showed first part printed was fine with Magenta, then Magenta started to streak/band in that conical shape, followed by little Magenta tapering to none whatsoever in the last half of the test pattern image.

This was a freshly refilled Magenta cartridge and this Magenta was never my problem when dealing with the old prinhead.

Looking at the Magenta cartridge, I noticed some air in the channel created by the needle in refilling. Like ghwellsjr, my blunt needle travels along the bottom of the cartridge and there is a channel formed. Looking at the other refilled cartridges there appears to be varying amounts of trapped air in the channels, some more and some less than the Magenta, yet they are working as expected.

Additionally, squezzing the Magenta cartridge forces ink to pool at the exit port, so I know that there is ink in the sponge ready for use.

I did not try a different refilled Magenta cartridge yet.

I did, however, put in a brand new OEM, never refilled Magenta cartridge and I am back to PERFECT printouts.

Questions:

1) While the Yellow problem seemed to be a clogged printhead, the Magenta problem seems to be a cartridge issue of some sort. Why didn't the Magenta act up with the old printhead?

2) Maybe both the Yellow and the Magenta problems are due, in part or in whole, to the cartridges (I never tried a new OEM Yellow with the old printhead). I was about to flush all cartridges as each set became empty. Was/is my problem due to sediments blocking the flow of ink through the sponge?

3) I store ink in 4 oz Howard Electronic plastic squeeze bottles with a scabbored Luer Lock needle attached. The ink is not much more than one year old if that. Could the problem be due to older ink that has dessicated over time or changed properties somehow over time? Maybe I should mark the fluid level on the bottle and see if it lowers over time. I have not see particulate or fungal/bacterial matter inthe ink.

4) Maybe the new printhead has issues. It has been stored unopened in a climate controlled room since I received the refurbed printer in December of 2008. As far as i know the printhead is brand new and not a refurb.

5) I am going to fluch all cartridges as i planned and then will see how they work. If the Magenta or another cartridge develops these printing issues, I will consider using the older traditional method for refilling - to hole over spongeless side. I already drill a on top for flushing, which is sealed with hot wax.

***The Magenta and Yellow cartridges which were in use during the printing problems never were flushed and did not have a top hole drilled yet.***

6) Another consideration is sealing the Durchstitch refill hole after each refill. I don't think this would matter, since so many people use this method and have no problems, but it is something to try and at least rule out as a cause.

7) About the issue of BLUNT vs SHARP needle - I have only used a blunt 18 guage 3" needle. I first make the refill hole via a push pin which is rotated to enlargen the hole. The needle itslef makes a very snug fit in the hole. Also, I make the refill hole between the ">" and "<" at the bottom of the side of the cartridge, which ~ 1mm from the floor of the inside of the cartridge. The sponge is not destroyed during the making of the hole or insertion of the needle as far as I can tell, although the bottom part is compressed to make the needle channel. It would be interesting to know what type of needle and where and how the refill hole was made for nay people having problems such as my own. Could it be due to using a blunt needle or the location of the refill hole?

Further thoughts?
 

stratman

Printer VIP
Platinum Printer Member
Joined
Apr 19, 2007
Messages
8,712
Reaction score
7,173
Points
393
Location
USA
Printer Model
Canon MB5120, Pencil
pharmacist said:
Stratman: I would recommend to use a solution of 20 % glycerin with 20 % alcohol and 60 % distilled water to prime the printhead. This solution will preven the nozzles from drying out: new Canon printheads contain a slighty blue solution to condition the printhead and to prevent it from drying out. Why 20 % glycerin ? Glycerin is very hygroscopic and does not dry out very quickly like water. However: it is quite thick (high viscosity) and using more than 20 % makes it very difficult the enter the nozzles effectively, therefore you have to mix it with alcohol and water.

If you have the time and the necessary extra clean carts with chips: you can refill these carts with this solution and run a few cleaning cycles to flush the ink out from the printhead and to prime the head with this solution. Take out the printhead and seal it.
Thank you pharmacist. I will do that.
 

pharmacist

Printer VIP
Platinum Printer Member
Joined
May 29, 2007
Messages
2,567
Reaction score
1,269
Points
313
Location
Ghent, Belgium
Printer Model
Epson SC-P800,WF-7840,XP-15000
18G is very thick indeed: is it possible to use a thinner needle ? I use 20-22G and even then I actually rotate to drill the needle through the sponge and my needles are very sharp indeed. 22G is very thin, but pulling ink from the bottle is a bit cumbersome and slow and I do experience alot of back pressure (actually vacuum) when pulling up the ink.

I make my refill hole as close to the bottom of the cartridge. Just try to seal the refill hole and see if anything will improve.
 

stratman

Printer VIP
Platinum Printer Member
Joined
Apr 19, 2007
Messages
8,712
Reaction score
7,173
Points
393
Location
USA
Printer Model
Canon MB5120, Pencil
pharmacist said:
18G is very thick indeed: is it possible to use a thinner needle ?
No, do not have any long enough. If I continue having problems with multiple cartridges despite attempted fixes then I will either try higher guage needles or change to the traditional method of refilling.

I use 20-22G and even then I actually rotate to drill the needle through the sponge and my needles are very sharp indeed.
I rotate the needle on insertion as well. Have not had any bunching up or other destruction of the sponge as far as I know using the blunt needles. Maybe I need bifocal lenses!

22G is very thin, but pulling ink from the bottle is a bit cumbersome and slow and I do experience alot of back pressure (actually vacuum) when pulling up the ink.
I use Howard Electronics squeeze bottles with a luer lock top to store the ink and refill cartridges with. I do not need to extract ink from the bottle with a syringe - just squeeze the bottle and the ink flows through the luer lock needle attached.

I make my refill hole as close to the bottom of the cartridge.
So do I. See my above post for details.

Just try to seal the refill hole and see if anything will improve.
That is something I am considering.
 
Top