Anatomy of a Canon print head

ghwellsjr

Printer Master
Platinum Printer Member
Joined
Jun 16, 2006
Messages
3,645
Reaction score
85
Points
233
Location
La Verne, California
Printer Model
Epson WP-4530
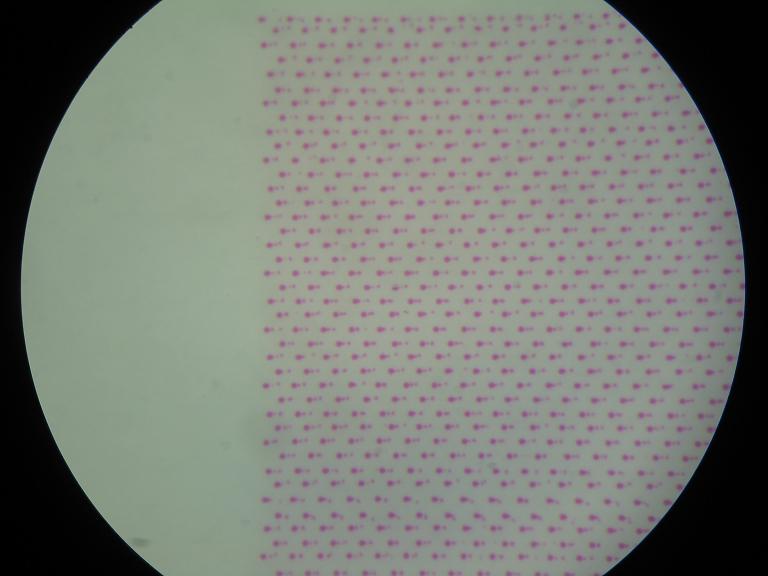
I have wondered why the taped image looks so clean while the untaped one has so many extra small dots. There are three possible explanations that I can think of: one is that the taped nozzles are not as good as the untaped nozzles and have a tendency to break up the droplets into smaller ones like your animation shows in this post:

http://www.nifty-stuff.com/forum/viewtopic.php?pid=10550#p10550

Another possible explanation is that the interaction of droplets coming from two different sources at different times causes them to collide in mid air and break up.

And the third possible explanation that I can think of is that ejecting two dots at nearly the same location causes the second one to splatter.

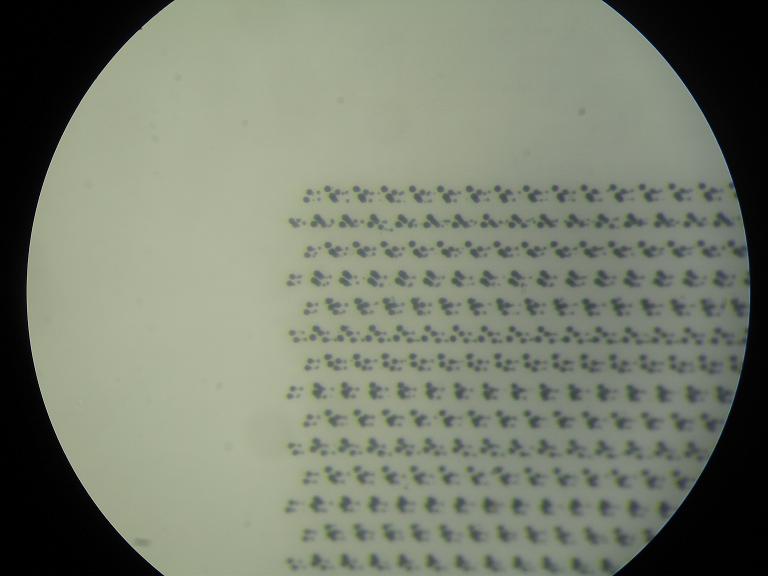
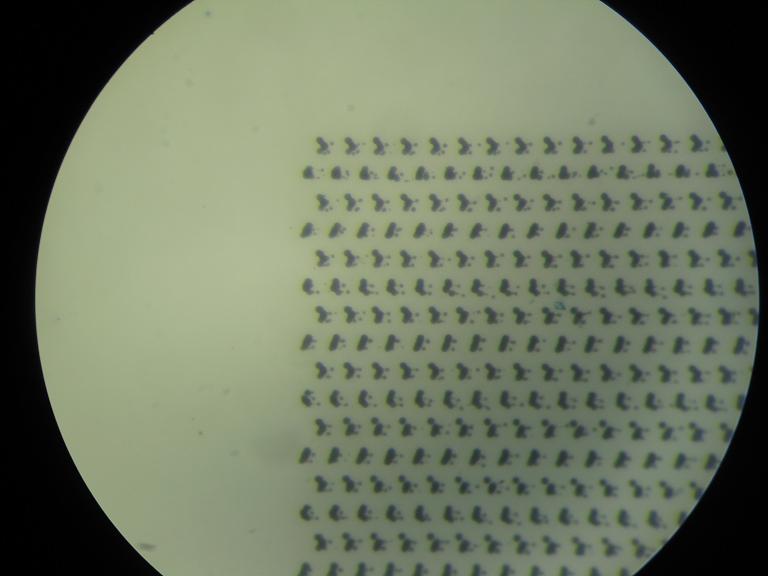
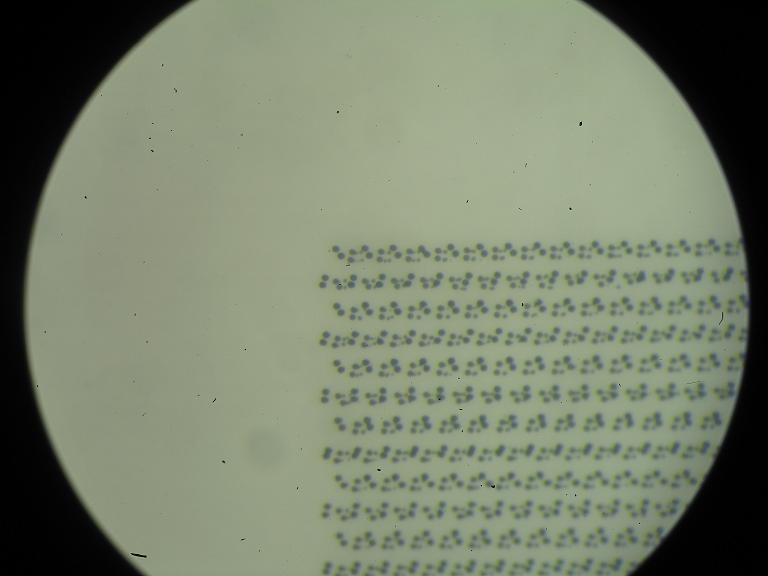
I suppose I could tape up the other set of nozzles and see if it produces a clean set of dots to rule whether the first explanation is true or not.

I'm also going to take a look at my print head through the microscope today and see if that will help explain what's going on. If not, I'll try taping the other set of nozzles sometime this weekend.
 

ghwellsjr

Printer Master
Platinum Printer Member
Joined
Jun 16, 2006
Messages
3,645
Reaction score
85
Points
233
Location
La Verne, California
Printer Model
Epson WP-4530
Here is the image of the magenta part of the nozzle check with the other set of nozzles taped:

Other_Taped_Nozzle_Check.jpg


As you can see, the extra small dots are present so they are not caused by any interaction between the two sets of nozzles firing at the same time. Either this set of nozzles is not as good as the other set or possibly, the Canon is firing from both the larger and smaller sets of nozzles which I thought were dedicated to the light magenta.
 

ghwellsjr

Printer Master
Platinum Printer Member
Joined
Jun 16, 2006
Messages
3,645
Reaction score
85
Points
233
Location
La Verne, California
Printer Model
Epson WP-4530
While I was at it, I thought it would be interesting to see what the alignment does to the nozzled check. First I did a manual alignment and placed all the settings at the maximum negative value:

_Manual_Aligned.JPG


Next I did an auto alignment:

Auto_Aligned.JPG


And finally I did another manual alignment with all the settings at the maximum positive value:

__Manual_Aligned.JPG


Remember that the black nozzle check, for properly aligned nozzles, will attempt to place groups of four dots almost on top of each other. Each group of four dots is made up of two pairs, one pair from one set of nozzles and the other pair from the other set of nozzles on the other side of the print head.

As you look at these three images, the top one shows a pair of dots in the upper left corner, all by themselves. To the right of them are two pairs of dots, one pair of the same orientation as the first pair and a second pair in a different orientation. Remember these two orientations.

In the middle image, you can see that the first pair of dots has moved to the right, just the right amount, so that they form the best set of four dots to appear as one larger dot. This is what the automatic alignment procedure is designed to do.

Finally, in the bottom image, you can see that the first pair of dots has moved too far to the right and is all by itself again.

Don't be confused by the fact that the black nozzle check looks different than the magenta nozzled check. This is becasue the magenta places the dropletts in isolation while the black places them in pairs. See my first post in this thread for explanation.
 

Defcon2k

Printing Ninja
Joined
Dec 1, 2006
Messages
105
Reaction score
2
Points
94
Location
Germany
ghwellsjr said:
Here is the image of the magenta part of the nozzle check with the other set of nozzles taped:

http://www.nifty-stuff.com/img/files/Other_Taped_Nozzle_Check.jpg

As you can see, the extra small dots are present so they are not caused by any interaction between the two sets of nozzles firing at the same time. Either this set of nozzles is not as good as the other set or possibly, the Canon is firing from both the larger and smaller sets of nozzles which I thought were dedicated to the light magenta.
Thank you for testing this, I think this thread is really interesting!

Let me add a third theory to the two ones mentioned above:

As I quoted before, the printhead is probably designed to help bi-directional printing. But the nozzle check is done in one pass (uni-directional). This probably means that 50% of the nozzles are used in the "wrong direction" on the paper (I'm not completely sure about this).
Perhaps a nozzle normally has several unwanted tiny drops after the main drop (like in this animation), but they found a way to minimize that problem if the head is travelling in the "right direction". This would mean that only 50% of the dots on the nozzle check print would show the unwanted tiny dots.
Looking at your pictures, this may be. I think you pics look like this:

nozzleideayg0.png


1 and 3 may belong to the set of nozzles which print in the "right direction".
 

ghwellsjr

Printer Master
Platinum Printer Member
Joined
Jun 16, 2006
Messages
3,645
Reaction score
85
Points
233
Location
La Verne, California
Printer Model
Epson WP-4530
Defcon2k said:
As I quoted before, the printhead is probably designed to help bi-directional printing. But the nozzle check is done in one pass (uni-directional). This probably means that 50% of the nozzles are used in the "wrong direction" on the paper (I'm not completely sure about this).
Perhaps a nozzle normally has several unwanted tiny drops after the main drop (like in this animation), but they found a way to minimize that problem if the head is travelling in the "right direction". This would mean that only 50% of the dots on the nozzle check print would show the unwanted tiny dots.
Hey, that's absolutely brilliant, Defcon2. One way I can think of that this could be implemented is if the nozzles are aimed opposite to the direction of travel so that the droplets have no horizontal velocity. Whether this is the method they use or something else, it could possibly be tested, maybe by examining the extended nozzle check or by comparing printouts done at different speeds and/or that print uni-directional or bi-directional. This link shows the different printing methods done on my i9900:

http://www.nifty-stuff.com/forum/viewtopic.php?pid=9079#p9079

I haven't done a similar test for my MP760 but I imagine that the results would be the same for photo paper. These tests need to be done on photo paper, even if you specify plain paper, because it's the only way to see individual drops.

Anyway, I don't think I will be able to do any more testing for several weeks, I've got other priorities right now. Maybe you or someone else will come up with some way to test this or better yet, maybe someone from Canon will just tell us all the brilliant things they did to produce these printers.
 

bruckshaw

Newbie to Printing
Joined
Jan 18, 2008
Messages
5
Reaction score
0
Points
7
I have come very late to this fascinating thread.

I have an IP4000 which produces a test pattern where the dark magenta and cyan areas are the same intensity as the light ones would normally be and the light areas even lighter. There is no striping apparent. Pigment black is OK, yellow "looks" Ok (it is difficult to tell on white paper) and the dye black looks OK. Oddly enough in the service mode print test the large cyan area looks OK.
The problem appeared suddenly one morning after I had photo printed successfully the previous day.

I have another used printhead producing the same effect in the same printer and I am tempted to assume this means that I have a problem with the electrics rather than with the printheads .... it is unlikely that two printheads would be clogged in the same way and I would have expected the small nozzles to clog before the larger ones and not on both magenta and cyan at the same time.

What does the work in this thread suggest for my problem please?
 

ghwellsjr

Printer Master
Platinum Printer Member
Joined
Jun 16, 2006
Messages
3,645
Reaction score
85
Points
233
Location
La Verne, California
Printer Model
Epson WP-4530
Can you do a nozzle check and post the result here? It would actually be better to do the extended nozzle check so you can more easily see the if each individual nozzle is firing.
 

bruckshaw

Newbie to Printing
Joined
Jan 18, 2008
Messages
5
Reaction score
0
Points
7
Thanks,

I do have an extended nozzle test print. I assume by that you mean the one from the service mode.

The problem is that it is so faint that some of it is barely visible even on the original print. As I mentioned, the large cyan area on the print looks fine. The pigment black lattice is complete. To the right of that are 2 light cyan latices almost complete, with 2 more cyans below them almost invisible. Again to the right of the cyans the 4 magenta ones are identical in density to thye cyans. To the right yet again are two yellows vrtually complete but almost invisible withb 2 good but faint dye blacks below the yellows.

At the bottom of the page all of the black vertical lines are complete with the darker sectioms on them as in the manual.

If this description is inadequate I will try to scan or photograph a copy but I do not expect it to be successful.

Let me know
 

ghwellsjr

Printer Master
Platinum Printer Member
Joined
Jun 16, 2006
Messages
3,645
Reaction score
85
Points
233
Location
La Verne, California
Printer Model
Epson WP-4530
Yes, please do a scan (not a photograph) of both the regular and extended nozzled check and upload them. It would be best if you print them on glossy photo paper. You'd be surprised how much a scan can see that your eyes sometimes miss.
 

bruckshaw

Newbie to Printing
Joined
Jan 18, 2008
Messages
5
Reaction score
0
Points
7
I have produced the regular and extended nozzle checks on photo paaper and tried to scan them. Apart from the black images and the large cyan rectangle the scanned colours are almost invisible to the naked eye.

I have a 4X inspection lens here and with that I can see that the varous lattices are almost perfect.

Uploading the scans would not give you an image which you would be able to use I.m afraid.

Can you give me an idea of what to look for other than the completeness of the lattices?

Thanks for your help.
 
Top